Are you struggling to capture the perfect shot because your lighting isn’t right? Lighting can make or break your photos, but using lighting kits might feel confusing or overwhelming at first.
What if you could learn simple tricks to control light like a pro and instantly improve your images? You’ll discover how to use lighting kits step-by-step, so your photos look sharp, clear, and full of life. Keep reading, and you’ll unlock the secret to making your pictures stand out every time.
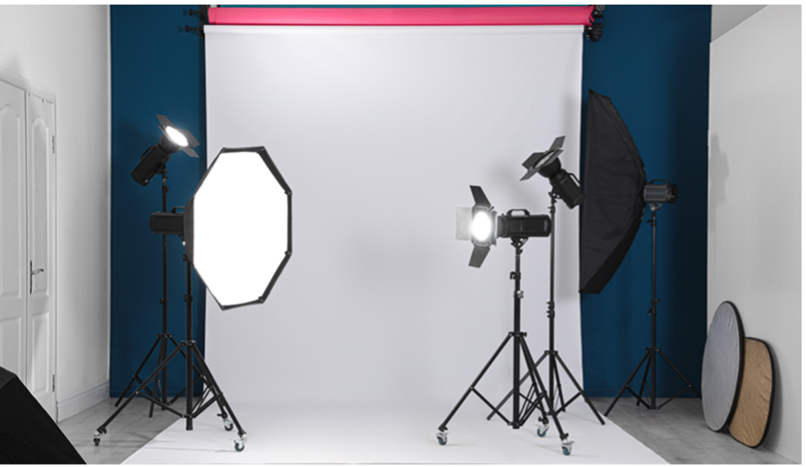
Credit: grattanstudios.com
Choosing The Right Lighting Kit
Choosing the right lighting kit can dramatically improve your photography. The right setup depends on your style, subject, and the environment you shoot in. Understanding the options and features available helps you make a smart choice that fits your needs and budget.
Types Of Lighting Kits
There are several types of lighting kits available, each suited for different photography styles.
- Continuous Lighting Kits:These provide a constant light source, making it easier to see how shadows and highlights fall. They are great for beginners and video work.
- Strobe Lighting Kits:These offer powerful bursts of light, perfect for freezing motion and working in darker environments. They require more knowledge but deliver professional results.
- Ring Lights:Ideal for portraits and close-up shots, ring lights provide even, shadow-free illumination.
Think about what kind of photos you want to create. Do you prefer natural-looking light or dramatic effects? Your answer will guide your choice.
Key Features To Consider
Not all lighting kits are created equal, so check for features that will make your work easier and more flexible.
- Light Output:Look at the wattage or lumen rating to understand the brightness. Adjustable brightness is a big plus.
- Color Temperature:Consistent color temperature ensures your photos have accurate colors. Some kits offer adjustable temperatures for different moods.
- Portability:If you shoot on location, lightweight and easy-to-set-up kits save time and effort.
- Accessories:Reflectors, softboxes, and stands add value and help shape your light effectively.
Ask yourself, which features will you use the most? This helps avoid paying for extras that won’t enhance your work.
Budget-friendly Options
You don’t need to spend a fortune to get good lighting. Several budget-friendly kits offer excellent quality for beginners and hobbyists.
- LED Panels:Affordable, energy-efficient, and easy to use. Great for portraits and product photography.
- Basic Softbox Kits:These soften harsh shadows and provide flattering light without breaking the bank.
- DIY Solutions:Using household lamps with diffusers or reflectors can be a creative way to start experimenting.
Have you tried mixing different light sources to find your perfect setup? Sometimes, combining a budget kit with natural light can produce stunning results.
Setting Up Your Lighting Kit
Setting up your lighting kit properly is essential to capture stunning photos. The arrangement of lights can completely change the mood and clarity of your shots. Knowing how to position your lights, use modifiers, and balance different light sources will give you greater control over your photography results.
Positioning Lights For Different Effects
Where you place your lights influences shadows, highlights, and overall depth. For a dramatic look, position one light at a sharp angle to your subject. A soft, even glow is achieved by placing lights directly in front or using multiple light sources.
Try experimenting with these common setups:
- Rembrandt lighting:Light at 45 degrees to create a triangle of light on the cheek.
- Butterfly lighting:Light above and centered to produce a shadow under the nose.
- Split lighting:Light from the side to split the face into light and shadow.
Ask yourself, what mood do you want your photo to convey? Adjusting light positions can help you tell that story visually.
Using Light Modifiers
Modifiers control the quality and direction of your light. Softboxes, umbrellas, and reflectors can soften harsh shadows and spread light evenly. I once struggled with harsh highlights until I added a diffuser—suddenly, the skin tones looked natural and flattering.
Here’s how each modifier can help:
- Softbox:Creates soft, diffused light for portraits.
- Umbrella:Bounces light broadly, great for filling shadows.
- Reflector:Redirects existing light to brighten dark areas.
Consider what effect you want and pick your modifier accordingly. Changing modifiers can be quicker than moving lights around.
Balancing Ambient And Artificial Light
Mixing natural and studio light can be tricky but rewarding. Ambient light sets the base tone, while your kit adds focus and highlights. I learned that turning off overhead lights and using window light with my kit gave me the best control over color and shadow.
To balance both, try these tips:
- Measure ambient light with a light meter or camera settings.
- Adjust your kit’s power to complement, not overpower, natural light.
- Use gels to match or contrast color temperatures.
Have you tested how natural light changes throughout the day? Planning your shoot around that can save you time and enhance your images.
Mastering Basic Lighting Techniques
Mastering basic lighting techniques is crucial for any photographer looking to elevate their craft. Lighting can transform a simple photograph into a masterpiece, bringing out textures, colors, and emotions. Whether you’re using a lighting kit for the first time or refining your technique, understanding these foundational methods can dramatically enhance your photography skills.
Three-point Lighting
Three-point lighting is a fundamental technique used to create a balanced and professional look in your photographs. It involves three lights: the key light, fill light, and back light.
- Key Light:This is your main light source, providing the most illumination to your subject. Position it to one side of your subject for depth.
- Fill Light:Used to soften the shadows created by the key light, it should be less intense and placed opposite the key light.
- Back Light:Positioned behind the subject, it helps to separate the subject from the background, adding a three-dimensional effect.
Have you ever noticed how professional portraits seem to pop? That’s often due to effective three-point lighting.
Rembrandt Lighting
Named after the famous painter, Rembrandt lighting is known for its dramatic and artistic effects. It involves creating a triangle of light under the subject’s eye on the shadowed side of the face.
To achieve this, position your key light at a 45-degree angle above and to the side of your subject. This technique adds depth and character to portraits, making them appear more intriguing.
Experimenting with Rembrandt lighting can unveil a whole new dimension in your photography. Have you tried capturing the subtle play of shadows and highlights yet?
Silhouette And Backlighting
Silhouette and backlighting techniques are perfect for creating striking images. By positioning your light source behind your subject, you can emphasize the outline while keeping details in shadow.
- Backlighting can be used creatively to add drama or mystery to your photographs.
- Silhouettes are particularly effective during golden hour when natural light is soft and diffused.
Think about how you can use these techniques to tell a story with your images. What emotions or narratives can you convey through silhouette and backlighting?
Adjusting Lighting For Various Subjects
Adjusting lighting for different subjects is key to creating stunning photos. Each subject demands a unique approach to lighting to highlight its best features. Understanding how to modify your lighting setup can dramatically improve your shots.
Portraits
For portraits, soft lighting works wonders. Use diffusers or softboxes to reduce harsh shadows and create a flattering, even glow on the face. Position your key light at about a 45-degree angle to add depth and dimension without flattening the features.
Try adding a reflector opposite your main light to fill in shadows gently. This technique helps reveal the natural contours of the face while keeping the mood warm and inviting. Have you noticed how subtle changes in light angle can change the entire expression?
Product Photography
Sharp, clear lighting is crucial for product shots. Aim for bright, even light to showcase details and colors accurately. Using multiple light sources can eliminate unwanted shadows and highlight textures.
- Place one light directly above or in front to illuminate the product evenly.
- Use side lights to enhance depth and dimension.
- Consider a light tent for reflective or shiny objects to avoid harsh reflections.
Experiment with the distance and intensity of your lights. Have you ever adjusted lighting and suddenly noticed a hidden flaw or a new angle that makes the product pop?
Outdoor Shoots
Natural light is powerful but unpredictable. Use your lighting kit to balance or supplement sunlight, especially during harsh midday hours. Reflectors and portable LED lights can fill shadows on faces or bring out details lost in backlighting.
Try positioning your lights to mimic the sun’s direction or to soften it on cloudy days. This control lets you maintain a consistent look despite changing conditions. What creative lighting tricks have you used outdoors to keep your photos sharp and vibrant?
Troubleshooting Common Lighting Issues
Lighting can make or break your photos. Even with the best lighting kits, issues like harsh shadows, exposure problems, and color temperature mismatches can sneak in. Knowing how to spot and fix these problems will save you time and improve your shots instantly.
Harsh Shadows
Harsh shadows often appear when your light source is too direct or too close to your subject. This creates strong, dark areas that can distract from your main focus.
Try moving your light further away or using a diffuser like a softbox or a white sheet to soften the light. You can also add a reflector opposite the light to bounce light back and fill in the shadows. Have you noticed how just a small reflector can change the mood of a portrait?
Overexposure And Underexposure
Overexposure washes out details by letting in too much light, while underexposure hides details in darkness. Both can ruin the balance of your image.
Adjust your light’s intensity or move the light source closer or farther to control brightness. Check your camera’s histogram to see if your highlights or shadows are clipped. Sometimes, lowering your ISO or tweaking shutter speed can fix exposure issues faster than changing your lighting setup.
Color Temperature Challenges
Mixed light sources can cause weird color casts, making your photos look unnatural. Daylight bulbs and tungsten bulbs, for example, have very different color temperatures.
Set your camera’s white balance manually or use custom settings to match your lighting. If your lighting kit allows, swap bulbs for ones with matching color temperatures. Have you tried using gels on your lights? They can help correct or creatively change the color temperature to suit your vision.

Credit: www.youtube.com
Tips For Fast Setup And Efficient Shooting
Setting up your lighting kit quickly and shooting efficiently can make a huge difference in your photography workflow. It allows you to focus more on creativity and less on technical delays. Here are practical tips to help you speed up your process without sacrificing quality.
Prepping Your Gear
Before you even arrive at your shooting location, organize your lighting gear. Pack your lights, stands, modifiers, and cables in a way that makes them easy to access and carry.
Label your equipment or use color-coded tape to identify different light types or power settings. This simple step saves time when you’re under pressure.
Also, check batteries and bulbs beforehand. Nothing slows you down like realizing your flash is dead just as the perfect shot appears.
Quick Adjustments On The Fly
Learn to make fast lighting tweaks without dismantling your entire setup. Use clamps and adjustable arms to reposition lights quickly.
Keep a small toolkit nearby with essentials like screwdrivers, gaffer tape, and spare bulbs. These help you fix or modify your gear instantly.
Practice changing modifiers like softboxes or grids swiftly. Over time, you’ll develop muscle memory that lets you adapt your lighting to different scenes in seconds.
Using Light Meters And Apps
Rely on light meters or smartphone apps to measure exposure quickly and accurately. They take the guesswork out of adjusting your lighting.
Some apps can even simulate how different lighting setups will affect your scene. This feature helps you plan shots faster, reducing trial and error.
Have you tried syncing your light meter readings with your camera’s settings? It’s a game-changer for efficient shooting and consistent results.
Creative Lighting Ideas To Elevate Your Shots
Creative lighting can transform simple photos into stunning images. It adds mood, depth, and interest. Using lighting kits opens many possibilities for unique effects. Here are some creative ideas to elevate your shots and make them stand out.
Using Colored Gels
Colored gels are thin sheets placed over lights to change their color. They bring vibrant tones and moods to your photos. Try warm colors like red or orange for a cozy feel. Cool blues or greens create a calm, mysterious look.
Mix colors to create new shades. Use gels on different lights for layered effects. Colored gels can highlight subjects or add dramatic backgrounds.
Experimenting With Shadows
Shadows add depth and texture to your photos. Position lights at sharp angles to create strong, interesting shadows. Use objects like blinds or leaves to cast patterned shadows on your subject.
Play with light distance and intensity. Softer shadows give gentle moods, while harsh shadows add drama. Shadows can guide the viewer’s eye or emphasize shapes.
Incorporating Reflectors And Diffusers
Reflectors bounce light to fill shadows and brighten your subject. Use white, silver, or gold surfaces to change light quality. Gold reflectors add warmth, silver boosts brightness, and white softens light.
Diffusers spread light evenly, softening harsh beams. Place diffusers between light and subject for smooth, flattering light. Combining reflectors and diffusers controls light perfectly for balanced photos.
Credit: skylum.com
Frequently Asked Questions
What Are The Basic Components Of A Lighting Kit?
A lighting kit usually includes lights, stands, reflectors, and power cords. These components help control and shape light for photography. Beginners should start with at least one key light and one fill light to create balanced lighting.
How Do I Set Up A Lighting Kit For Portraits?
Place the key light at a 45-degree angle from the subject’s face. Use a fill light on the opposite side to soften shadows. Adjust brightness and distance to achieve natural, flattering light for portraits.
Can I Use Lighting Kits For Outdoor Photography?
Yes, lighting kits enhance natural light outdoors by filling shadows or highlighting subjects. Portable and battery-powered kits work best. Use diffusers to soften harsh sunlight and maintain consistent lighting.
What Type Of Bulbs Are Best For Photography Lighting Kits?
Daylight-balanced LED bulbs are ideal for photography. They provide consistent, natural light and consume less power. LEDs also produce less heat, making them safer and more comfortable for subjects.
Conclusion
Using lighting kits can greatly improve your photos. Start with simple setups and practice often. Adjust lights to create the mood you want. Experiment with different angles and brightness levels. Good lighting helps your subject stand out. Keep learning and trying new techniques.
Over time, your photos will look more professional. Lighting kits are a useful tool for every photographer. Embrace the process and enjoy taking better pictures.