Are you ready to take your photography to the next level without breaking the bank? Creating your own lighting kit can transform your photos, making them look professional and vibrant.
Imagine having full control over shadows, highlights, and mood—all from gear you built yourself. In this guide, you’ll discover simple steps and smart tips to make a lighting kit that fits your style and budget. Keep reading, and you’ll soon master the secret to stunning photos that grab attention every time.
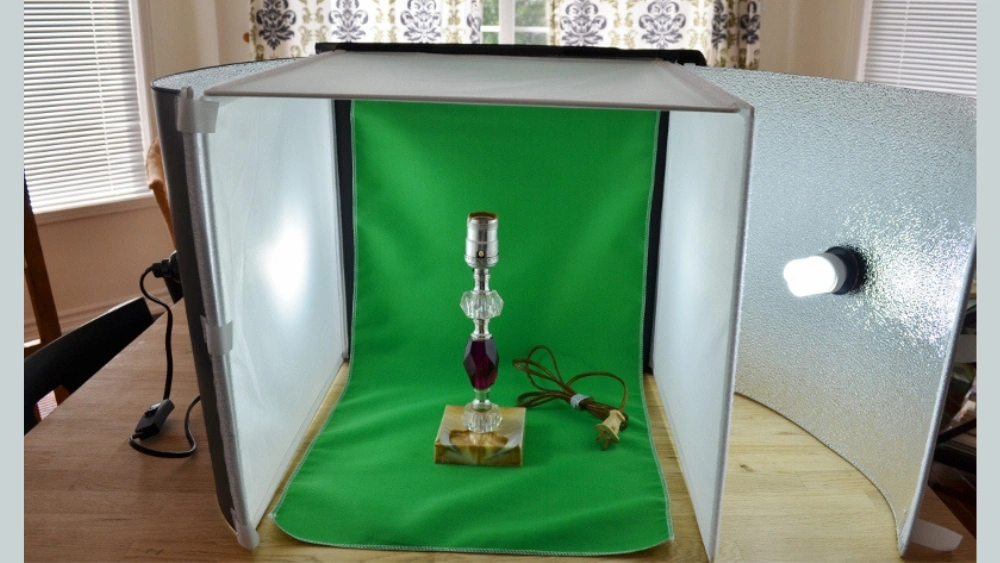
Credit: www.thephotovideoguy.com
Choosing The Right Components
Choosing the right components is key to building a lighting kit for photography. The quality and type of each part affect your final images. Careful selection helps create the mood and style you want. Balance your needs with your budget to get the best results. Consider the space and subjects you will shoot most often. This guide covers the essential parts you need to focus on.
Selecting Light Sources
Light sources set the tone of your photos. Choose between continuous lights and flashes. Continuous lights are easy to see and adjust. Flashes give powerful bursts of light for sharp images. Consider LED panels for low heat and energy use. Bulbs with adjustable brightness let you control light intensity. Color temperature matters too—select bulbs that match daylight or warm tones. Soft light sources help reduce harsh shadows.
Picking Power Options
Power options affect where and how you use your kit. Battery-powered lights offer portability for outdoor shoots. Plug-in lights provide steady power for studio work. Some lights support both battery and AC power for flexibility. Check battery life and charging time before buying. Portable power banks can extend shooting time outdoors. Make sure power options match your shooting style and location.
Essential Accessories
Accessories improve light control and shape. Use softboxes or umbrellas to soften light and reduce glare. Reflectors bounce light to fill shadows naturally. Grids and barn doors help direct light precisely. Light stands hold lights safely at different heights. Wireless triggers allow remote control of flashes. Carrying cases protect your gear and keep it organized.
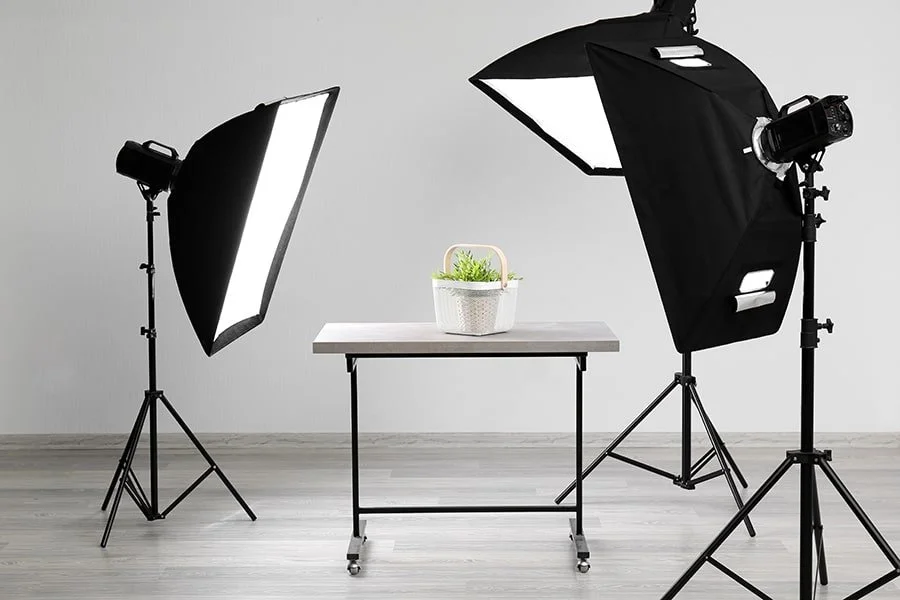
Credit: www.harlowe.com
Building The Frame And Mounts
Building a sturdy frame and reliable mounts is essential when creating a DIY lighting kit for photography. Your frame acts as the backbone, holding everything in place while allowing flexibility. Thoughtful construction here ensures your lights stay put and can be adjusted easily during shoots.
Materials For The Frame
Choose materials that are both lightweight and strong. Aluminum pipes or PVC tubes work well because they’re easy to cut and assemble. Wood can also be an option if you want a more budget-friendly frame, but it’s heavier and less portable.
Don’t forget the connectors: corner brackets, T-joints, or even zip ties can help hold the frame together securely. If you want a collapsible frame, look into quick-release clamps or hinges for convenience. What materials do you already have that could be repurposed?
Constructing Adjustable Mounts
Adjustable mounts let you control the angle and height of your lights. Using swivel brackets or ball heads gives you the most flexibility. You can attach these to your frame with screws or clamps.
Try creating mounts from scrap metal or sturdy plastic pieces combined with standard hardware like wing nuts and bolts. This setup allows you to loosen, reposition, and tighten lights quickly. How often do you find yourself needing to change light positions during your shoots?
Securing Lights Safely
Safety is key when mounting electrical equipment. Use heat-resistant materials around the light sockets and avoid anything flammable. Secure cables neatly with clips or Velcro straps to prevent tripping hazards.
Consider adding padding or rubber grips where lights touch the frame to reduce vibrations and protect your gear. Double-check all screws and clamps before each shoot to ensure stability. What measures do you take to keep your lighting setup safe and reliable?
Wiring And Electrical Setup
Creating a lighting kit requires careful wiring to ensure safety and functionality. Use proper cables and connectors to link bulbs, switches, and power sources effectively. Secure all connections to prevent shorts and maintain steady light output during photography sessions.
Wiring and electrical setup is a crucial aspect of building a lighting kit for photography. It ensures that your lights work efficiently and safely, helping you capture stunning images. Whether you’re a DIY enthusiast or a professional photographer, mastering the basics of wiring can make a world of difference.Basic Wiring Techniques
Understanding basic wiring techniques is essential. Start by choosing the right wires; typically, copper wires are preferred due to their conductivity. Keep your wires organized using cable ties or clips; this prevents tangles and makes maintenance easier. Learn to strip wires properly using a wire stripper. This tool helps you remove the insulation without damaging the wire itself. Connect your wires using connectors, and make sure each connection is tight to prevent any loose ends that might cause issues later.Ensuring Safety And Durability
Safety is paramount when dealing with electrical setups. Always use insulated tools to protect against electric shocks. Double-check your connections to ensure they are secure and properly insulated. Consider adding a fuse to your setup; it acts as a safeguard by breaking the circuit if there’s an overload. Durability is equally important. Use heat-shrink tubing to cover exposed wire joints. This provides protection against wear and tear. Moreover, choose components that are rated for high voltage if you plan to use powerful lights.Testing Electrical Connections
Once your wiring is complete, testing the electrical connections is a must. Use a multimeter to check for continuity; this ensures that electricity flows smoothly through the circuit. If you notice any inconsistencies, revisit your connections and rectify them. Conduct a trial run of your lighting kit. Turn on the lights and observe for any flickering or unusual noises. This helps identify potential issues early on. Testing not only guarantees functionality but also boosts your confidence in using your DIY lighting kit. Have you ever faced challenges with wiring a lighting kit? What strategies helped you ensure a safe and durable setup?Adding Light Modifiers
Adding light modifiers to your photography lighting kit is a game-changer. These tools help you control the quality, direction, and color of light, making your images stand out. Understanding how to create and use these modifiers gives you greater creative freedom without breaking the bank.
Creating Diffusers
Diffusers soften harsh light, reducing strong shadows and glare. You can make a simple diffuser using materials like white parchment paper, frosted plastic sheets, or even a white bedsheet stretched over a frame.
Attach your diffuser in front of your light source to spread light evenly. This technique creates a more flattering and natural look, especially for portraits. Have you noticed how professional portraits rarely have sharp shadows? That’s the effect diffusers create.
Using Reflectors
Reflectors bounce light back onto your subject, filling in shadows and adding dimension. You don’t need expensive gear—white foam boards, aluminum foil on cardboard, or even a car sunshade can work well.
Try positioning the reflector opposite your main light to brighten dark areas without adding another light source. Reflectors are especially useful outdoors, where sunlight can be harsh and uneven.
Incorporating Gels And Filters
Gels and filters add color and mood to your photos by changing the light’s hue. Colored cellophane sheets or affordable plastic gels taped over your lights can create dramatic effects.
Experiment with warm tones for a cozy feel or cool blues for a moody atmosphere. Have you ever thought about how a simple color change can transform the entire vibe of your shot?
Controlling And Adjusting Light
Controlling and adjusting light is key in photography. It shapes the mood, highlights details, and creates depth. Without control, photos can look flat or harsh. A good lighting kit allows you to manage brightness and direction easily.
Adjusting light means changing its intensity and where it falls. This helps create shadows or soften the scene. Photographers use different tools to control light power and position. These tools make the lighting setup flexible for any shoot.
Manual Dimmers And Switches
Manual dimmers let you change light brightness smoothly. You turn a knob or slide a control to adjust output. This fine-tunes how strong the light is on your subject. Switches help turn lights on or off quickly without unplugging. They give simple, hands-on control during shoots.
Remote Control Options
Remote controls add convenience and speed. You adjust lights without walking over to each unit. Some remotes connect via Bluetooth or radio signals. This allows changing brightness or turning lights off from a distance. Remote control suits setups with many lights or hard-to-reach spots.
Positioning For Desired Effects
Moving lights changes shadows and highlights. Position lights higher for softer shadows or lower for dramatic looks. Angling lights affects texture and mood. Use stands or clamps to fix lights in place. Experiment with distance to control brightness and spread.
Budget Tips And Material Sourcing
Building a lighting kit for photography can be affordable with smart planning. Saving money on materials lets you focus on improving your skills. Choosing the right supplies and using what you have at home can reduce costs. Balancing price and quality ensures your setup works well without overspending.
Finding Affordable Supplies
Check local hardware stores for budget-friendly options. Look for sales or clearance items to save more. Online marketplaces often have deals on lighting parts and bulbs. Compare prices before buying to get the best value. Buying in sets or bundles can lower overall costs.
Repurposing Household Items
Use items like white bedsheets as light diffusers. Aluminum foil can reflect light and brighten your shots. Cardboard boxes make great light modifiers or stands. Clear plastic containers work as softboxes with some tweaks. Old lamps and clamps can serve as light holders.
Balancing Cost And Quality
Cheap materials might break or fail quickly. Invest in key parts like bulbs or clamps for durability. Test supplies before full use to avoid wasting money. Mix low-cost and higher-quality items for a reliable kit. Focus spending on parts that affect light quality most.
Testing And Fine-tuning Your Kit
Testing and fine-tuning your photography lighting kit is essential. It ensures your setup produces the best results. This phase helps you understand how each light affects the scene. Small changes can make a big difference in your photos. Take time to experiment and adjust your equipment carefully.
Setting Up Test Shots
Start by arranging your lights as planned. Use a simple subject or model for testing. Take multiple shots from different angles. Keep camera settings constant to see lighting changes clearly. Review each photo on a large screen. Look for shadows, highlights, and overall brightness.
Adjusting Light Angles And Intensity
Move your lights closer or farther to change brightness. Tilt or rotate lights to soften or sharpen shadows. Adjust light power if your kit allows. Use diffusers or reflectors to control harsh light. Experiment with combinations to find the best look. Check how changes affect the subject’s features and mood.
Troubleshooting Common Issues
Flickering lights can ruin a shot—check power sources. Harsh shadows? Add a diffuser or move the light. Uneven lighting? Adjust angles or add fill lights. Overexposure? Lower the intensity or increase camera shutter speed. Underexposure? Increase light power or reduce shutter speed. Test and tweak until the scene looks balanced.

Credit: www.facebook.com
Maintenance And Upgrades
Keeping your lighting kit in top shape ensures consistent results and saves you money in the long run. Regular maintenance prevents unexpected failures during shoots, while timely upgrades can enhance your creative options. Let’s dive into practical ways to care for and improve your lighting setup.
Cleaning And Storage Tips
Dust and grime can reduce the brightness and quality of your lights. Use a soft, dry cloth or a gentle brush to clean bulbs and reflectors after every few sessions.
Store your lighting gear in a dry, cool place to avoid moisture damage. Consider using padded bags or cases to protect fragile components during transport.
Have you checked your cables recently? Loose or frayed wires can cause flickering or complete failure. Regularly inspect and replace damaged cords to avoid surprises on set.
Upgrading Components Over Time
As your skills grow, your lighting needs might change. Start with basic bulbs, but keep an eye out for LEDs that offer better color accuracy and lower heat output.
Swap out standard reflectors for adjustable ones to control light direction more precisely. Small changes like these can dramatically improve your shot quality.
Think about investing in wireless triggers or dimmers. These upgrades give you more control without cluttering your setup with cables.
Expanding Your Lighting Setup
Once you master a single light, adding more sources can add depth and dimension to your photos. Try incorporating a fill light or background light to create balanced scenes.
Experiment with modifiers like softboxes or umbrellas to soften harsh shadows. These tools expand your creative possibilities.
Have you considered color gels? They’re an inexpensive way to add mood and style without buying new lights.
Frequently Asked Questions
What Materials Do I Need For A Diy Lighting Kit?
You need LED bulbs, light stands, diffusers, clamps, and power sources. These items help create versatile, adjustable lighting for photography. Choose quality components for durability and consistent light output. Budget-friendly options work well for beginners starting a DIY lighting kit.
How To Set Up A Basic Photography Lighting Kit?
Position two lights at 45-degree angles from the subject. Use diffusers to soften shadows. Adjust height and distance for desired light intensity. This setup enhances subject details and reduces harsh shadows, ideal for portraits and product photography.
Can I Use Household Items For Photography Lighting?
Yes, you can use lamps, white sheets, or aluminum foil. Lamps provide continuous light, while white sheets act as diffusers. Aluminum foil reflects light, enhancing brightness. These items help create effective lighting setups without extra costs.
How To Maintain And Store A Diy Lighting Kit?
Keep components clean and dry to avoid damage. Store in a sturdy box or bag with compartments. Regularly check cables and bulbs for wear. Proper storage extends the life of your lighting kit and ensures readiness for shoots.
Conclusion
Creating your own lighting kit can save money and improve photos. Start with basic materials and build step-by-step. Adjust lights to fit your style and needs. Practice often to see better results. Lighting makes a big difference in photography. Keep experimenting and enjoy the process.
Your photos will look brighter and more professional. Simple tools can bring great effects. Try different setups to find what works best. Making a lighting kit is easy and fun.