
Are you tired of your laptop sitting flat on your desk, causing neck pain and poor posture? What if you could create a simple, sturdy laptop stand without spending a dime?
Using just cardboard, you can build a custom stand that lifts your laptop to the perfect height, improving comfort and productivity. Keep reading, and you’ll discover easy step-by-step instructions to make your own laptop stand right now—no special tools or skills needed.
Your back will thank you, and your workspace will look smarter instantly. Ready to get started?
Credit: medium.com
Materials Needed
Gathering the right materials is the first step to make a sturdy laptop stand from cardboard. The materials should be easy to find and safe to use. Using simple supplies keeps the project affordable and eco-friendly.
Choose cardboard that is thick and strong. It will hold your laptop without bending. Basic cutting tools and adhesives will help shape and join the pieces securely.
Cardboard Sheets
- Choose corrugated cardboard for strength
- Use clean, dry sheets without tears
- Size depends on your laptop dimensions
Cutting Tools
- Use a sharp utility knife or box cutter
- Keep scissors handy for small cuts
- Cut on a safe surface to protect furniture
Measuring Tools
- Use a ruler or measuring tape
- Mark dimensions clearly with a pencil
- Check twice before cutting
Adhesives
- Use strong glue like hot glue or craft glue
- Double-sided tape can add extra hold
- Allow glue to dry fully before use
Additional Supplies
- Pencil for marking cuts and folds
- Sandpaper to smooth rough edges
- Optional: Paint or decorative paper for finish
Choosing The Right Cardboard
Choosing the right cardboard is key to building a strong laptop stand. The cardboard must hold the laptop’s weight without bending or breaking. This makes your stand safe and stable.
Not all cardboard is the same. Some types are thin and weak, while others are thick and sturdy. Picking the right one saves time and effort during the project.
Thickness And Strength
Thick cardboard supports more weight. Look for pieces that are at least 5mm thick. Corrugated cardboard, with its wavy inner layer, is ideal. It adds strength and resists bending.
Size And Shape
Choose cardboard large enough to cut all parts of the stand. Bigger sheets mean fewer joints. Fewer joints mean more strength. Check the shape too. Flat, even surfaces work best.
Condition Of The Cardboard
Use dry and clean cardboard. Wet or damaged pieces lose strength. Avoid cardboard with tears or holes. Fresh cardboard lasts longer and holds better.
Recycled Vs New Cardboard
New cardboard tends to be stronger and more reliable. Recycled cardboard can work but inspect it carefully. Avoid pieces with soft spots or stains.
Where To Find Quality Cardboard
- Ask at electronics or appliance stores for discarded boxes
- Look in supermarkets for sturdy packaging boxes
- Use shipping boxes that are intact and thick
- Check recycling centers for usable sheets
Measuring And Marking
Measure the cardboard carefully to fit your laptop’s size and shape. Mark the lines clearly for cutting and folding to ensure a stable stand. Accurate marking helps create a balanced and sturdy laptop stand.
Measuring and marking are crucial steps in creating a sturdy laptop stand. Precise measurements ensure stability and balance. Accurate marking helps guide the cutting process, minimizing errors. Using cardboard, these tasks are easy yet essential for a functional stand.Gather Necessary Tools
Before starting, collect a ruler, pencil, and cardboard. A straight edge helps maintain accuracy. These basic tools streamline the measuring process.Determine Stand Dimensions
Decide the height and width of the stand. Consider your laptop size and preferred viewing angle. Write these dimensions down for reference.Mark The Cardboard
Use a ruler to draw straight lines on the cardboard. Align the ruler carefully to ensure precision. Marking clearly helps guide the cutting process.Double-check Measurements
Review your dimensions to confirm accuracy. Small mistakes can affect the stand’s stability. Correct any errors before proceeding to cutting.Prepare For Cutting
With measurements marked, gather cutting tools. Scissors or a utility knife can be used. Ensure all marked lines are visible and clear. These steps set a solid foundation for crafting your laptop stand.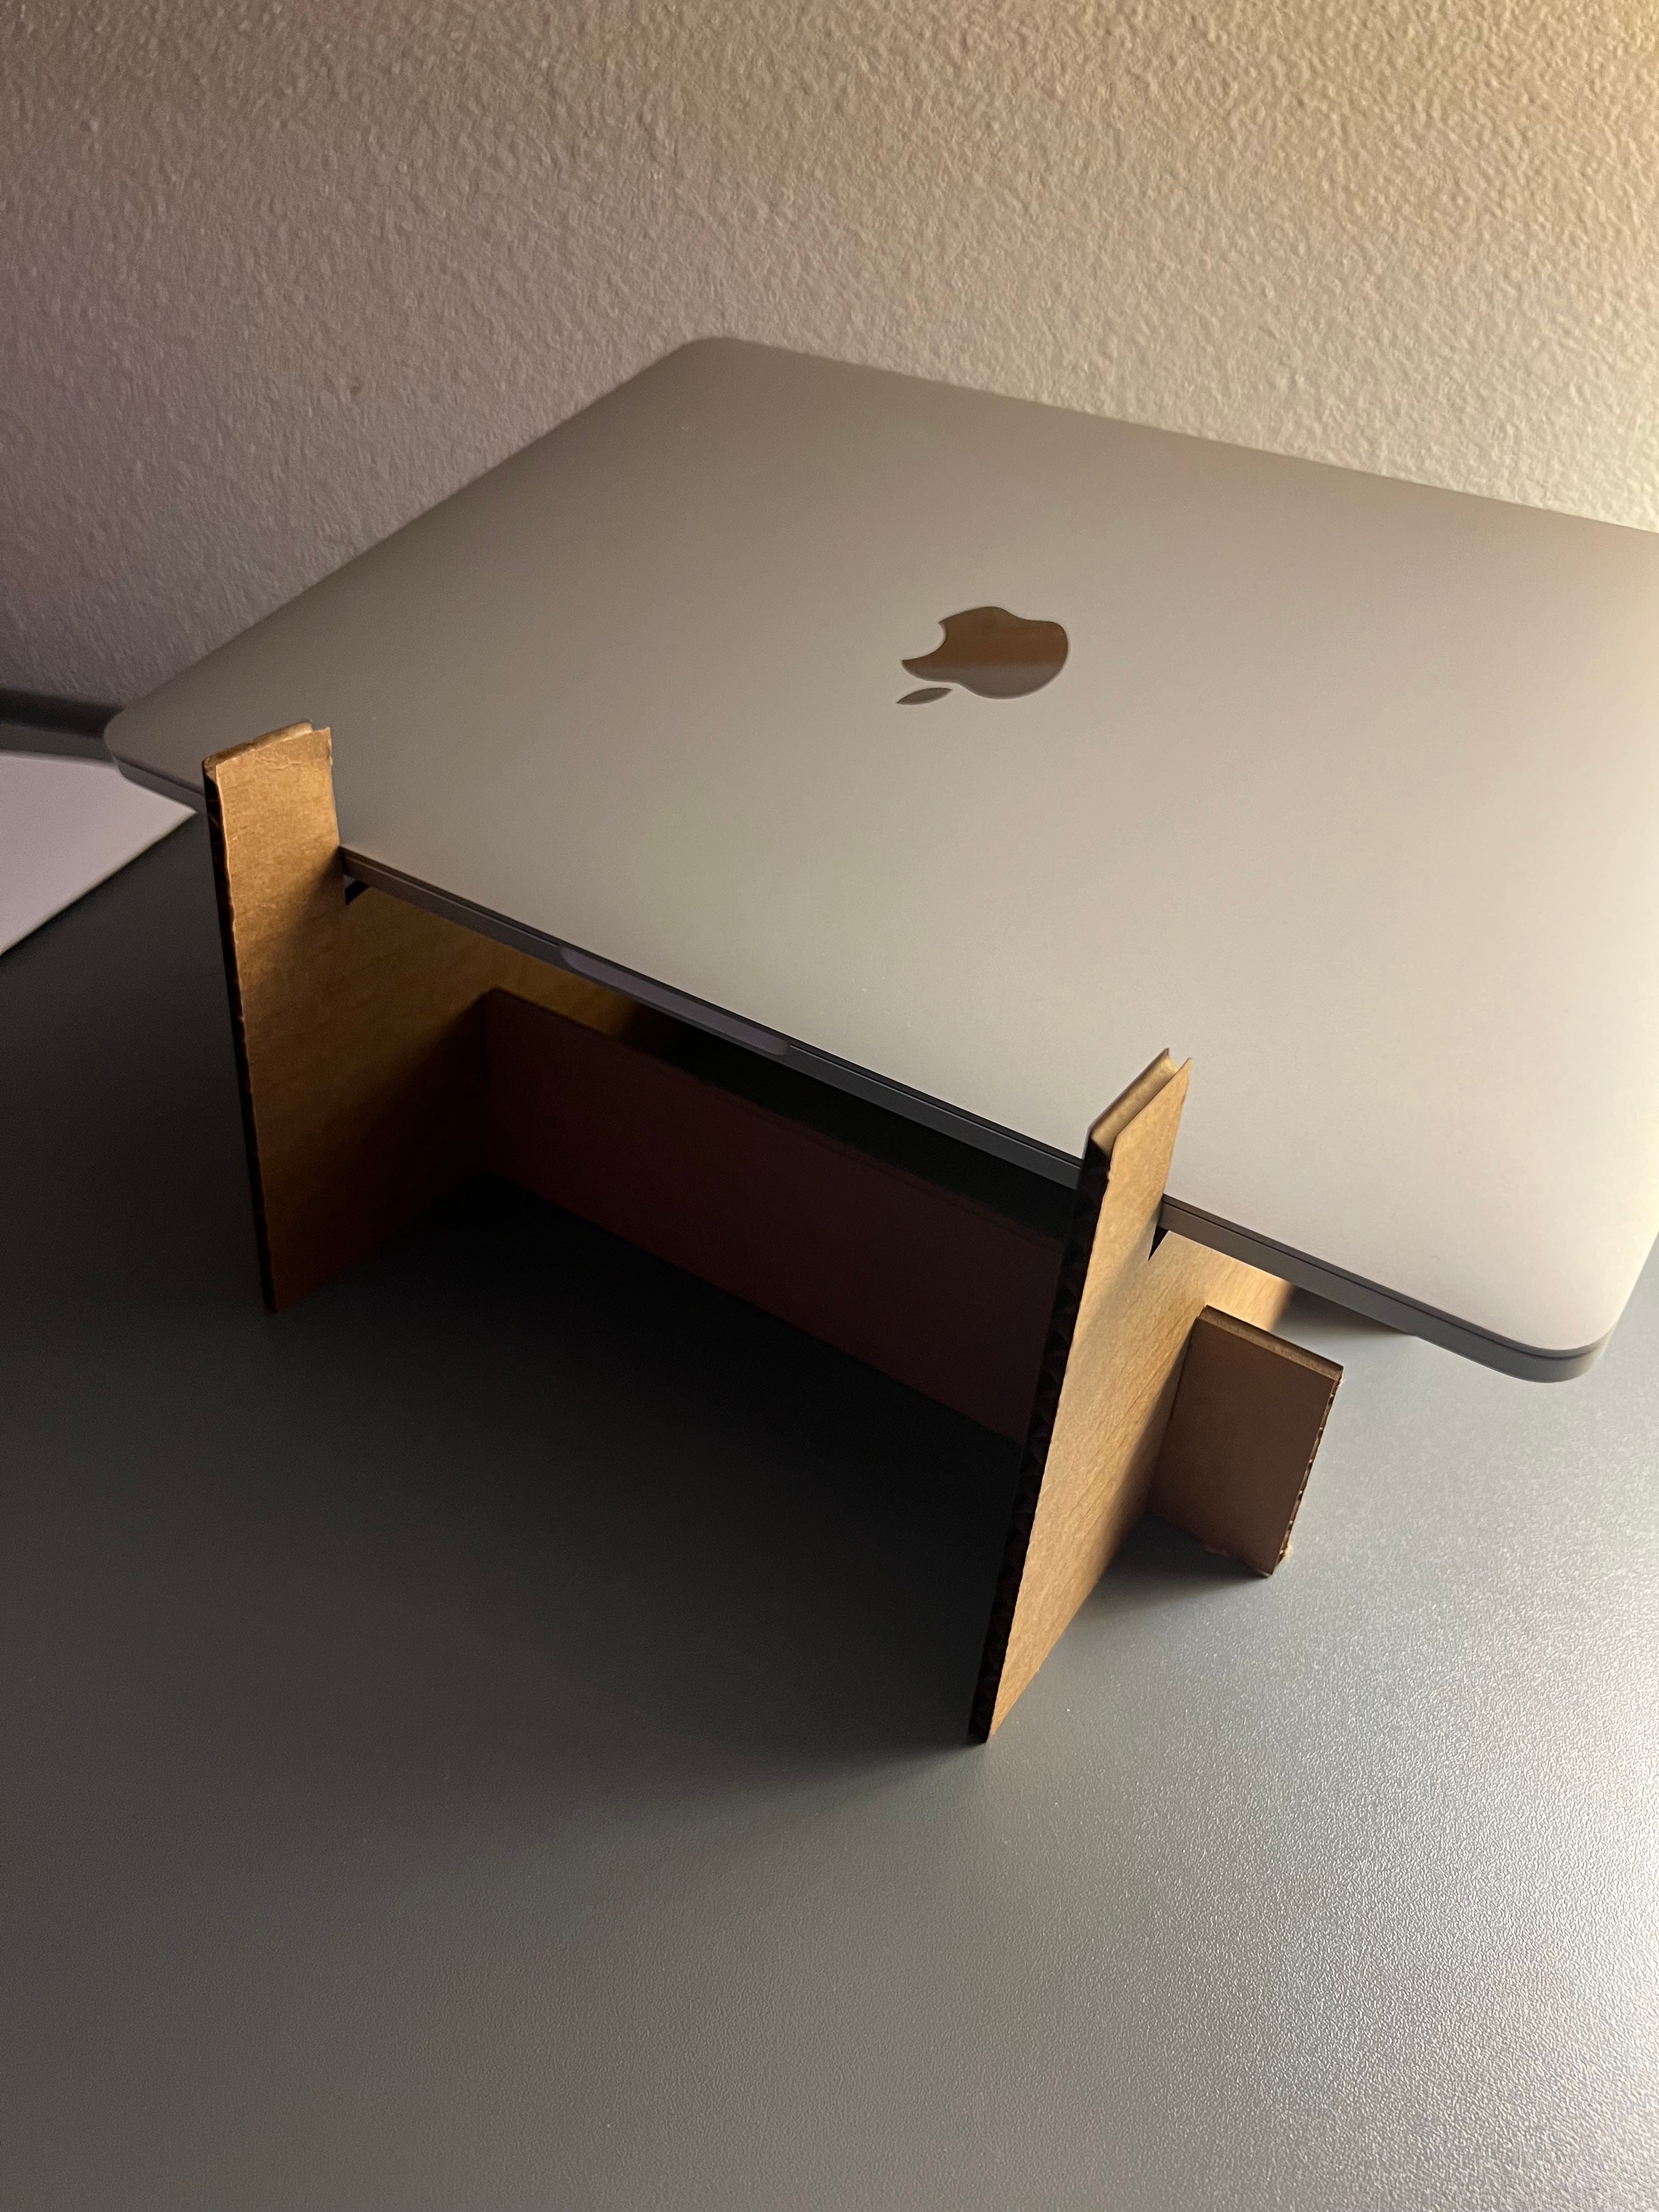
Credit: doankn.medium.com
Cutting The Cardboard Pieces
Cutting the cardboard pieces is a crucial step in making a sturdy laptop stand. Accurate cuts ensure the stand fits together well and holds your laptop safely. Use a sharp utility knife or scissors to get clean edges. Mark the cardboard before cutting to avoid mistakes.
Choose a flat surface for cutting to keep the pieces even. Take your time and cut slowly for precision. Remember, neat pieces make assembly easier and the stand more stable.
Measuring And Marking The Cardboard
Measure the size of your laptop to determine the stand dimensions. Use a ruler and pencil to draw straight lines on the cardboard. Mark all parts clearly before cutting. This helps prevent errors and saves time.
Choosing The Right Tools For Cutting
Use a sharp utility knife for thick cardboard. Scissors work well for thinner sheets. A cutting mat protects your surface and helps with straight cuts. Replace dull blades to avoid tearing the cardboard.
Cutting Different Shapes And Sizes
Cut rectangular pieces for the base and vertical supports. Make slits or slots for interlocking parts. Ensure all pieces match the measurements exactly. This allows the stand to fit together tightly.
Safety Tips While Cutting
- Cut away from your body to avoid injury.
- Keep fingers clear of the blade path.
- Work in a well-lit area to see lines clearly.
- Store sharp tools safely after use.
Folding And Shaping
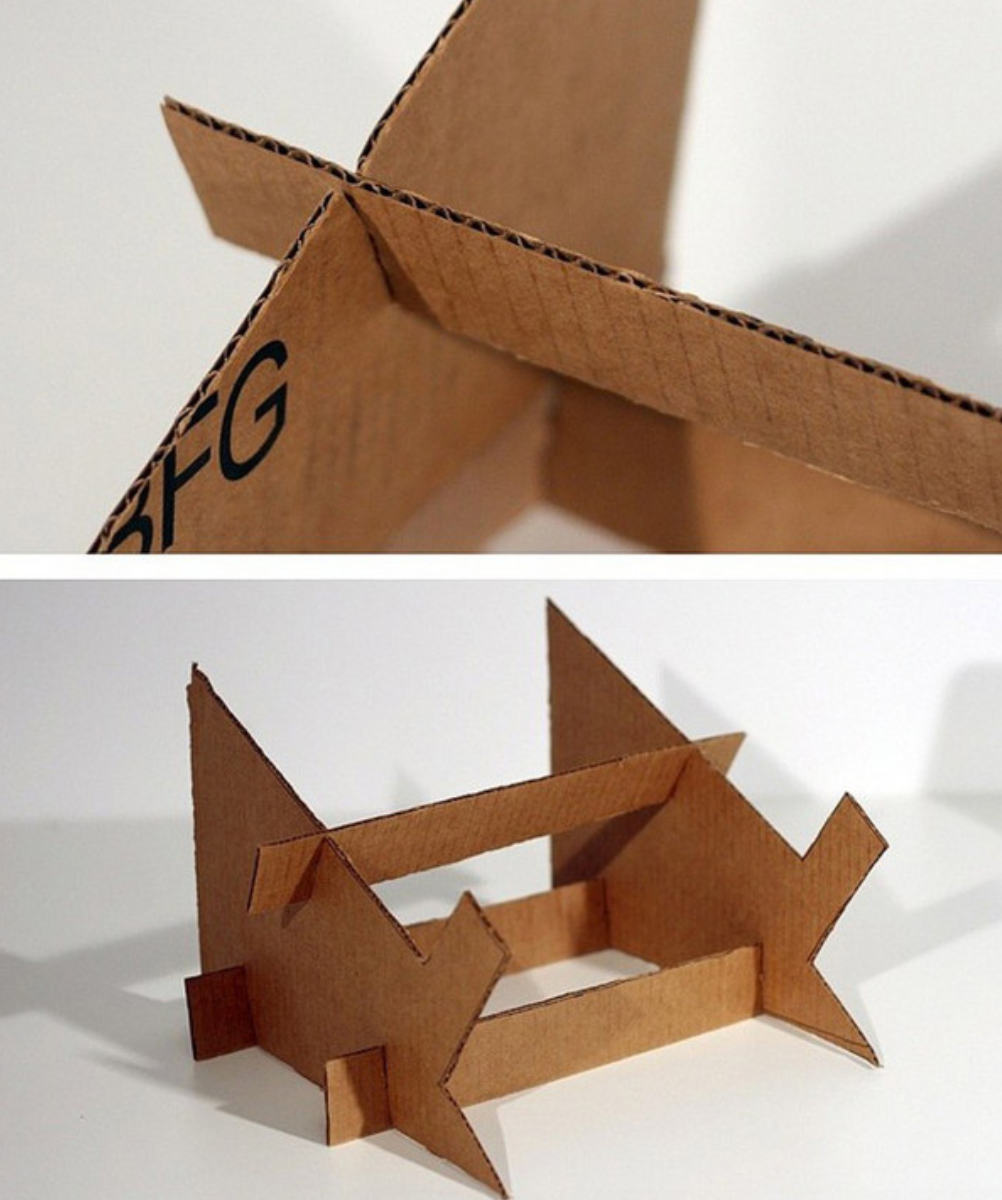
Folding and shaping cardboard is the heart of creating a sturdy and functional laptop stand. The way you fold impacts the stand’s strength and the angle at which your laptop will sit. You want to make sure your folds are precise and strong enough to hold the weight without collapsing.
Choosing The Right Folding Technique
Not all folds are equal. A crisp, clean fold creates a solid edge, while a loose fold can weaken the structure. Try folding the cardboard along its natural crease lines or score the cardboard lightly with a knife before folding to get sharper edges.
If you want extra support, consider creating a triangular fold. Triangles distribute weight better, which means your stand won’t wobble. You can test this by folding a scrap piece and pressing down on it to feel the stability.
Shaping For Comfort And Stability
Think about the angle at which you want your laptop to sit. Too steep or too flat can strain your neck or wrists. A good rule is to aim for a tilt that raises the back of your laptop around 15 to 20 degrees.
To achieve this, fold the cardboard in layers or steps so the back is higher than the front. You might need to experiment with different shapes until you find the perfect balance between comfort and stability.
Securing The Shape
Once you have the shape, keep it in place using tape or glue. Double-sided tape can be especially useful because it won’t show and keeps the folds tight. You might also want to reinforce stress points with extra layers of cardboard.
Have you noticed your stand feels shaky even after folding? Adding small cardboard braces inside the folds can significantly improve durability without adding bulk. This little trick saved my first cardboard stand from collapsing under a heavier laptop.

Credit: www.facebook.com
Assembling The Stand
Assembling your laptop stand from cardboard is where the project truly comes to life. This stage requires careful attention to detail to ensure your stand is both sturdy and functional. You’ll find that with a few smart folds and cuts, your simple materials turn into a practical workstation accessory.
Preparing The Cardboard Pieces
Start by cutting the cardboard into precise shapes and sizes. You’ll need a base, two side supports, and a backrest piece. Make sure all edges are smooth to avoid any wobbling or uneven surfaces.
Use a ruler and pencil to mark your cuts clearly. Accuracy here saves frustration later. Have you noticed how a small misalignment can throw off the whole structure?
Folding And Shaping The Cardboard
Next, fold the cardboard along the lines you’ve drawn to create strong angles. Crease the folds firmly to maintain stability when the stand is in use.
A tip from experience: fold slowly and reinforce each crease with a bone folder or the edge of a ruler. This gives your stand a professional, neat finish that holds its shape under your laptop’s weight.
Joining The Pieces Securely
Attach the side supports to the base using hot glue or strong tape. Apply glue evenly to avoid lumps that can affect balance. Hold the pieces together for a few seconds to ensure a firm bond.
To make the joint even stronger, add extra strips of cardboard along the inside corners. This simple trick increases the stand’s durability and prevents wobbling during use.
Final Adjustments And Testing
Once assembled, test the stand by placing your laptop on it. Check for any instability or weak points. If the stand wobbles, reinforce those areas with additional glue or cardboard strips.
Ask yourself: does the angle feel comfortable for typing and viewing? If not, adjust the folds or add support to achieve your ideal setup.
Securing And Reinforcing
Securing and reinforcing your cardboard laptop stand is key to making it sturdy and reliable. Without proper support, the stand might wobble or collapse, risking damage to your laptop. Let’s look at practical ways to strengthen your creation using simple materials.
Using Extra Cardboard Layers
Add extra layers of cardboard to the base and the parts that bear the most weight. Double or triple layers can significantly improve stability. You can glue or tape these layers together to create a thick, solid foundation.
Think about where your laptop puts the most pressure—usually the bottom and the edges touching the stand. Reinforce these areas first. This approach saved my first stand from bending after just a few uses.
Applying Strong Adhesives
Choose strong glue or heavy-duty tape to hold the parts firmly in place. Hot glue works well because it bonds quickly and holds tight. Make sure to press the pieces together firmly until the adhesive sets.
Don’t rely on weak tape alone; it may peel off after some time. Using a combination of glue and tape provides extra security. Have you tried gluing cardboard before? It changes everything when it holds fast.
Adding Support Braces
Create triangular braces from cardboard strips to place inside the stand’s corners. These braces help distribute weight evenly and prevent the stand from bending. Cut strips about two inches wide and glue them at a 45-degree angle where the sides meet.
This simple trick made my stand feel like it could hold much heavier laptops. You can experiment with different brace sizes depending on your laptop’s weight. What’s your laptop’s weight, and how strong does your stand need to be?
Securing With Tape Wraps
Wrap strong packing tape around the edges and joints of your stand. This adds a protective layer and keeps the cardboard from fraying or splitting. Clear tape can keep your stand looking neat, while colored tape adds a personal touch.
Try wrapping the tape tightly and in multiple layers for maximum strength. It’s an easy way to reinforce without adding bulk. Have you noticed how taped edges last longer on cardboard projects?
Customizing Your Stand
Customizing your cardboard laptop stand makes it truly yours. It improves comfort and suits your needs. A few simple tweaks can change its look and function. Personal touches also boost your workspace style.
Use colors, shapes, and extra features to match your taste. Think about how you use your laptop daily. Adjust height, angle, and size for better ergonomics. Small changes lead to big improvements.
Choosing The Right Height And Angle
Set your stand height so your eyes meet the screen naturally. Keep your neck straight to avoid strain. The angle should hold your laptop steady and easy to see. Try different positions before finalizing your design.
Adding Pockets And Holders
Create small compartments on the sides or back. Use extra cardboard pieces to make pen holders or phone slots. These keep your desk tidy and essentials close. Attach them with glue or tape securely.
Decorating With Colors And Patterns
Paint your stand with bright colors or cool patterns. Use markers, stickers, or colored paper for decoration. Choose designs that inspire and motivate you. Keep the surface smooth for easy cleaning.
Reinforcing For Extra Strength
Double-layer cardboard adds stability to your stand. Glue layers together, focusing on weight points. Use tape to secure weak spots. This ensures your stand holds the laptop safely every day.
Tips For Stability And Durability
Building a laptop stand from cardboard needs careful attention to stability and durability. A sturdy stand keeps your laptop safe and comfortable to use. Small details can make a big difference in strength and balance.
Using the right techniques helps your stand hold weight without wobbling. Think about how the cardboard folds and supports the laptop’s weight. Reinforce areas that bear the most pressure to prevent bending or collapsing.
Choose Thick, Quality Cardboard
Start with strong, thick cardboard. Thin cardboard bends easily and breaks fast. Double-layered or corrugated cardboard offers better support. Avoid old or soft cardboard. Fresh, firm sheets last longer and hold weight better.
Use Proper Folding Techniques
Sharp, clean folds improve stability. Score the cardboard lightly before folding to avoid cracks. Make folds crisp and precise. Fold edges inward to create strong beams. This increases the stand’s resistance to bending.
Reinforce With Extra Layers
Add extra layers in high-stress areas. Glue multiple layers together for strength. Focus on the base and laptop platform. Use strong adhesive and press firmly to avoid gaps. Overlapping layers prevent weak spots and increase durability.
Secure Joints With Tape Or Glue
Seal all joints tightly. Use strong tape or glue to hold parts together. Reinforce corners and connection points. Loose joints cause wobbling and instability. Proper sealing keeps the stand firm and reliable.
Test Weight And Balance Before Use
Place your laptop gently on the stand. Check for any wobble or tilt. Adjust folds or add reinforcements if needed. Balance is key to preventing accidents. Ensure the stand supports your laptop evenly on all sides.
Benefits Of A Diy Cardboard Stand
Creating a laptop stand with cardboard saves money and is eco-friendly. It offers a simple, lightweight solution to improve your laptop’s height and comfort. This DIY project also helps reduce clutter and can be customized to fit your needs.
The benefits of crafting your own laptop stand using cardboard are surprisingly numerous. Not only does it save money, but it also encourages creativity and repurposes materials that might otherwise be discarded. You don’t need to be a crafting expert to appreciate the advantages of this simple yet effective DIY project.Cost-effective Solution
Creating a laptop stand from cardboard is incredibly budget-friendly. You likely have cardboard boxes lying around your house, just waiting to be transformed. Instead of spending money on a store-bought stand, you can invest your resources in other essentials.Eco-friendly Choice
Using cardboard reduces waste and promotes recycling. By repurposing old boxes, you contribute to environmental sustainability. It’s a small step, but each DIY project that uses recycled materials makes a difference.Customizable Design
With a DIY cardboard stand, you’re not limited by commercial designs. You can tailor the stand to suit your preferences, whether it’s adjusting the height or adding compartments for accessories. Let your imagination guide the design process.Enhances Creativity
Crafting a stand is a fun and rewarding experience. It challenges you to think outside the box and solve practical problems with creativity. You’ll likely find yourself inspired to tackle more DIY projects.Encourages Problem Solving
Have you ever thought about how cardboard can be transformed into a sturdy stand? Building it requires planning and problem-solving skills, offering a mini workout for your brain. This hands-on project helps sharpen your decision-making abilities.Promotes A Personal Touch
Each cardboard stand reflects the personality and style of its creator. Whether you opt for a minimalist look or a colorful masterpiece, your stand is uniquely yours. Personalization adds a special touch to your workspace.Easy Maintenance
Cardboard is easy to clean and replace. If your stand gets damaged, you can quickly whip up another one without hassle. This convenience is especially useful if you live in a busy household. By making your own stand, you’re not just saving money—you’re creating something useful and personal. Have you considered what other items you could create using cardboard?Frequently Asked Questions
How Durable Is A Cardboard Laptop Stand?
A cardboard laptop stand can be quite durable if made with thick, high-quality cardboard. Proper folding and reinforcement increase strength. It supports typical laptop weights but avoid exposure to moisture or heavy impact to maintain longevity.
What Tools Are Needed To Make A Cardboard Laptop Stand?
You only need simple tools like a ruler, pencil, box cutter or scissors, and glue or tape. These tools help measure, cut, and assemble the cardboard pieces accurately and securely.
Can A Cardboard Stand Improve Laptop Ergonomics?
Yes, a cardboard stand raises the laptop screen to eye level. This reduces neck and back strain. It also improves airflow, which helps keep the laptop cool during use.
Is Making A Cardboard Laptop Stand Cost-effective?
Absolutely, making a cardboard stand is very cost-effective. It uses inexpensive or recycled materials. This DIY approach saves money compared to buying commercial stands while being eco-friendly.
Conclusion
Building a laptop stand with cardboard saves money and helps the environment. It is easy to make with simple tools and materials. The stand improves your laptop’s position and comfort while working. You can customize the size and shape to fit your needs.
This project is a fun way to reuse old cardboard boxes. Try making one today and enjoy a better workspace. Small changes like this can make a big difference in your daily routine.