Are you tired of seeing the same old Wi-Fi network name every time you connect? Changing your Wi-Fi network name on your Windstream router is easier than you think, and it can make your home network feel more personal and secure.
In this guide, you’ll learn simple, step-by-step instructions to update your network name quickly. By the end, you’ll have a fresh Wi-Fi name that’s easy to recognize and hard for others to guess. Keep reading to take control of your Wi-Fi and make your connection truly yours!
Credit: sathya-velir.medium.com
Accessing The Router Settings
Accessing your Windstream router settings is the first crucial step to changing your Wi-Fi network name. Without entering the router’s control panel, you won’t be able to make any adjustments. It might seem technical, but it’s quite straightforward once you know where to look.
Connect To Windstream Network
Start by connecting your device to the Windstream Wi-Fi network. This can be your laptop, smartphone, or tablet. Make sure you use the current Wi-Fi network associated with your Windstream router, as this connection is necessary to access its settings.
If you’re already connected but unsure, double-check your device’s Wi-Fi list for the network name you want to change. This direct connection helps avoid any access issues when logging into the router.
Find Router Ip Address
The router’s IP address acts like a gateway to its settings page. Typically, Windstream routers use common IP addresses such as 192.168.1.1or 192.168.0.1. You can enter these numbers into your web browser’s address bar to open the login page.
If these don’t work, you can find the IP address by:
- On Windows: Open Command Prompt and type
ipconfig, then look for the “Default Gateway.” - On Mac: Go to System Preferences > Network, select your active connection, and click Advanced > TCP/IP to find the router address.
Knowing this address is key. Have you ever tried to access a website without knowing its URL? The router IP address is just as essential for your device’s communication.
Login Credentials
Once you access the router’s IP address, a login screen appears. This is where you enter your username and password. For Windstream routers, the default credentials are often found on a sticker on the router itself.
Common defaults are:
| Username | Password |
|---|---|
| admin | password |
| admin | admin |
If you’ve changed these in the past and forgotten them, resetting the router might be necessary. Always keep your login details secure to prevent unauthorized access.
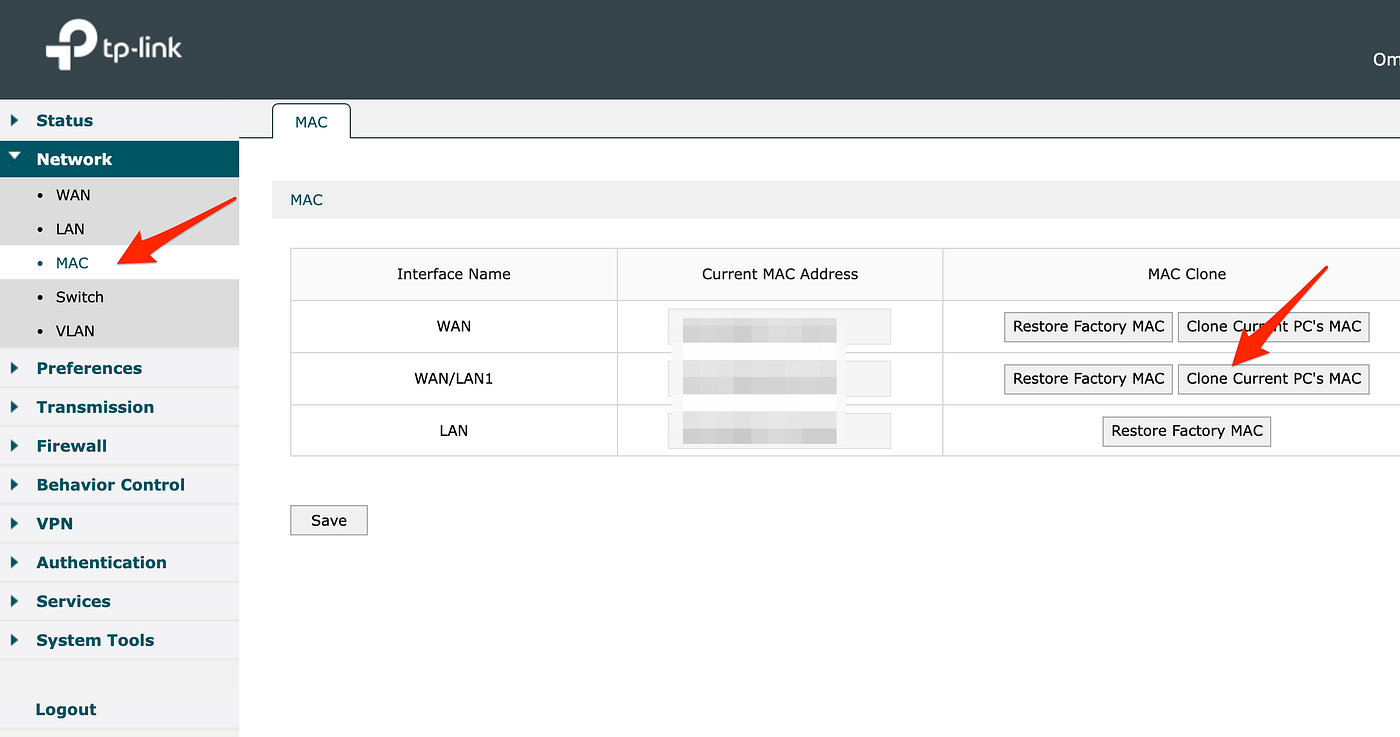
Navigating To Wireless Settings
Changing your Wi-Fi network name on a Windstream router starts with finding the wireless settings in the router’s interface. This part can feel tricky if you haven’t accessed router settings before, but it’s straightforward once you know where to look. Navigating to the right section is the key to customizing your network quickly and safely.
Locate Wireless Section
After logging into your Windstream router’s admin page, look for a menu option labeled something like Wirelessor Wireless Settings. This section controls everything related to your Wi-Fi network, including the name, password, and frequency settings.
Depending on your router model, the menu might be on the left side or across the top. If you don’t see “Wireless” right away, check under categories such as Networkor Setup. Remember, the goal is to find where the router lists your Wi-Fi details.
Identify Ssid Settings
Within the Wireless section, search for the field labeled SSID. This is your current Wi-Fi network name. It’s usually an editable text box where you can type a new name.
Changing the SSID is simple, but think about a name that’s easy to recognize and secure. After entering your new network name, don’t forget to save or apply the changes. Your devices will then need to reconnect using the new SSID.
Have you ever picked a Wi-Fi name that confused your guests or made your own connection tricky? Choosing the right SSID can make your daily Wi-Fi experience smoother and more personal.
Changing The Wi-fi Network Name
Changing the Wi-Fi network name on your Windstream router is a simple yet effective way to personalize your internet connection and make it easier to identify. Whether you want a fun name or something more professional, updating your network’s SSID (Service Set Identifier) can help you manage your devices better.
It only takes a few clicks to switch out the default name for one that suits you. Are you ready to make your Wi-Fi stand out from the crowd?
Enter New Network Name
After logging into your Windstream router’s admin panel, navigate to the wireless settings section. Here, you’ll find the current network name displayed under the SSID field.
Click inside the SSID box and type your new preferred network name. Keep it simple and avoid special characters to ensure all devices can connect smoothly. Want to make it memorable? Use a mix of letters and numbers that you can easily recall.
Save And Apply Changes
Once you’ve entered the new network name, don’t forget to save your changes. Look for the “Save” or “Apply” button at the bottom of the page and click it.
The router may restart or briefly disconnect devices while it updates the settings. After this, reconnect your devices using the new Wi-Fi name. Have you noticed how a custom name can make managing multiple networks in your area much easier?

Credit: www.youtube.com
Restarting The Router
Restarting your Windstream router is often the simplest fix when you want to change your Wi-Fi network name. It helps the device apply new settings effectively and can clear up any temporary glitches that might interfere with the update. Think of it as giving your router a quick break to refresh its system.
Why Restart Is Needed
After changing your Wi-Fi network name, the router needs to reboot to save and activate the new settings. Without restarting, your device might continue broadcasting the old network name, causing confusion when you try to connect. A restart also clears the router’s cache, which can improve overall performance.
Have you ever updated settings on a device that didn’t seem to take effect until you restarted it? The same principle applies here. Restarting ensures that your Windstream router fully registers the changes you made.
How To Restart
Restarting your Windstream router is straightforward. You can do this in two main ways:
- Using the power button:Simply press the power button on your router to turn it off. Wait for about 30 seconds before turning it back on. This short pause helps clear any residual power and resets the hardware.
- Unplugging the router:Disconnect the power cable from the router. Wait for 30 seconds, then plug it back in. This method works if your router doesn’t have a power button or if you want a more thorough reset.
Once restarted, check your device’s Wi-Fi list to see if the new network name appears. If it doesn’t, try restarting again or double-check your settings. Sometimes, patience makes all the difference in tech.
Connecting Devices To New Network
After changing your Windstream router’s Wi-Fi network name, your devices won’t automatically connect to the new network. You need to manually update each device to recognize the new name. This process ensures smooth internet access without interruptions.
Forget Old Network
Start by telling your device to forget the old Wi-Fi network. This removes any saved settings that might cause connection issues.
- On smartphones or tablets, go to Wi-Fi settings, tap the old network, and select “Forget” or “Remove.”
- On laptops, find the list of known networks, right-click the old network, and choose “Forget.”
Failing to forget the old network can lead to devices trying to connect with outdated credentials. Have you ever struggled with your phone connecting to the wrong Wi-Fi? Forgetting the old network fixes that instantly.
Join New Network
Next, connect your device to the new Wi-Fi network name you just set up. This step is simple but crucial for restoring internet access.
- Open Wi-Fi settings on your device and look for your new network name.
- Select the new network and enter the password you created during the router setup.
- Wait for confirmation that the device is connected.
If your device doesn’t find the new network, double-check the router settings or try restarting your device. Connecting to a fresh network name can feel like starting over, but it helps keep your home network secure and organized.

Credit: www.facebook.com
Troubleshooting Tips
Changing your Wi-Fi network name on a Windstream router can be straightforward, but sometimes issues arise. Troubleshooting tips can help resolve these problems. Here are some common issues and solutions to get your network back on track.
Common Connection Issues
Connection issues are often due to signal interference. Look for physical obstructions between your router and devices. Metal objects and walls can weaken the Wi-Fi signal. Adjust the router’s position to improve coverage. Another common issue is outdated firmware. Check for updates regularly to ensure optimal performance. Incorrect network settings can also cause disruptions. Verify your router’s settings to match your internet service provider’s requirements.
Resetting Router To Default
Resetting your router can solve persistent problems. Locate the reset button on your Windstream router. Press and hold for 10 seconds to initiate a reset. This restores factory settings, erasing custom configurations. After resetting, reconfigure your network name and password. Ensure these settings are correct to avoid future issues. Keep your router firmware updated for improved functionality.
Frequently Asked Questions
How Do I Access My Windstream Router Settings?
Open a web browser and enter 192. 168. 1. 1 in the address bar. Login with your router’s username and password, usually found on the device label.
Can I Rename My Wi-fi Network On Windstream Router?
Yes, you can rename your Wi-Fi network. Access the router settings, go to the wireless section, and change the SSID or network name.
Will Changing Wi-fi Name Affect My Connected Devices?
Changing the Wi-Fi name disconnects all devices. You must reconnect each device using the new network name and password.
How Often Should I Change My Windstream Wi-fi Name?
Changing your Wi-Fi name is optional. Do it if you want better network identification or enhanced security.
Conclusion
Changing your Windstream router’s Wi-Fi name is quick and simple. Just follow the steps carefully, and you will see the new name in no time. A clear network name helps you find your Wi-Fi easily. It also keeps your connection organized and secure.
Feel free to change the name anytime you want. Keeping your network settings updated is a smart habit. Enjoy a smoother internet experience with your personalized Wi-Fi name today.