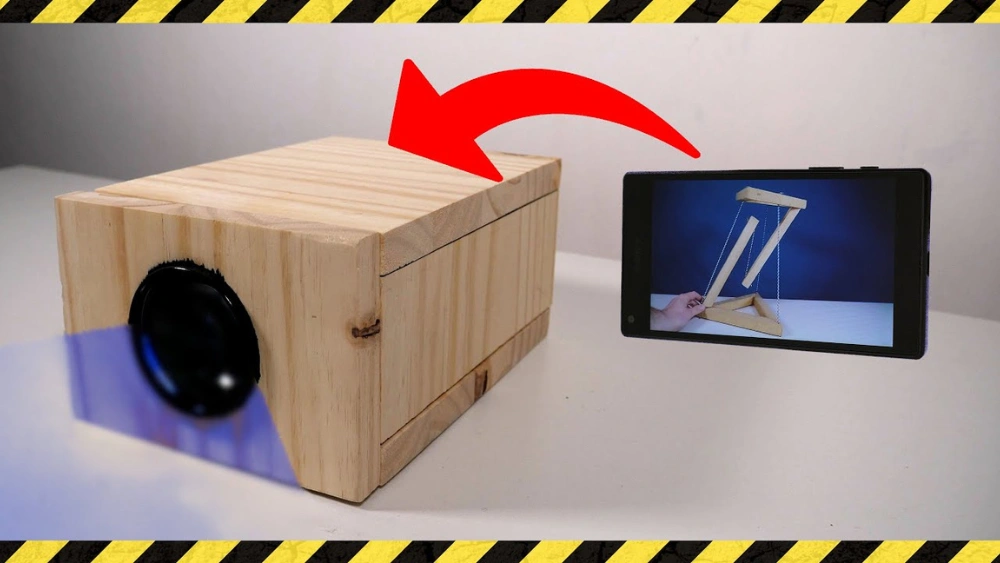
Have you ever wished you could watch your favorite movies or share photos on a big screen without buying expensive equipment? What if your phone could become a powerful projector right in your hands?
Imagine turning any wall into your personal cinema or presentation space instantly. You’ll discover simple, practical ways to transform your phone into a projector. By the end, you’ll have the tools and know-how to impress friends, enjoy bigger visuals, and make the most out of your device.
Ready to unlock this surprising trick? Keep reading to find out how.

Credit: www.kickstarter.com
Materials You Need
Turning your phone into a projector is easier than you think, but gathering the right materials is key to getting a clear and bright image. You don’t need fancy equipment—just a few simple items that you might already have or can easily find. Let’s break down what you need to make your DIY projector a success.
Choosing The Right Phone
Your phone is the heart of the projector. A phone with a bright and high-resolution screen will give you the best results. Phones with OLED or AMOLED screens often produce better contrast, making images sharper and more vibrant.
Think about the phone’s brightness level too. Older phones with dim screens might result in a faint projection, so pick one that can get really bright. Also, the size of your phone matters; larger screens make it easier to align the image with the lens.
Selecting A Suitable Lens
The lens focuses the light from your phone’s screen onto the projection surface. A simple magnifying glass with a diameter of around 50-70mm usually works well. The bigger the lens, the brighter and larger the projection can be.
I once used a cheap magnifying glass from a dollar store and was surprised by how clear the image turned out. Just make sure the lens is convex and not scratched, as imperfections can blur the picture.
Additional Supplies
Besides your phone and lens, you’ll need a few other items to complete the setup:
- Cardboard box or shoebox:Acts as the projector’s body to hold everything in place.
- Black tape or glue:For securing the lens and blocking out extra light.
- Knife or scissors:To cut holes for the lens and phone screen alignment.
- Dark paint or black paper:Helps reduce internal reflections inside the box for a clearer image.
Have you thought about where you’ll project your image? A smooth, white wall or a projector screen works best. These materials are simple but make all the difference between a blurry and a crisp display.

Credit: www.reddit.com
Preparing Your Phone
Before you can project anything from your phone, it’s important to get your device ready. Preparing your phone properly ensures the best image quality and smooth projection experience. Small tweaks to your settings and the right apps can make a big difference.
Adjusting Brightness And Settings
Start by increasing your screen brightness to the maximum. A brighter screen means a clearer and more visible projection, especially in dim lighting.
Turn off any power-saving modes. These can dim your screen or limit background activity, which disrupts the projection.
Also, disable auto-lock or sleep mode. You don’t want your phone screen turning off in the middle of your presentation or movie.
- Set screen timeout to “Never” or the longest available option.
- Check that your volume is turned up if you plan to project video with sound.
- Close unnecessary apps to free up system resources and avoid interruptions.
Downloading Projection Apps
You’ll need the right app to help your phone act like a projector. There are several apps designed to improve projection quality or connect your phone to external projectors.
Look for apps with good user reviews and regular updates. This often means better reliability and new features.
Some apps offer features like screen mirroring, image adjustment, and even virtual projector interfaces that enhance the experience.
- Try apps like “Screen Stream Mirroring” or “iProjection” depending on your device type.
- Check if the app supports the file types you want to project, such as videos, photos, or presentations.
- Test the app before your actual projection to troubleshoot any issues.
Have you ever tried projecting content from your phone? Adjusting brightness and choosing the right app can transform your simple device into a powerful tool for sharing visuals with friends or colleagues.
Building The Projector Box
Building the projector box is a key part of turning your phone into a projector. This box holds all parts in place and helps focus the image. A well-built box makes the picture clear and bright. It also protects the phone and lens from damage. Focus on making the box steady and functional.
Creating A Stable Base
Use a strong, flat material like cardboard or wood for the base. It should be wide enough to hold the phone and lens without tipping over. Make sure the base is level and steady. Add small rubber pads under the box to stop slipping. A stable base keeps the image sharp and the setup safe.
Installing The Lens
Choose a magnifying glass or a simple convex lens for the projector. Cut a hole in the box where you want to place the lens. Fit the lens tightly into the hole. Use glue or tape to keep it secure and prevent light leaks. The lens focuses the phone screen’s light onto the wall or screen.
Ensuring Proper Ventilation
Phones can get hot when projecting for long periods. Add small holes or vents in the box to let air flow inside. Avoid placing vents near the lens area to keep the image clear. Proper ventilation stops the phone from overheating and ensures longer use.
Setting Up The Projection
Setting up the projection correctly is key to a clear, bright display. This section guides you through the best ways to position your phone and box. It also covers focus adjustments and tips to improve image quality. Follow these simple steps for an enjoyable viewing experience.
Positioning The Phone And Box
Place your phone inside the box with the screen facing the lens. Ensure the box is stable on a flat surface. Point the box toward a smooth, white wall for the best image. Keep the room dark to improve visibility. Avoid any bright lights near the projection area.
Adjusting Focus And Distance
Move the box closer or farther from the wall to change image size. Find the right distance where the picture is clear and fills the space well. Adjust your phone inside the box by sliding it back and forth. Small movements can sharpen the focus. Take your time to get the perfect clarity.
Optimizing Image Quality
- Turn off auto-brightness on your phone.
- Set the screen brightness to the highest level.
- Use a plain, dark background on your phone.
- Close any apps that may dim the screen.
- Clean the lens and screen surface to avoid blurs.
These tips help you get a brighter, sharper image. Clear images make the viewing experience much better.
Tips For Best Results
Place your phone in a dark room to improve image clarity. Adjust the focus by moving the phone closer or farther from the lens. Use a flat, steady surface to keep the projection stable and clear.
Turning your phone into a projector is a fun DIY project that can bring your favorite movies and shows to life on a bigger screen. However, achieving the best results requires a bit of finesse. With the right tips, you can enhance your viewing experience and make your DIY projector truly shine. Here are some practical insights to help you get the most out of your phone projector.Choosing The Right Room Lighting
Selecting the perfect lighting is crucial for optimal projection quality. Aim for a dimly lit room to ensure the projected image is vivid and clear. Try using blackout curtains or blinds to minimize any external light entering the room. If you’re projecting during the day, these can be your best friends. Consider using a small lamp or indirect lighting to avoid complete darkness, which can strain your eyes.Using Reflective Surfaces
Reflective surfaces can significantly enhance the brightness and clarity of your projection. A white wall or a projector screen is ideal, but not everyone has one readily available. You can use a large white sheet or poster board as an alternative. Make sure it’s smooth and wrinkle-free for the best results. Experiment with different surfaces to find the one that offers the sharpest image. Sometimes, a simple switch can make a big difference.Maintaining Your Diy Projector
Maintenance is key to keeping your DIY projector functioning optimally. Regularly clean the lens of your phone to ensure no dust or smudges affect image quality. Check the box or enclosure used for your projector setup. Make sure it remains sturdy and aligned to prevent any distortion. Don’t forget to update your phone’s software for the best performance. New updates can improve your phone’s display capabilities and overall efficiency. By addressing these areas, your DIY projector can offer an impressive viewing experience. What adjustments have you made that transformed your phone into the perfect projector?
Credit: www.pocket-lint.com
Troubleshooting Common Issues
Turning your phone into a projector can be exciting, but you might run into some common hiccups along the way. Knowing how to fix these issues quickly keeps your movie nights or presentations running smoothly. Let’s look at some frequent problems and practical fixes you can try right now.
Blurry Images
Blurry projections can ruin the viewing experience. Often, the issue lies in the focus setup. Check if your DIY projector lens or setup allows you to adjust the distance between the phone and the lens.
Try moving your phone or the lens slightly closer or farther away until the image sharpens. Also, clean the lens carefully—dust or fingerprints can cause blurriness.
If you are using a mirror or any reflective surface, ensure it is smooth and clear. Have you tried using a magnifying glass with a different focal length? Sometimes swapping lenses can make all the difference.
Dim Projection
Dim images can make it hard to see details, especially in bright rooms. First, check your room’s lighting—turn off lights or close curtains to darken the space.
Next, increase your phone’s screen brightness to the maximum. Some phones also have a “reading mode” or “eye comfort” setting that dims the screen; make sure it’s off.
Using a high-quality magnifying lens helps focus more light. If your projector box is too large or not well sealed, light may escape, so try to make it as tight as possible. Have you considered using a reflective surface inside to boost brightness?
Phone Overheating
Your phone might get hot when projecting for long periods. Overheating can cause your phone to slow down or shut off unexpectedly.
To prevent this, avoid using heavy apps alongside your projector setup. Close background apps and lower screen brightness after adjusting the room’s light.
Place your phone on a hard, cool surface to help heat escape. If you notice your phone heating up quickly, pause projection for a few minutes to cool down. Ever thought about using a small external fan or cooling pad?
Frequently Asked Questions
How Can I Turn My Phone Into A Projector?
You can turn your phone into a projector using DIY methods or mini portable projectors. Simple setups use lenses and boxes to magnify your screen. Portable projectors connect via HDMI or wireless casting. Choose the method based on your budget and desired image quality.
What Apps Help Project Videos From A Phone?
Apps like Miracast, AirPlay, and Google Home help project videos. They wirelessly mirror your phone screen to compatible projectors or smart TVs. These apps support various file types and streaming services. Ensure your projector supports screen mirroring for smooth casting.
Do I Need Extra Equipment For Phone Projection?
Yes, extra equipment like lenses, a dark room, or a mini projector enhances projection. DIY methods often require magnifying lenses and stable mounts. Portable projectors need charging cables and HDMI adapters. Proper equipment improves image clarity and size.
Can All Phones Be Used As Projectors?
Most smartphones can be used as projectors with external devices or DIY setups. However, older models may lack wireless casting features. Compatibility depends on your phone’s operating system and available accessories. Check your phone’s specs before starting.
Conclusion
Turning your phone into a projector is simple and fun. You only need a few tools and some space. This trick lets you watch videos or share photos on a big screen. It works well for small gatherings or casual movie nights.
Give it a try and enjoy a new way to use your phone. No extra devices are always necessary. Just follow the steps and see the magic happen.