
If your car is running rough or losing power, a faulty fuel injector might be the culprit. But how do you know for sure?
Testing a fuel injector with a multimeter is a simple and effective way to find out. In this guide, you’ll learn exactly how to check your fuel injector’s condition step-by-step, even if you’re not a mechanic. By the end, you’ll have the confidence to diagnose the problem yourself and save time and money on repairs.
Ready to take control of your car’s health? Let’s dive in.
Tools Needed
Testing a fuel injector with a multimeter requires the right set of tools. Having the proper equipment ensures accurate readings and saves you from unnecessary guesswork. Before you start, make sure you have everything ready to avoid interruptions during the process.
Choosing The Right Multimeter
Not all multimeters are created equal, especially when working on fuel injectors. You need a multimeter that can measure resistance accurately, typically in the ohms range. A digital multimeter with a clear display and reliable probes will make your job easier and more precise.
Look for features like auto-ranging, which adjusts the scale automatically, so you don’t have to guess the measurement range. Some multimeters even have a continuity test function, helping you quickly check wiring connections. You don’t need the most expensive model, but avoid very basic ones that might give inconsistent results.
Additional Equipment
Besides the multimeter, a few more tools can improve your testing experience. A set of insulated alligator clips can hold the probes securely on the injector terminals, freeing your hands. This helps maintain steady contact and prevents slipping that could cause false readings.
You might also need a wiring diagram of your vehicle’s fuel injector system. Having this on hand helps you identify the correct pins and avoid confusion. Finally, a basic screwdriver set may be necessary to remove any covers or connectors blocking access to the injector.
Do you have your tools ready? The right equipment can turn a complicated task into a straightforward one.
Credit: www.yourmechanic.com
Preparing For The Test
Preparing to test a fuel injector with a multimeter requires careful steps. These steps ensure safety and accurate results. Proper preparation saves time and avoids damage to the vehicle or tester.
Safety Precautions
Wear safety glasses and gloves to protect from fuel and sparks. Work in a well-ventilated area to avoid inhaling fumes. Disconnect the car battery to prevent electrical shocks. Keep fire extinguishers nearby as a precaution. Avoid smoking or open flames near the testing area.
Locating The Fuel Injector
Open the vehicle’s hood and find the engine cover. Remove it if needed to see the fuel rail. Fuel injectors attach to the fuel rail and engine intake. Check the vehicle manual for exact injector locations. They usually sit on the engine’s intake manifold.
Accessing The Injector Connector
Locate the electrical connector on each fuel injector. Gently disconnect the connector by pressing the tab. Avoid pulling on wires to prevent damage. Use a flashlight for better visibility. Keep connectors clean and free of dirt before testing.
Setting Up The Multimeter
Setting up the multimeter correctly is key before testing a fuel injector. A wrong setup can give false readings. Follow simple steps to prepare your device for accurate results. Understanding the multimeter’s settings will save time and avoid mistakes.
Selecting The Correct Mode
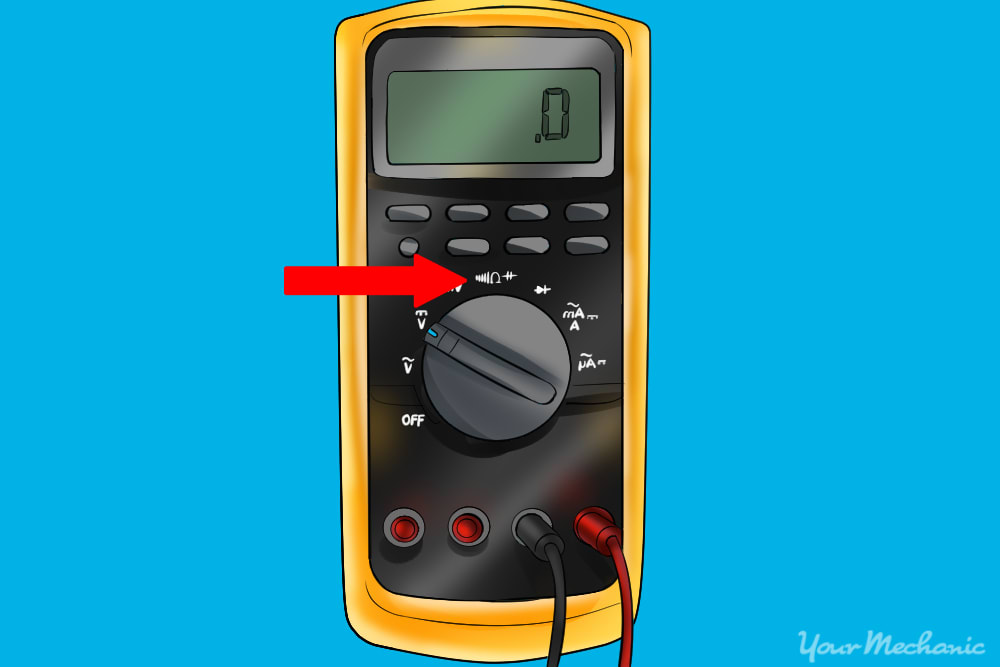
Turn on the multimeter and choose the right mode for testing. For fuel injectors, use the resistance or ohms (Ω) mode. This mode measures the coil’s resistance inside the injector. Avoid voltage or current modes, as they do not apply to injector testing.
Look for the symbol that looks like an omega (Ω). Set the dial to this symbol. If your multimeter has multiple ranges, pick a low range, usually 200 ohms. This helps get a clear and precise reading.
Calibrating The Device
Calibration ensures the multimeter shows accurate numbers. Start by connecting the two test leads together. The screen should show zero or close to zero ohms.
If the reading is not zero, use the calibration knob or button to adjust it. This step removes any internal resistance in the leads themselves. Repeat this step each time before testing the injector for best accuracy.
Measuring Resistance
Measuring resistance in a fuel injector is a crucial step to determine if it is functioning properly. Resistance tells you how much the injector’s coil is allowing electric current to pass through. If the resistance is too high or too low, the injector might fail to open or close correctly, affecting engine performance.
Connecting The Probes
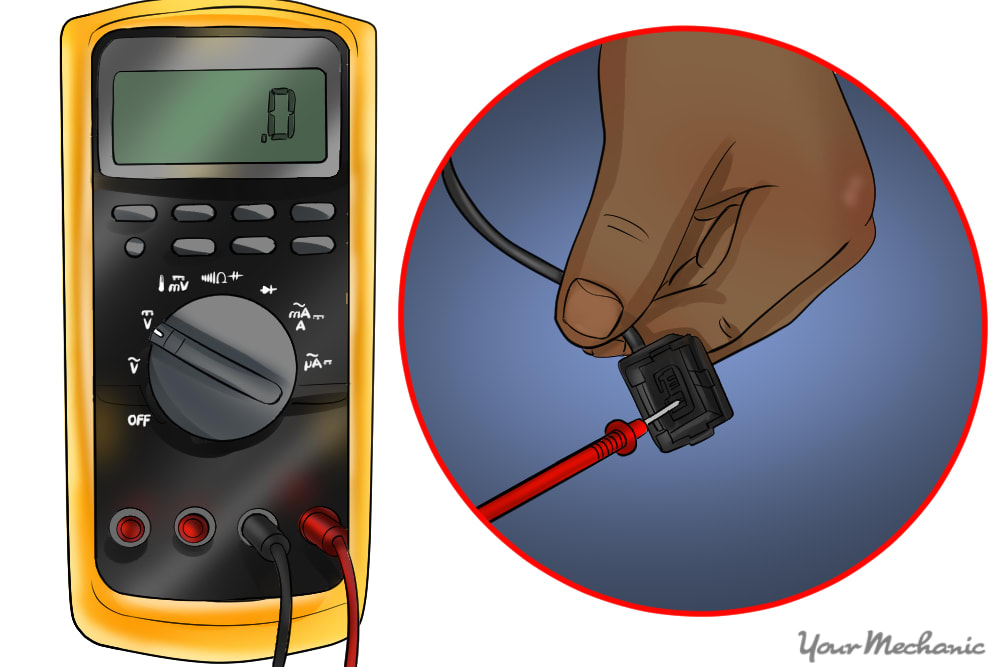
First, ensure your multimeter is set to the resistance (ohms) mode. Take the two probes of your multimeter and touch them to the injector’s electrical terminals. It doesn’t matter which probe goes on which terminal because resistance is not directional.
Make sure the injector is disconnected from the vehicle’s wiring harness before testing. This avoids false readings caused by other components. Hold the probes steadily to get a stable reading on the multimeter screen.
Interpreting Resistance Readings
Most fuel injectors have a resistance range between 12 to 17 ohms, but check your vehicle’s service manual for exact values. A reading significantly outside this range suggests a problem:
- Higher resistance:This could mean corrosion or a damaged coil winding.
- Lower resistance or zero:Might indicate a short circuit inside the injector.
- Infinite resistance or no reading:Often means the coil is broken or the injector is open circuit.
Have you ever had an injector that seemed fine but caused misfires? Measuring resistance can reveal hidden issues you wouldn’t spot just by looking. This simple test saves you from replacing parts blindly and helps you target the exact problem quickly.
Checking Voltage Supply
Checking the voltage supply to your fuel injector is a crucial step in diagnosing injector problems. Without the right voltage, the injector won’t open and close properly, causing poor engine performance. Using a multimeter lets you see if the injector is getting the correct electrical power.
Testing The Injector Circuit
Start by turning off your vehicle’s engine and disconnecting the fuel injector connector. Set your multimeter to measure DC voltage. Then, reconnect the ignition without starting the engine. This powers the injector circuit and allows you to test the voltage supply.
Place the multimeter’s positive lead on the injector’s positive terminal and the negative lead on a good ground point. You should see a steady voltage reading close to your vehicle’s battery voltage, usually around 12 volts. If the voltage is low or fluctuating, it means there’s a problem somewhere in the wiring or fuse.
Identifying Voltage Issues
If your multimeter shows no voltage or a reading far below 12 volts, check the fuse box for any blown fuses related to the fuel injection system. Wiring issues such as loose connections, damaged wires, or corroded terminals can also cause voltage drops.
Sometimes, the problem lies in the vehicle’s ECU or relay, which controls power delivery to the injector. Have you ever found a tiny blown fuse causing big engine troubles? It’s worth inspecting these simple components before assuming the injector itself is faulty.
By carefully testing voltage supply, you can save time and money by pinpointing the exact cause of injector failure. This approach keeps your troubleshooting targeted and efficient.

Credit: www.youtube.com
Testing Injector Pulse
Testing the injector pulse is crucial to ensure your vehicle’s fuel system is functioning properly. A multimeter can be your best friend in diagnosing issues related to fuel injectors. Using it to test the injector pulse allows you to see if the injector is getting the right signals from the engine control unit. Have you ever wondered how to effectively use a multimeter to check this vital component?
Using The Multimeter In Frequency Mode
First, set your multimeter to frequency mode. This setting will help you measure the pulse frequency of the injector signal. Connect the multimeter probes to the injector terminals. Ensure the connections are secure to avoid inaccurate readings. You should see a frequency reading on the multimeter display, indicating the pulse rate.
It’s like tuning into the right radio station to hear your favorite song; getting the correct frequency ensures you’re reading the injector’s pulse accurately. If the frequency is out of expected range, it might be a sign of faulty wiring or a malfunctioning injector.
Observing Injector Response
Once the multimeter is set up, observe the injector response as you start the engine. Does the frequency change smoothly with varying engine RPMs? If it does, your injector is likely in good condition. If not, you might need further inspection. A consistent pulse frequency shows the injector is receiving consistent signals from the engine.
Think of this process as a health check for your car’s heart. You wouldn’t want to skip regular check-ups, right? Observing how the injector responds helps ensure your vehicle runs efficiently and saves you from costly repairs.
Analyzing Results
After testing a fuel injector with a multimeter, understanding the readings is crucial. The numbers you see tell you if the injector works well or needs replacement. Analyzing these results helps avoid engine problems and saves money on repairs.
Careful comparison of your readings with standard values gives clear insight. This analysis guides the next steps to keep your vehicle running smoothly.
Normal Vs Faulty Injector Readings
Normal fuel injector resistance usually falls between 12 and 17 ohms for most cars. Some models may vary, so check your vehicle manual.
Faulty injectors show resistance values outside this range. Readings too high or too low indicate problems like:
- Broken wiring inside the injector
- Clogged or damaged injector coil
- Short circuits or open circuits
Stable readings mean the injector coil is intact. Fluctuating or infinite readings show an open circuit or coil failure.
Next Steps After Testing
If the injector passes, clean it for better performance. Use injector cleaner or professional services.
For faulty injectors, replacement is often necessary. Continued use can harm the engine and reduce fuel efficiency.
Check wiring and connectors for damage if readings are inconsistent. Sometimes, the injector itself is fine but wiring causes issues.
Test all injectors to ensure uniform performance. One bad injector affects the entire engine operation.
Credit: www.yourmechanic.com
Frequently Asked Questions
How Do I Test A Fuel Injector With A Multimeter?
To test a fuel injector, set your multimeter to Ohms. Disconnect the injector, then measure its resistance. A typical reading ranges from 12 to 17 Ohms, indicating a good injector coil.
What Resistance Should A Fuel Injector Show?
A healthy fuel injector usually shows resistance between 12 and 17 Ohms. Values outside this range may indicate a faulty injector or wiring issues.
Can A Multimeter Detect All Fuel Injector Problems?
A multimeter tests only the injector’s electrical resistance. It cannot detect clogging or mechanical issues, which require other diagnostic methods.
Is It Necessary To Disconnect The Injector Before Testing?
Yes, always disconnect the fuel injector from the wiring harness. This ensures an accurate resistance reading without interference from other components.
Conclusion
Testing a fuel injector with a multimeter is simple and useful. You can find faults early and save money on repairs. Follow the steps carefully and check resistance values. This helps ensure your engine runs smoothly and efficiently. Regular checks keep your vehicle in good shape.
Use your multimeter often to catch problems fast. Stay safe and work in a clean, dry place. Now, you know how to test fuel injectors yourself. Give it a try and keep your car healthy.