
If your car is acting up or not starting right, the distributor could be the problem. But how do you know for sure?
Testing a distributor with a multimeter is a simple way to find out if it’s working properly. In this guide, you’ll learn step-by-step how to check your distributor quickly and accurately. By the end, you’ll save time, avoid costly repairs, and get your engine running smoothly again.
Ready to take control of your car’s health? Let’s dive in.
Tools Needed
Before you start testing a distributor with a multimeter, gathering the right tools is essential. The accuracy of your test depends heavily on the equipment you use. Having the proper tools not only saves time but also prevents unnecessary frustration during the process.
Choosing The Right Multimeter
Selecting a reliable multimeter is your first priority. Look for one with clear digital readings rather than an analog dial; digital models are easier to read and reduce the chance of errors. A multimeter with a continuity test feature is especially useful for checking the distributor’s internal circuits.
Consider the multimeter’s range settings—ensure it can measure low resistance values since distributor components often have small resistance levels. If you want precision, a multimeter with auto-ranging capability can help by automatically adjusting to the right measurement scale. Have you ever struggled to read tiny needle movements on an analog meter? Switching to digital can make all the difference.
Additional Equipment
Besides the multimeter, a few other items make the testing process smoother. A good set of insulated probes or test leads helps avoid accidental shorts and makes it easier to reach tight spots inside the distributor. You might also want a small flashlight to illuminate the distributor’s interior, especially if you’re working in a dim garage.
Don’t forget safety gear like gloves and safety glasses to protect yourself from sparks or debris. Finally, having a wiring diagram of your specific distributor can be a huge help. It guides you on where to connect the multimeter probes, preventing guesswork and potential damage to the components.

Credit: www.youtube.com
Safety Precautions
Testing a distributor with a multimeter involves working with your vehicle’s electrical system, which requires careful attention to safety. Taking proper precautions protects you from electric shocks and prevents damage to your car’s components. Never rush through these steps; your safety and your vehicle’s health depend on it.
Disconnecting The Battery
Before you touch any electrical parts, disconnect your car’s battery. This stops any accidental current flow that could cause shocks or short circuits. Use a wrench to loosen the negative terminal first, then the positive. Keep the terminals apart to avoid accidental contact.
Have you ever experienced a sudden spark while working on your car? That’s a clear sign you didn’t disconnect the battery properly. Taking this simple step saves you from unexpected shocks and costly repairs.
Working In A Safe Environment
Choose a well-lit, dry workspace to test your distributor. Moisture and poor lighting increase the risk of mistakes and accidents. Make sure your tools, including the multimeter, are in good condition and rated for automotive use.
Clear your work area from clutter and flammable materials. This reduces distractions and hazards. Standing on a non-conductive surface, like a rubber mat, adds an extra layer of protection.
Locating The Distributor
Locating the distributor is the first step to testing it with a multimeter. The distributor controls the flow of electricity to the spark plugs. Finding it on your engine helps you check its condition. Most distributors sit near the engine block’s front or side. Some engines have a cap that looks like a round hat. This cap covers the internal parts of the distributor.
Identifying Distributor Components
The distributor has several parts you need to know. The distributor cap is the plastic cover on top. Underneath, you find the rotor. The rotor spins and sends electricity to the right spark plug. There are also points or electronic modules inside. These parts help control the timing of the spark. Wires connect the distributor to the spark plugs and ignition coil. Knowing these parts helps you check them with a multimeter.
Accessing The Distributor
Finding the distributor is easy with the engine off and cool. Open the hood and look near the engine’s front. Look for the round plastic cap with wires attached. Sometimes, other parts block the view. Remove air filters or covers if needed. Use a flashlight to see better inside the engine bay. Take care not to touch hot or moving parts. Once visible, you can start testing the distributor with your multimeter.
Setting Up The Multimeter
Setting up the multimeter correctly is the first step to test a distributor. A proper setup ensures accurate readings and helps avoid damage to the tool or the distributor. This process involves choosing the right mode on the multimeter and calibrating it before use.
Selecting The Correct Mode
Turn on the multimeter and check the dial or buttons for mode selection. Choose the mode based on the distributor test type. For resistance checks, select the ohmmeter or resistance mode (Ω). For voltage checks, choose the DC voltage mode (V). This selection ensures the multimeter measures the right electrical property.
Calibrating The Meter
Before testing, calibrate the multimeter to ensure accuracy. Connect the test leads together and observe the reading. The meter should show zero or close to zero in resistance mode. If it doesn’t, use the calibration knob or adjust settings until it reads zero. This step prevents incorrect readings during the distributor test.
Testing The Primary Coil
Testing the primary coil requires setting your multimeter to the ohms setting. Connect the probes to the coil terminals and check for proper resistance. A reading outside the normal range indicates a faulty coil needing replacement.
Testing the primary coil of a distributor with a multimeter is a crucial task for anyone diving into auto maintenance. This coil is essentially the heartbeat of your vehicle’s ignition system, transforming low voltage from the battery into the high voltage needed to fire the spark plugs. Understanding how to test it with precision can save you from unexpected roadside breakdowns and costly repairs.Measuring Resistance
Begin by setting your multimeter to measure resistance, often indicated by the ohm symbol (Ω). Disconnect the coil from the distributor to ensure accurate readings. Attach the multimeter probes to the coil’s terminals. The primary coil typically has two main terminals. You’re looking for a resistance value between 0.3 and 1.0 ohms.Interpreting Results
A reading within the specified range indicates a healthy primary coil. If your measurement falls outside this range, it might signal damage or wear. A zero reading suggests a short circuit, while an extremely high reading could mean an open circuit. Consider your next steps carefully. If your coil shows anomalies, it might be time to replace it. But what if everything seems fine, and yet the car still struggles to start? It might be worth exploring other parts of the ignition system. Remember, your multimeter is like a trusted advisor in this scenario, offering insights and guidance. But ultimately, you decide the course of action. How confident are you in your understanding of your vehicle’s intricate workings?Credit: www.toyotanation.com
Testing The Secondary Coil
Testing the secondary coil of a distributor is a crucial step to ensure your ignition system is functioning correctly. This coil handles the high-voltage output that ultimately fires the spark plugs. Checking it with a multimeter helps you catch issues before they cause engine misfires or poor performance.
Probing The Terminals
First, locate the secondary coil terminals on your distributor. These are usually the points where the high-voltage wire connects. With your multimeter set to the ohms (Ω) setting, touch the probes to these terminals carefully.
Be sure your multimeter leads make good contact without slipping. Avoid touching the metal parts of the probes with your fingers, as this can affect the reading. If the distributor is still installed, disconnect the ignition wire to get an accurate measurement.
Expected Resistance Values
After probing, check the resistance reading on your multimeter. Most secondary coils should show a resistance between 6,000 and 15,000 ohms, but this range can vary by manufacturer. If your reading is outside this range, it’s a clear sign the coil may be failing.
Keep in mind that a very low or zero resistance suggests a shorted coil, while an extremely high or infinite reading points to a broken wire or open circuit. Do you have your distributor’s specs handy? It’s always best to compare your readings with the exact values for your model.
Checking The Points And Condenser
Testing the points and condenser helps check the distributor’s electrical condition. Use a multimeter to measure resistance and continuity for accurate results. This step ensures the ignition system works properly and prevents engine problems.
Checking the Points and Condenser The distributor plays a crucial role in your vehicle’s ignition system. It helps in delivering the spark to ignite the fuel-air mixture. Inside the distributor, points and condenser are vital components. They ensure proper current flow and voltage regulation. Testing them can prevent ignition issues and ensure smooth engine operation.Inspecting For Wear
Begin by inspecting the points visually. Look for signs of wear or damage. Burnt or pitted points indicate excessive arcing. This can lead to poor performance. Also, check the condenser. It should be free from corrosion and physical damage. A faulty condenser might cause ignition timing issues.Testing With Multimeter
To test the points, set your multimeter to measure resistance. Connect the probes to the point terminals. The reading should be zero ohms when closed. If not, the points might be faulty. Next, test the condenser. Switch the multimeter to the capacitance setting. Connect the probes to the condenser terminals. A reading within the specified range indicates a healthy condenser. If the reading is off, consider replacing it. Testing these components ensures reliable distributor function.Troubleshooting Common Issues
Troubleshooting common issues with your distributor can save you time and money. Using a multimeter to test the distributor helps pinpoint the exact problem rather than guessing. This section will guide you through identifying faulty parts and deciding when it’s time to replace the distributor entirely.
Identifying Faulty Components
Start by checking the distributor cap and rotor for cracks or carbon tracks, which can cause misfires. Use your multimeter to test the resistance of the ignition coil and pickup coil—values outside the manufacturer’s specifications usually indicate failure.
Pay attention to these signs:
- Open circuit readings on the pickup coil
- Unusual resistance in the ignition coil primary or secondary windings
- Physical damage like corrosion or burns inside the distributor cap
Sometimes, a simple cleaning of contacts inside the distributor can restore function. But if your multimeter shows inconsistent readings or no continuity where there should be, that’s a strong clue that a component is faulty.
When To Replace The Distributor
Ask yourself: is the distributor worn out beyond repair? If multiple components inside fail or if the distributor shaft is loose, replacement is often the safest choice.
Here are clear signs replacement makes sense:
- Continuous electrical faults despite testing and cleaning
- Excessive wear causing timing issues
- Damaged distributor housing or inability to maintain ignition timing
Replacing the distributor can seem like a hassle, but it can prevent future breakdowns and improve engine performance. Have you ever struggled with a stubborn ignition problem only to find the distributor was the root cause? Testing with a multimeter can save you from that frustration.
Tips For Accurate Testing
Testing a distributor with a multimeter needs care and attention. Accurate testing helps find real issues. Small errors can give wrong results. Follow these tips to get precise readings and save time.
Ensuring Proper Connections
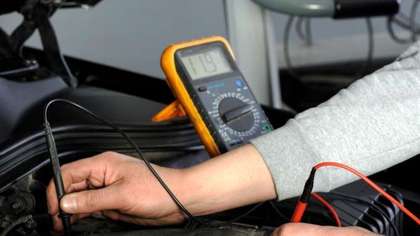
Check the multimeter leads before starting. Make sure the probes are clean and not damaged. Connect the black lead to the multimeter’s common (COM) port. Attach the red lead to the voltage or resistance port. Hold the probes firmly on distributor terminals to avoid slips.
Secure the distributor wires to avoid loose connections. A shaky connection can cause fluctuating readings. Turn off the ignition before testing. This prevents electric shocks and protects the multimeter. Also, test in a dry place to avoid short circuits.
Avoiding Common Mistakes
Do not guess the multimeter setting. Choose the correct mode: voltage, resistance, or continuity. Using the wrong setting can damage the meter or give false results. Always start with the highest range and move down if needed.
Do not touch the metal parts of the probes during testing. Your body can affect the reading. Keep your hands steady to stop erratic measurements. Avoid testing while the engine runs unless specified. Engine running can cause voltage spikes and confuse results.
Double-check the distributor’s wiring diagram before testing. Testing the wrong wires wastes time and causes errors. Write down readings to compare later. This helps track changes and pinpoint faults better.
Credit: car-repair.carsdirect.com
Frequently Asked Questions
How Do I Test A Distributor With A Multimeter?
Set the multimeter to the ohms setting. Measure resistance between the distributor terminals. Compare readings to the manufacturer’s specs. If readings are off, the distributor may be faulty.
What Resistance Values Indicate A Bad Distributor Coil?
Resistance values below or above the specified range suggest a bad coil. Check the manual for exact values. Out-of-range readings mean the coil or distributor needs replacement.
Can A Multimeter Detect Distributor Cap Issues?
A multimeter can check continuity but not physical damage. Inspect the distributor cap visually for cracks or carbon tracking. Use the multimeter for electrical tests only.
When Should I Test The Distributor With A Multimeter?
Test the distributor if you experience engine misfires, rough idling, or starting problems. Early testing helps diagnose ignition system issues and prevents further damage.
Conclusion
Testing a distributor with a multimeter helps find engine problems fast. Follow the steps carefully for accurate results. Always check the multimeter settings before you start. A good test can save time and money on repairs. Keep your tools clean and work in a safe place.
With practice, testing becomes easier and more reliable. Stay patient and double-check your readings. This simple skill keeps your car running smoothly. Try testing regularly to catch issues early. Easy and useful for any car owner.