Have you ever tried to peel off a screen protector from your phone and ended up frustrated or worried about damaging your screen? Removing a screen protector might seem simple, but if you’re not careful, it can cause scratches or leave sticky residue behind.
In this guide, you’ll learn easy, safe steps to take your screen protector off quickly and cleanly—without any stress. Keep reading, and you’ll be ready to refresh your phone’s look or replace that old protector in no time.
Prepare Your Workspace
Preparing your workspace is a crucial first step before removing a screen protector from your phone. A well-organized area helps prevent accidental damage and keeps dust or debris from getting under your screen. Taking a few moments to set up properly can save you from frustration later on.
Clean Surface Setup
Choose a flat, stable surface with good lighting. A clean desk or table works best—avoid carpet or soft surfaces where small particles can stick to your phone. Wiping the area with a microfiber cloth removes dust and dirt that could scratch your screen during the process.
Consider working near a window or under a bright lamp to see fine details clearly. You don’t want to miss any cracks or edges when peeling off the protector. Have a small container or tray nearby to hold tiny screws or tools so they don’t roll away.
Gather Necessary Tools
Before you start, collect the items you’ll need to make the removal smooth and safe. Common tools include a plastic card (like an old credit card), a microfiber cloth, and adhesive tape. These help lift the protector gently without scratching the screen.
Some people find a hairdryer useful to warm the edges slightly, making the adhesive easier to separate. However, be careful with heat to avoid damaging your phone. Having everything ready in one place means you won’t have to interrupt your work once you begin.
Turn Off Your Phone
Turning off your phone prevents accidental touches while removing the screen protector. This makes the process safer and easier to handle.
Turning off your phone is a crucial first step. It ensures safety while removing the screen protector. A powered-on phone can cause accidental changes or damage. This is especially true with touch-sensitive devices.Why Power Off Your Device?
Turning off your phone helps avoid accidental screen taps. It prevents any internal damage while peeling off the protector. A powered device may misinterpret touch during removal.Steps To Shut Down Your Phone Safely
- Press the power button until the screen shows options.
- Select the ‘Power Off’ option on the screen.
- Wait until the screen turns completely black.
Benefits Of Turning Off Your Phone
Turning off minimizes risk to internal components. It also helps you focus on removing the protector carefully. This reduces stress and ensures better results.Locate The Screen Protector Edge
Before you try to peel off your phone’s screen protector, it’s crucial to find its edge first. Knowing exactly where the screen protector begins makes the removal process much easier and reduces the risk of damaging your screen. Sometimes the edge is obvious, but often it’s subtle and blends with the phone’s surface, so you’ll need a careful eye and a steady hand.
Check For Lifted Corners
Start by examining the corners of your screen. Corners tend to lift slightly after some use, making them the best place to begin your search. Look closely at each corner under good light—do you see any part that seems raised or separated from the screen?
If you find a lifted corner, gently try to peel it up a bit with your fingertip. Don’t force it; a little wiggle can help reveal the edge without cracking the protector. If none of the corners show signs of lifting, move on to the sides and edges, as sometimes the screen protector may start to peel there.
Use A Fingernail Or Card
If your fingernail is strong and sharp, it can be the perfect tool to lift the edge without scratching the screen. Carefully slide your nail under the edge you found and lift gently. If your nails aren’t strong enough or you’re worried about damage, grab a thin plastic card instead—like an old credit card or gift card.
Slide the card slowly under the edge and move it back and forth to loosen the protector. This approach avoids putting too much pressure on one spot and helps lift the protector evenly. Have you noticed how a smooth, steady motion works better than quick jerks? That’s because it reduces the chance of cracking or leaving residue behind.
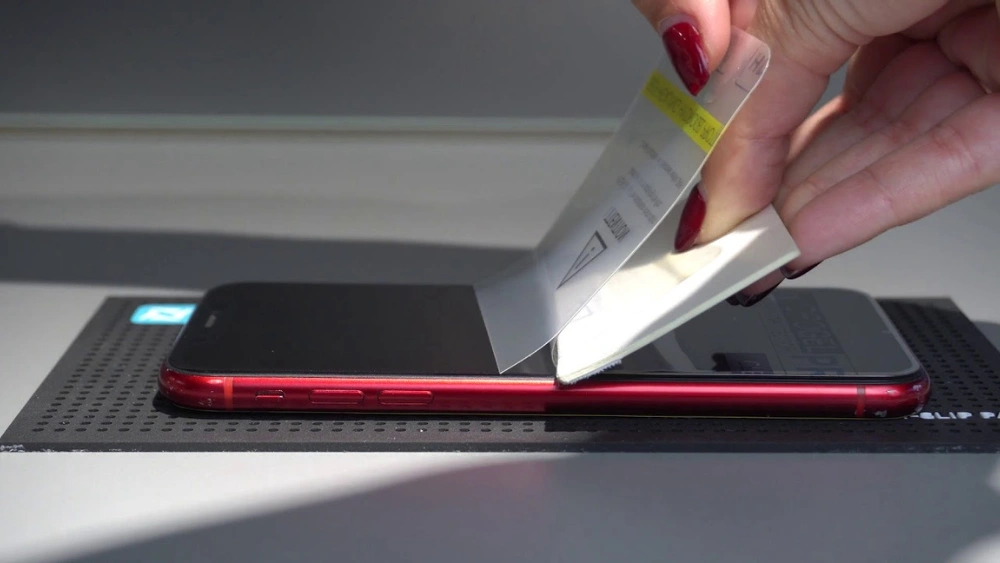
Peel Off The Screen Protector
Removing a screen protector requires care to avoid damage. Peeling it off slowly helps keep your phone safe. Follow simple steps to lift the protector without leaving residue or scratches. Patience is key during this process.
Lift Slowly And Gently
Start lifting the screen protector from one corner. Use your fingernail or a soft tool to create a small gap. Pull the protector back slowly at a low angle. This prevents sudden tears or leaving sticky residue. Taking your time helps keep the screen clean and undamaged.
Avoid Bending Or Cracking
Do not bend the screen protector sharply. Sharp bends can crack or break it into pieces. Instead, keep the protector flat while peeling it off. Handle it gently to maintain its shape. This also reduces the risk of scratching your phone screen.
Remove Residue From The Screen
Removing residue from your phone screen after taking off a screen protector can be trickier than you expect. Sticky patches or tiny bits of adhesive often cling to the glass, making your screen look dirty or smudged. Cleaning it properly not only restores clarity but also prepares the surface for a new protector or case.
Use A Microfiber Cloth
A microfiber cloth is your best friend for wiping away leftover residue without scratching the screen. These cloths attract dust and oils effectively thanks to their fine fibers.
Gently rub the screen in small circular motions. Avoid pressing too hard; the goal is to lift residue, not spread it around. You might notice the cloth picking up sticky spots as you go—keep flipping to a clean side.
Apply Screen Cleaner If Needed
If the microfiber cloth alone doesn’t do the job, a screen cleaner designed for electronics can help dissolve stubborn adhesive. Choose a cleaner free from ammonia or harsh chemicals to protect your screen’s coating.
Spray a small amount onto the cloth, never directly on the screen. Then wipe gently, focusing on sticky patches. You’ll be surprised how quickly these cleaners erase residue, leaving your screen spotless and ready for use.
Inspect The Phone Screen
Before peeling off your phone’s screen protector, take a close look at the screen beneath. This inspection is crucial because it helps you understand the condition of your phone’s display and prepares you for applying a new protector smoothly. Skipping this step might leave you with surprises like cracks or dirt trapped under the new layer.
Check For Damage
Look carefully for any scratches, cracks, or dead pixels on the screen. Sometimes, damage hides under the protector, and removing it reveals problems you didn’t notice before. If you spot any damage, decide whether you need a screen repair before adding a new protector.
Wipe the screen gently with a microfiber cloth to remove dust or fingerprints. Dust particles can cause bubbles when you place the new protector, so a clean surface is key. Take your time here—rushing can lead to frustration later.
Prepare For New Protector
After checking for damage, get your screen ready for the new protector. Ensure your hands are clean and dry to avoid leaving oils or dirt on the screen. Find a well-lit, dust-free area to work in; even tiny particles can stick to the screen and ruin the new protector’s adhesion.
Consider using a dust removal sticker or tape to pick up any remaining particles. This extra step can save you from those annoying bubbles that are hard to remove. Have your new screen protector and any installation tools within reach to make the process smooth and stress-free.
Frequently Asked Questions
How Do I Safely Remove A Screen Protector From My Phone?
To remove a screen protector safely, start at one corner and lift gently using your fingernail or a thin plastic card. Avoid using sharp objects to prevent screen damage. Slowly peel it off to minimize residue and protect your phone’s display.
Can I Reuse A Removed Screen Protector?
Most screen protectors cannot be reused after removal. They lose adhesive strength and may collect dust or dirt. For optimal protection and clarity, it’s best to replace the screen protector with a new one.
What If The Screen Protector Leaves Adhesive Residue?
Use a microfiber cloth lightly dampened with isopropyl alcohol to clean off residue. Avoid harsh chemicals or abrasive materials to prevent screen damage. Gently wipe the surface until clean and dry before applying a new protector.
How Long Should I Wait Before Applying A New Protector?
It’s best to apply a new screen protector immediately after removing the old one. Ensure the screen is clean and dry to prevent bubbles and ensure strong adhesion for lasting protection.
Conclusion
Removing a screen protector can be simple and quick. Use gentle pressure and patience to avoid damage. Clean your phone’s screen after removal for best results. Keep your phone safe by choosing the right protector next time. Small care steps help your device last longer.
Taking off a screen protector does not have to be hard. Try these easy tips for a smooth experience. Your phone will look clear and fresh again.