Are you struggling to understand how to read resistance on your multimeter? You’re not alone.
Knowing how to measure resistance accurately is a key skill for fixing electronics, troubleshooting circuits, and ensuring everything works smoothly. But if you’re new to using a multimeter, those numbers and settings can feel confusing. Don’t worry—this guide will walk you through each simple step.
By the end, you’ll feel confident reading resistance values and using your multimeter like a pro. Keep reading—you’re about to unlock a skill that will save you time and frustration on your next project.

Credit: www.youtube.com
Choosing The Right Multimeter
Choosing the right multimeter is essential for accurate resistance measurement. The right tool saves time and prevents errors. Not all multimeters offer the same features or ease of use. Understanding the differences helps you pick the best one for your needs.
Digital Vs Analog Multimeters
Digital multimeters show readings on an LCD screen. They provide clear, easy-to-read numbers. Their accuracy is usually higher than analog meters. They also offer features like auto-ranging, which adjusts the scale automatically.
Analog multimeters use a needle to show measurements. They require more skill to read and interpret. Analog meters can be useful for observing changes quickly. They are often less expensive but less precise.
For resistance measurement, digital multimeters are generally better. They reduce reading mistakes and save time.
Key Features For Resistance Measurement
- Auto-Ranging:Adjusts scale automatically for easier readings.
- High Accuracy:Provides precise resistance values.
- Clear Display:Large digits and backlight help in low light.
- Continuity Test:Sounds a beep when resistance is very low.
- Range of Resistance:Check if it covers the resistance values you need.
Choosing a multimeter with these features simplifies resistance measurement. It ensures better results and user confidence.

Credit: www.facebook.com
Preparing The Multimeter
Before you dive into measuring resistance, getting your multimeter ready is crucial. This preparation ensures accurate readings and protects both your device and the component you’re testing.
Setting The Resistance Mode
First, turn on your multimeter and look for the resistance setting, often marked with the Greek letter omega (Ω). This symbol represents resistance and guides you to the correct mode quickly.
Switch the dial or press the mode button until you see the Ω symbol displayed. If your multimeter has multiple modes, double-check you are not in continuity or diode test mode, as these will give you incorrect resistance readings.
Selecting The Correct Range
Choosing the right range is key to getting a precise measurement. If your multimeter isn’t auto-ranging, you’ll need to select the range manually.
Start with the highest range available and then move down until the display shows a stable reading. This prevents overload and protects the multimeter from damage.
For example, if you expect a resistance around 500 ohms, set the range slightly higher, like 2kΩ, then narrow it down for better accuracy. Have you noticed how skipping this step can lead to confusing results or damage to your meter?
Testing Resistance Safely
Testing resistance safely is key to accurate readings and personal safety. A multimeter can measure resistance only under the right conditions. Ignoring safety steps can damage the device or cause injury. Follow careful steps to protect yourself and your equipment.
Ensuring Power Is Off
Always turn off power to the circuit before testing resistance. Measuring resistance on a live circuit can harm the multimeter and give wrong results. Disconnect batteries or unplug the device. Verify power is completely off using a voltage test. This step prevents electric shocks and protects the meter.
Handling Components Properly
Hold components by their edges to avoid damage. Do not touch metal leads with your fingers. Oils and static from skin can affect readings and harm sensitive parts. Use insulated tools if needed. Place components on a clean, dry surface during testing. Handle parts gently to avoid breaking or bending them.
Measuring Resistance Step-by-step
Measuring resistance with a multimeter is simple and useful for many electronics tasks. Follow clear steps to get accurate readings. This guide breaks down the process into easy actions. Each step helps avoid mistakes and ensures reliable results.
Connecting The Probes
Turn off power to the circuit or device. Set the multimeter to the resistance mode, often marked with the omega symbol (Ω). Insert the black probe into the common (COM) port. Insert the red probe into the port marked for resistance (Ω).
Touch the probes to the two points where resistance needs measuring. Ensure firm contact. Avoid touching the metal parts of the probes with your fingers, as this can affect the reading.
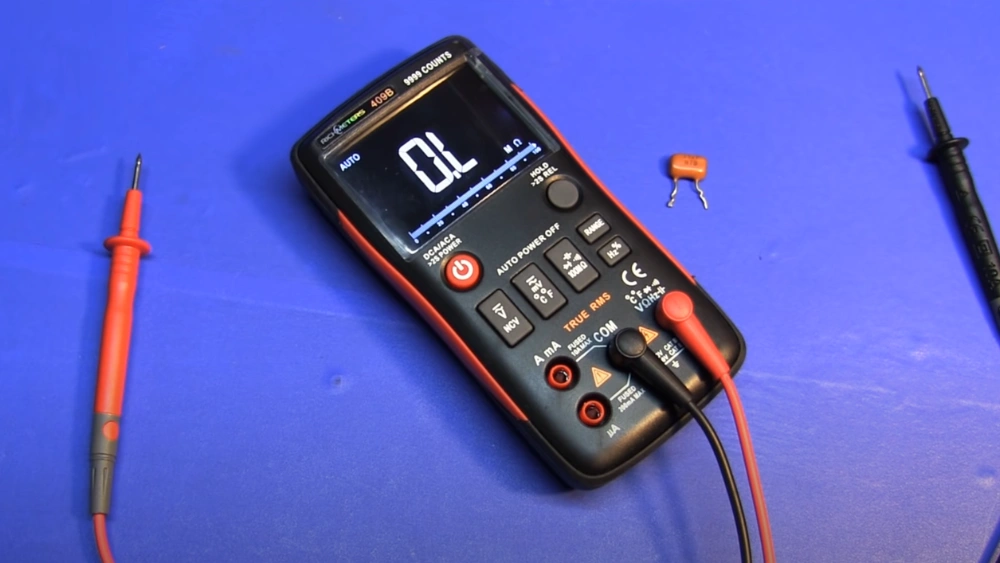
Reading The Display
Check the multimeter screen for the resistance value. The number shows resistance in ohms (Ω). If the multimeter shows “OL” or “1,” the resistance is too high or the circuit is open.
Wait a moment for the reading to stabilize. Some meters take a second or two to show the correct value. If the reading fluctuates, adjust the probe position to ensure good contact.
Interpreting The Results
Low resistance means good electrical connection or a short circuit. High resistance can mean a broken wire or faulty component. Compare the reading with the expected value from a datasheet or manual.
Use the resistance value to decide if a component is working properly. Replace parts that show very high or zero resistance when they shouldn’t. Accurate interpretation helps with effective repairs and troubleshooting.
Common Issues And Troubleshooting
Reading resistance on a multimeter can be straightforward, but occasionally, you might face common issues that require troubleshooting. Whether you’re a beginner or have some experience, these challenges can be frustrating. Let’s dive into how you can address these issues and ensure your multimeter gives accurate readings.
Inconsistent Readings
Ever found yourself doubting the numbers on your multimeter? Inconsistent readings can often be attributed to poor connections. Ensure your probes are firmly attached to the resistor and that the contact points are clean.
Another factor could be the battery life of your multimeter. A low battery can cause erratic readings. Always check the battery level, and replace it if necessary.
Multimeter Shows Ol Or 0l
Seeing an OL or 0L display can be perplexing. This usually indicates a very high resistance or an open circuit. Ensure the resistor is properly connected and that there’s no break in the circuit path.
If the issue persists, it could be a faulty resistor. Try testing another resistor to rule out equipment failure. This simple swap can save you from unnecessary headaches.
Dealing With High Resistance
High resistance can sometimes be tricky. Make sure your multimeter is set to the correct range. If the resistance is beyond the scale of your multimeter, it will struggle to provide an accurate reading.
Consider using a different multimeter with a higher range. Sometimes, it’s about having the right tool for the job. Do you have a multimeter that suits your needs?

Credit: www.facebook.com
Tips For Accurate Measurements
Accurate resistance readings depend on careful preparation and technique. Small mistakes can cause wrong results. Follow these tips to improve your measurement accuracy and trust your multimeter readings.
Calibrating Your Multimeter
Regular calibration keeps your multimeter precise. Check the manual for calibration instructions. Use a known resistor or a calibration tool to verify accuracy. Calibration ensures the device measures true resistance values.
Avoiding Contact Resistance
Contact resistance can add error to your reading. Clean the component leads and probe tips before testing. Hold probes firmly but gently to avoid unstable contact. Avoid touching metal parts with your fingers to reduce interference.
Using Proper Probe Techniques
Use the correct probe settings for resistance measurement. Place the probes directly on the resistor leads. Keep the probes steady and avoid moving them during reading. Use sharp, pointed probes for better contact on small components.
Frequently Asked Questions
What Is Resistance And Why Measure It With A Multimeter?
Resistance is how much a material opposes electrical current. Measuring it with a multimeter helps check circuit health and component functionality.
How Do I Set My Multimeter To Measure Resistance?
Turn the dial to the resistance symbol (Ω). Choose the correct range if your multimeter is not auto-ranging.
How Do I Read Resistance Values On A Multimeter?
Read the number displayed on the screen in ohms (Ω). Higher numbers mean higher resistance.
Can I Measure Resistance Without Disconnecting The Circuit?
It’s best to disconnect power and the component to avoid inaccurate readings and damage to the multimeter.
Conclusion
Reading resistance on a multimeter is simple with practice. Set the dial to the right resistance range. Connect the probes to the component’s ends. Watch the display for the resistance value. Always check your connections and settings twice. This skill helps in fixing and testing electronics at home.
Keep your multimeter handy for quick checks anytime. Understanding resistance lets you work safely and confidently. Try it today, and see how easy it becomes.