Have you ever had your Popsocket top pop off at the worst moment? It’s frustrating, right?
You want your phone grip back, but you’re not sure how to fix it without breaking anything. Don’t worry—you’re in the right place. This guide will show you exactly how to put your Popsocket top back on, step by step.
By the end, you’ll have your favorite phone accessory working like new again. Keep reading, and get ready to say goodbye to the hassle!
Tools Needed
Before you start putting the Popsocket top back on, gathering the right tools can make the process smoother and less frustrating. Having everything ready saves time and prevents unnecessary fumbling.
Sometimes, the challenge isn’t just snapping the top back on but handling the tiny parts with care. Do you have what you need to keep a steady grip and avoid damaging your Popsocket?
Sticky Adhesive Or Double-sided Tape
The adhesive is the key to ensuring your Popsocket top stays securely attached. If the original adhesive is worn out, replacing it with a high-quality double-sided tape or a sticky adhesive patch is essential.
Look for tape that’s thin and strong—too thick, and the top won’t fit properly. Have you checked if your adhesive is still sticky enough before reattaching?
Clean Cloth Or Alcohol Wipes
Cleaning the surface before reattaching the top is often overlooked. Dirt or oil can prevent the adhesive from sticking well, causing the top to fall off again.
Use a clean cloth or alcohol wipes to gently clean both the Popsocket base and the top surface. This small step can save you from repeating the process multiple times.
Precision Tweezers Or Small Pliers
If your Popsocket top is small or slippery, tweezers or small pliers can help you hold it steady during reattachment. This tool offers better control and prevents smudging the adhesive with your fingers.
Have you ever struggled to hold tiny objects steady? Tweezers might be the simple solution you never thought to use.
Optional: Hair Dryer Or Heat Source
Sometimes, warming up the adhesive slightly with a hair dryer can improve stickiness. The heat activates the glue, helping it bond better to the surface.
Be cautious not to overheat—just a few seconds of warm air can do the trick. Have you tried this tip to revive sticky backs before?
Remove Old Adhesive
Have you ever tried to reattach a Popsocket top only to find the adhesive isn’t as sticky as before? It’s a common issue, but with a little effort, you can restore your Popsocket’s grip. The first step is to remove the old adhesive, ensuring a clean surface for the new adhesive to stick effectively.
Soften Adhesive Residue
Begin by softening the leftover adhesive. Try using a hairdryer on a low setting to gently warm the adhesive.
The heat will help loosen the residue, making it easier to peel off. Be careful not to overheat the plastic, as this can cause damage.
Alternatively, you can use a warm, damp cloth to achieve a similar effect. Simply press the cloth against the adhesive for a few minutes.
Clean Surface Thoroughly
Once the adhesive is softened, it’s time to clean the surface. Use a mixture of mild soap and water to scrub away any remaining residue.
A soft-bristled toothbrush can be particularly useful for this task, allowing you to get into those hard-to-reach grooves.
Finish by wiping the area with a clean, dry cloth to ensure no moisture remains. Do you feel the satisfaction of a clean surface yet?
With the old adhesive gone, you’re one step closer to reattaching your Popsocket top securely. Are you ready to give your Popsocket a fresh start?
Prepare Popsocket Top
Preparing the Popsocket top is important before reattaching it. A clean and secure surface ensures the top sticks well. This step helps avoid future detachment problems and keeps the Popsocket looking good.
Inspect For Damage
Check the Popsocket top for cracks or breaks. Look closely at the edges and surface. If any damage exists, the top might not fit properly. Also, check the base for dirt or residue. Clean off any dust or grease to help the adhesive stick better.
Apply New Adhesive
Old adhesive loses stickiness over time. Remove any leftover glue carefully from the base and the top. Use a mild cleaner or rubbing alcohol to clean both parts. Let them dry completely before applying new adhesive.
Use a strong, double-sided adhesive tape or glue designed for small surfaces. Cut the tape to fit the Popsocket top shape. Press the adhesive firmly on the top. Avoid air bubbles for a smooth fit. Now, the Popsocket top is ready to be attached again.
Attach Popsocket Top
Attaching the Popsocket top back onto the base is a simple task, but it requires a bit of care to make sure it fits securely. If you’ve ever tried to snap it on without aligning it properly, you know it can feel frustrating. Getting this step right ensures your Popsocket stays in place and functions well every time you use it.
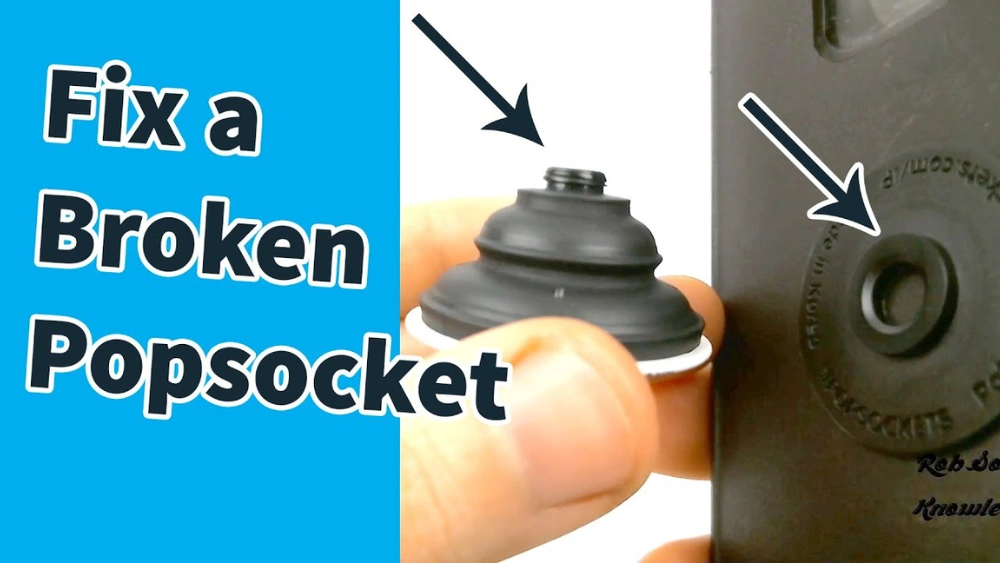
Align Correctly
Start by checking the grooves on both the Popsocket top and the base. They need to line up exactly for the top to snap on properly. If the alignment is off, the top won’t secure, and you risk it popping off unexpectedly.
Take a moment to rotate the top gently while holding the base steady. This helps you find the perfect position where the grooves interlock smoothly. Have you noticed how a slight twist can make all the difference?
Press Firmly
Once aligned, press the top down onto the base with steady, even pressure. Avoid pushing too hard at one spot; instead, apply pressure evenly across the surface. This ensures the mechanism locks in place without damaging any parts.
If it doesn’t click right away, don’t give up. Try pressing again, this time focusing on a firm, consistent push. You’ll feel and hear a satisfying snap when it’s locked in correctly.
Allow Adhesive To Set
Allowing the adhesive to set is key to securing the Popsocket top firmly. This stage ensures the glue bonds well to the phone or case surface. Skipping this step can cause the Popsocket to fall off again quickly. Patience here saves frustration later.
Recommended Waiting Time
Wait at least 12 hours after pressing the Popsocket top onto the adhesive. This time lets the glue dry fully and stick tightly. Avoid rushing this period; it helps create a strong hold. For best results, 24 hours is ideal.
Avoid Usage During Setting
Do not use or pull on the Popsocket during the adhesive setting time. Any movement can weaken the bond and cause lifting. Keep the phone steady and avoid pressure on the Popsocket. Let the glue cure without disturbance for a lasting fit.
Tips To Prevent Future Detachment
Keeping your Popsocket top firmly attached saves you time and frustration. Small habits can make a big difference in preventing it from popping off again. Let’s look at practical tips that help maintain a strong grip and extend the life of your Popsocket.
Proper Cleaning Routine
Dirt and oils on the phone surface or the Popsocket base weaken the adhesive. Clean both areas gently but thoroughly before attaching the top.
- Use a soft, lint-free cloth slightly dampened with rubbing alcohol.
- Wipe away any dust, grease, or residue.
- Let both surfaces dry completely before pressing the top back on.
I once skipped cleaning and reattached my Popsocket top quickly. It slipped off the next day. That taught me the importance of taking a minute to clean properly. Have you ever noticed how a small amount of dust reduces stickiness?
Avoid Excessive Force
Popsocket tops are designed to snap on and off with gentle pressure. Applying too much force risks damaging the attachment mechanism or loosening the adhesive.
- Press firmly but steadily when putting the top back on.
- Don’t twist or yank the top aggressively.
- Handle your phone carefully to avoid sudden impacts that might jar the Popsocket loose.
Think about how you handle your Popsocket daily. Are you rough with it when you grab or pull your phone? A lighter touch can keep your Popsocket secure much longer.
Frequently Asked Questions
How Do I Reattach A Popsocket Top?
To reattach a Popsocket top, align it with the base and press down firmly. Twist gently until it clicks into place. Ensure it fits snugly for secure use.
Can I Reuse The Adhesive When Putting Popsocket Back?
No, the adhesive loses strength after removal. Use a new adhesive or Popsocket mount for best results. This ensures a strong, lasting hold on your phone.
What If My Popsocket Top Won’t Stay On?
Check if the base or top is damaged or dirty. Clean both surfaces and try reattaching. If it still won’t stay, consider replacing the adhesive or contacting Popsocket support.
Is It Safe To Put The Popsocket Top Back On?
Yes, it is safe when done correctly. Avoid forcing the top, which could damage the mechanism. Proper alignment ensures smooth functionality and prevents wear.
Conclusion
Putting the Popsocket top back on is simple and quick. Just align the top with the base and press firmly. Make sure it clicks into place for a secure fit. This helps keep your grip strong and your phone safe.
Taking a moment to fix it right saves future hassle. Now your Popsocket is ready to use again. Enjoy better control and convenience with ease.