
You just got a new iPhone, and now it’s time to protect that beautiful screen. But putting on a screen protector can feel tricky.
What if bubbles appear? What if it doesn’t fit right? You want your screen to stay flawless without any hassle. In this guide, you’ll learn simple, step-by-step tips to apply your iPhone screen protector perfectly—without frustration or mistakes. Keep reading, and you’ll soon have a smooth, clear shield that looks like it was applied by a pro.
Your phone deserves the best, and so do you.
Prepare Your Workspace
Preparing your workspace is a crucial step before applying an iPhone screen protector. It sets the stage for a smooth, bubble-free installation. Taking time here can save you from frustration and wasted protectors.
Choose A Dust-free Area
Dust is the biggest enemy when applying screen protectors. Even tiny particles can cause bubbles or imperfections that are hard to fix later.
Pick a clean, quiet room with minimal airflow. Avoid places near open windows or fans. A bathroom after a hot shower works well because steam settles dust.
Wipe surfaces with a damp cloth before starting. If you have a microfiber cloth, keep it handy to remove any stray dust from your phone screen just before application.
Gather Necessary Tools
Having all the tools ready prevents interruptions that might let dust settle on your screen. You want everything within reach.
- Screen protector kit:This usually includes the protector, dust stickers, and cleaning wipes.
- Microfiber cloth:For a final clean and polish.
- Dust removal stickers:To pick up any stubborn particles.
- Flat surface:A stable table or desk to work on.
Think about how frustrating it can be to search for a dust sticker mid-application. Having your tools ready helps you stay focused and confident.
Clean Your Iphone Screen
Cleaning your iPhone screen properly before applying a screen protector is crucial. Even tiny dust particles or smudges can cause bubbles or reduce the protector’s effectiveness. Taking a few extra minutes to prepare your screen ensures a smooth, clear application that lasts longer.
Use Microfiber Cloth
A microfiber cloth is your best friend when cleaning your iPhone screen. It gently removes fingerprints and oils without scratching the glass. Avoid using paper towels or rough fabrics, as they can leave fibers or cause micro-scratches.
Wipe the screen in a circular motion with the cloth until it looks spotless. You’ll notice how much clearer the screen becomes, making it easier to spot any remaining dirt.
Apply Cleaning Solution
Sometimes, a dry cloth isn’t enough to remove stubborn grime. Use a small amount of screen-safe cleaning solution or a mixture of water and isopropyl alcohol (70% or less) to dampen your microfiber cloth.
Never spray the solution directly on the screen. Instead, lightly moisten the cloth and wipe your screen gently. This step dissolves oils and sticky residues that could interfere with the screen protector’s adhesion.
Remove Dust Particles
Even after cleaning, tiny dust particles can cling to your screen and ruin the protector’s application. Use a dust removal sticker or a piece of scotch tape to lift off these invisible annoyances.
Press the sticker or tape gently onto the screen and peel it off slowly. Repeat this until no dust sticks to the tape—your screen should feel perfectly smooth and clean.
Have you ever applied a screen protector only to find bubbles trapped underneath? Most likely, it was because of missed dust particles. Taking these extra steps can save you from that frustration.
Align The Screen Protector
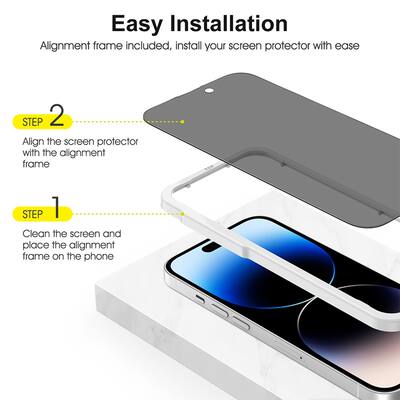
Aligning the screen protector correctly is key for a smooth installation. Proper alignment avoids bubbles and protects your iPhone screen fully. Take your time to line up the protector with the screen edges and openings.
Identify Screen Features
Look closely at your iPhone screen before placing the protector. Notice the front camera, speaker, and home button or Face ID area. These features need clear, precise cutouts on the protector. Check the protector’s cutouts and compare them to your screen. This helps you place it in the right position without covering sensors or cameras.
Position Protector Carefully
Hold the protector by its edges to avoid fingerprints. Start by aligning one edge of the protector with the phone’s screen edge. Slowly lower it while keeping it straight. Use gentle pressure to stick the protector from the center outwards. This pushes out air bubbles and ensures a tight fit. Pause and adjust if the protector does not line up perfectly. Small shifts can make a big difference in final fit.

Credit: www.mobileorigin.com
Apply The Screen Protector
Applying an iPhone screen protector takes a steady hand and a bit of patience. This step is crucial to ensure your screen stays safe without annoying bubbles or misalignment. Let’s focus on how to place the protector perfectly on your device.
Peel Off Protective Layer
Start by carefully peeling off the thin protective film on the adhesive side of the screen protector. Avoid touching the sticky surface with your fingers to prevent fingerprints or dust from sticking.
Hold the protector by the edges as you peel to keep it clean and ready for application.
Slowly Place On Screen
Align the screen protector with your iPhone’s edges and camera cutouts before setting it down. Take your time to position it correctly; once it touches the screen, it’s harder to adjust.
Lower the protector gently, starting from one edge or corner, and let it settle naturally onto the screen.
Press Out Air Bubbles
Use a soft cloth or a plastic card wrapped in a microfiber cloth to press out air bubbles from the center towards the edges. This prevents trapped air pockets that can be distracting and reduce touch sensitivity.
If small bubbles remain, give it 24-48 hours—they often disappear as the adhesive settles.
Fix Air Bubbles And Edges
Putting on an iPhone screen protector can be a daunting task, especially when those pesky air bubbles and uneven edges come into play. The satisfaction of a perfectly applied screen protector is unparalleled. But how do you achieve that? Let’s delve into practical solutions to fix air bubbles and edges effectively.
Use A Card To Smooth Bubbles
A common challenge is dealing with air bubbles trapped underneath the screen protector. The key is to use a simple card, like a credit card or a library card. Gently press the card against the screen protector and push the bubbles towards the edges.
This technique ensures the bubbles are expelled without damaging the protector. Applying a bit of pressure, but not too much, creates a smooth surface. Have you ever noticed that a little patience goes a long way in this process?
Check And Adjust Edges
Ensuring the edges of your screen protector are properly aligned is crucial for a clean look. Misalignment can lead to peeling and reduced effectiveness. Start by checking each corner and side to see if they align perfectly with the iPhone’s screen.
If adjustments are needed, gently lift the protector and reposition it. It’s surprising how a small tweak can make a significant difference. Don’t forget to check for any new air bubbles that might have formed during adjustment.

Credit: www.youtube.com
Final Touches
After carefully applying your iPhone screen protector, the final touches make all the difference. These small steps ensure your screen stays clear and responsive, giving you the best experience possible. Don’t rush through this part—your patience here pays off in a smooth, bubble-free finish.
Clean Surface Again
Once the protector is in place, take a clean microfiber cloth and gently wipe the surface. This removes any fingerprints or dust that might have settled during application. I once skipped this step and noticed smudges that were hard to clean later—it’s easier to handle them now.
Focus on areas near the edges where dust tends to hide. A quick, gentle wipe keeps your screen looking flawless and extends the life of your protector.
Test Touch Sensitivity
Now, check how your screen responds to your touch. Open apps, type messages, and swipe around to make sure everything feels natural. Some protectors can reduce sensitivity, and catching this early lets you adjust or reposition if needed.
Have you ever experienced a delayed or unresponsive screen after adding a protector? Testing now prevents frustration later. If you notice any lag, try pressing down firmly on the edges or gently lifting and reapplying the protector.
Credit: www.bestbuy.com
Frequently Asked Questions
How Do I Clean My Iphone Screen Before Applying Protector?
Use a microfiber cloth and alcohol-based cleaner. Remove all dust and fingerprints. This ensures the protector sticks smoothly and prevents bubbles.
What’s The Best Way To Align The Iphone Screen Protector?
Align the protector with the iPhone edges and camera cutouts. Use guide stickers if provided. Proper alignment prevents misplacement and bubbles.
How Can I Avoid Bubbles Under The Screen Protector?
Peel back the protector slowly while pressing from the center outward. Use a credit card to push out bubbles gently for a smooth finish.
Is It Necessary To Remove Old Screen Protector Before Applying New One?
Yes, always remove the old protector to avoid dust buildup. Clean the screen thoroughly for better adhesion and clarity with the new protector.
Conclusion
Applying an iPhone screen protector is simple with the right steps. Clean the screen well to avoid dust and bubbles. Align the protector carefully before placing it down. Press gently to remove air pockets for a smooth finish. Taking your time helps ensure a perfect fit.
Protect your phone screen and keep it looking new. Following these easy steps saves you from damage and extra costs. Now, your iPhone stays safe and clear every day.