
Are you ready to unlock the full power of your Nvidia graphics card and take your gaming experience to the next level? Optimizing your Nvidia Control Panel can make a huge difference in how smooth and responsive your games feel.
Whether you want sharper visuals, faster frame rates, or reduced lag, this guide will show you exactly how to tweak your settings for the best results. Keep reading, and you’ll discover simple changes that can transform your gameplay right now.

Credit: www.youtube.com
Accessing Nvidia Control Panel
Accessing the Nvidia Control Panel is your first step toward customizing your gaming experience. It gives you direct control over how your graphics card handles games and visuals. Knowing exactly where to find it and how to move around within the panel can save you time and make tweaking settings much easier.
Locating The Panel
To open the Nvidia Control Panel, start by right-clicking on your desktop. In the menu that appears, look for the “Nvidia Control Panel” option. If you don’t see it, you might need to update your graphics drivers or install the panel from Nvidia’s official site.
You can also access it through the Windows Control Panel under “Hardware and Sound.” Sometimes, it’s tucked away in the system tray near the clock—click the small Nvidia icon to open it quickly. Have you ever missed this step and spent minutes searching your PC? It’s a common hiccup that’s easily fixed.
Basic Navigation Tips
Once inside the panel, you’ll find a sidebar on the left with several categories. These include 3D Settings, Display, and Video. Clicking on each section reveals different options you can adjust to enhance gaming performance.
Use the search bar at the top if you want to jump directly to a specific setting. Remember, any changes you make take effect immediately, but you can always revert them if something doesn’t feel right. How often do you revisit your graphics settings to find better performance? It’s worth checking regularly as games and drivers update.
Adjusting 3d Settings
Adjusting the 3D settings in the Nvidia Control Panel can significantly boost your gaming experience. These settings control how your graphics card handles rendering, performance, and visual quality. Tweaking them allows you to find the right balance between smooth gameplay and stunning graphics.
Managing Global Settings
The Global Settings tab lets you apply changes to all games and 3D applications on your computer. This is handy if you want a consistent gaming experience without adjusting each game individually.
Start by setting the Power Management Modeto Prefer Maximum Performance. This keeps your GPU running at full speed, preventing frame drops during intense scenes.
Next, enable Threaded Optimization. This setting allows your CPU to better handle multi-threaded tasks, which is common in modern games.
Don’t forget to adjust Texture Filtering – Qualityto High Performanceif you need extra FPS. It reduces visual quality slightly but can make a noticeable difference in fast-paced games.
Customizing Program Settings
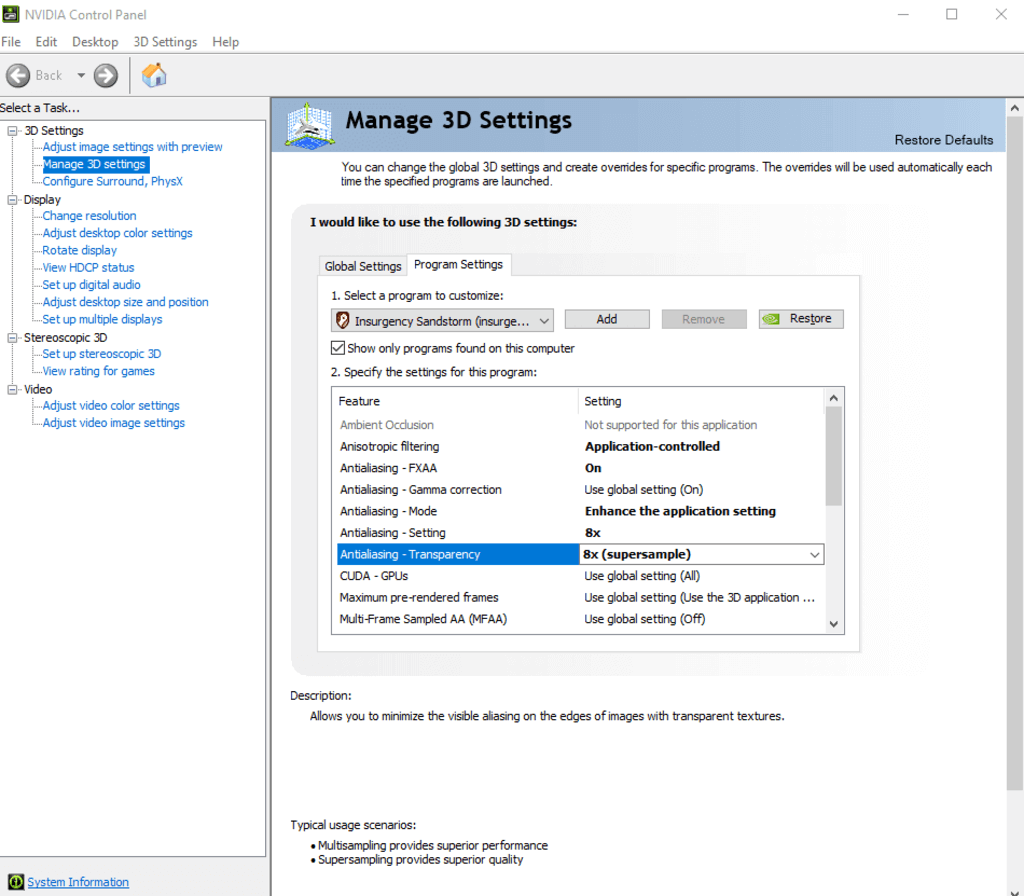
Instead of applying one-size-fits-all settings, customize 3D options for specific games using the Program Settings tab. This way, you can optimize each game based on its demands and your preferences.
Pick the game from the dropdown menu, then change settings like Antialiasing, Vertical Sync, and Shader Cacheindividually. For example, turn off Vertical Sync in competitive shooters to reduce input lag.
Adjusting Maximum Pre-Rendered Framesto 1 can improve responsiveness in fast games. However, for story-driven games, a higher value might smooth out animations.
Have you tried customizing settings for a favorite game and noticed a big difference? Experiment with these options to see what works best for your setup and play style.
Optimizing Image Settings
Optimizing image settings in the Nvidia Control Panel helps improve game visuals and performance. Adjusting these settings balances how clear your game looks and how smoothly it runs. The right tweaks can reduce lag while keeping graphics sharp. Focus on options that best suit your hardware and gaming style.
Balancing Quality And Performance
Finding the right balance between image quality and performance is key. High settings improve graphics but may lower frame rates. Lower settings boost speed but reduce detail. Adjust settings gradually to find what feels best.
- Start with medium settings for texture quality and anti-aliasing.
- Lower shadows and ambient occlusion to improve frame rates.
- Increase settings for effects and textures if your PC handles it well.
- Test changes in-game to see real impact on visuals and speed.
Using The ‘use The Advanced 3d Image Settings’ Option
This option lets Nvidia control panel use settings from the 3D application or game. It often gives better results than manual tweaks. The system decides the best balance based on game needs and hardware capacity.
- Open Nvidia Control Panel and go to ‘Manage 3D settings.’
- Select ‘Use the advanced 3D image settings’ under Global Settings.
- Apply changes and close the panel.
- Run games and check if performance and visuals improve.
This setting is useful for users who prefer automatic optimization. It reduces the need to adjust settings manually for every game.
Configuring Physx Settings
Adjusting PhysX settings in the Nvidia Control Panel boosts game performance and smoothness. Assign PhysX to your GPU for better frame rates and reduced lag. This simple change helps games run more efficiently on Nvidia graphics cards.
Configuring PhysX settings can greatly enhance your gaming experience. PhysX is a physics engine developed by Nvidia. It allows for more realistic game interactions and effects. Optimizing these settings can lead to smoother gameplay and better visuals. Dive into the Nvidia Control Panel to configure these settings for your setup.Selecting The Preferred Processor
Choosing the right processor for PhysX can impact game performance. In the Nvidia Control Panel, locate the PhysX section. You’ll find an option to select the preferred processor.- Choose between your GPU and CPU.
- For most games, select your Nvidia GPU.
- This option usually delivers better performance.
Improving Physics Performance
Optimizing physics performance is crucial for a seamless gaming experience. In the PhysX settings, adjust parameters to suit your hardware.- Ensure your GPU drivers are up-to-date.
- Adjust in-game settings to complement PhysX.
- Test different configurations for best results.
Setting Display Resolution And Refresh Rate
Setting the display resolution and refresh rate is key to improving gaming visuals and smoothness. Adjusting these settings in the Nvidia Control Panel ensures games look sharp and run fluidly. The right choices reduce lag and prevent screen tearing, enhancing your overall experience.
Choosing Optimal Resolution
Select the resolution that matches your monitor’s native specs. This keeps images clear and sharp. Higher resolution means better detail but needs more graphics power.
For best results:
- Use the highest resolution supported by your display.
- Avoid resolutions lower than your screen’s native setting to prevent blurriness.
- Match the aspect ratio to your monitor to avoid stretched images.
Adjusting Refresh Rate For Smooth Gameplay
Set the refresh rate to the highest your monitor supports. This controls how many frames appear each second. Higher rates deliver smoother motion and reduce input lag.
- Check your monitor’s max refresh rate in the Nvidia Control Panel.
- Pick a refresh rate of 60Hz or above for gaming.
- Use 120Hz, 144Hz, or higher if your monitor and GPU can handle it.
Proper refresh rates help avoid screen tearing and stuttering. This makes fast action scenes easier to follow.

Credit: www.youtube.com
Enabling G-sync For Tear-free Gaming
Enabling G-Sync in the Nvidia Control Panel is essential for a smooth gaming experience. This feature helps eliminate screen tearing, providing fluid and responsive visuals. Gamers often face screen tearing, which disrupts the immersive experience. G-Sync ensures your monitor refresh rate matches your graphics card output. This synchronization enhances gameplay and delivers stunning visuals.
Requirements For G-sync
To enable G-Sync, certain requirements must be met. First, ensure your monitor supports G-Sync. Check the specifications or manufacturer details. The graphics card must be Nvidia and capable of G-Sync. Download the latest Nvidia drivers for optimal performance. An adequate DisplayPort cable is necessary for connectivity. Confirm your monitor is connected via DisplayPort, not HDMI.
Step-by-step Activation
Activating G-Sync is straightforward. Start by opening the Nvidia Control Panel. Right-click on your desktop and select it from the menu. In the panel, navigate to “Display” settings. Find the “Set up G-Sync” option. Click it to open the configuration window.
Enable G-Sync by checking the box labeled “Enable G-Sync.” Choose between fullscreen and windowed modes based on your preference. Click “Apply” to save changes. Confirm the settings by testing your favorite game. Observe the enhanced visual quality and smoothness.
Managing Power Settings
Managing power settings in the Nvidia Control Panel can make a noticeable difference in your gaming experience. Tweaking these options helps you either squeeze out every bit of performance or find a balance that keeps your system cool and energy-efficient. The key is knowing which settings to adjust based on your gaming habits and hardware.
Maximizing Performance Mode
To get the most out of your GPU, set the power management mode to “Prefer maximum performance.” This forces your graphics card to run at its highest clock speeds during gaming sessions, reducing lag and frame drops.
Keep in mind, this setting will increase power consumption and heat output. If you’ve ever noticed your game stuttering during intense scenes, switching to this mode can stabilize your frame rates.
Here’s how to enable it:
- Open Nvidia Control Panel
- Navigate to “Manage 3D settings”
- Find “Power management mode”
- Select “Prefer maximum performance” from the dropdown
After applying these changes, monitor your GPU temperature. If it gets too high, consider improving your cooling setup or tweaking other settings.
Balancing Power Consumption
Not everyone needs their GPU running at full throttle all the time. If you’re gaming casually or multitasking, balancing power can reduce energy use and keep your system quieter.
Choosing the “Optimal power” setting lets the GPU scale its performance based on demand. This saves power during less intense moments without sacrificing too much speed.
Here’s when you might want to use this setting:
- Playing less demanding games
- Streaming or browsing while gaming
- Using a laptop on battery power
Have you noticed your laptop battery draining fast during gaming? Adjusting the power settings in Nvidia Control Panel can help extend your playtime without a charger nearby.
Tweaking Surround And Physx Configuration
Tweaking the Surround and PhysX settings in the Nvidia Control Panel can significantly enhance your gaming experience, especially if you use multiple monitors or want smoother physics effects. These settings allow you to customize how your GPU handles display outputs and physics calculations, which can reduce lag and improve visual consistency. Taking control of these options helps you tailor your setup to your specific gaming needs.
Setting Up Multi-monitor Gaming
Using multiple monitors can create an immersive gaming environment, but it requires proper configuration to avoid issues like screen tearing or uneven frame rates. Start by opening the Nvidia Control Panel and navigating to the “Configure Surround, PhysX” section.
- Enable Surround to combine your monitors into a single large display.
- Arrange your monitors logically by dragging and dropping their icons to match your physical setup.
- Choose the resolution and refresh rate that works best for all connected screens.
Once set, test your game to see how the expanded view affects performance. If you notice lag, consider lowering the resolution or adjusting in-game settings. Have you ever experienced a game where the action felt disjointed across screens? Proper Surround setup can fix that.
Optimizing Physx For Multiple Displays
PhysX handles dynamic physics effects like explosions and debris. If you’re running multiple monitors, assigning PhysX to the right GPU can reduce stutter and improve frame stability.
- In the PhysX settings, select your dedicated Nvidia GPU instead of auto-select or CPU.
- Make sure PhysX is enabled and linked to the most powerful GPU in your system.
- Disable PhysX on secondary GPUs to prevent resource conflicts that can lower performance.
This setup ensures physics calculations don’t bottleneck your gaming performance. Think about a game with heavy physics like destruction—would you want those effects to slow down your gameplay? Setting PhysX correctly keeps the action smooth and responsive.
Using Video Color And Image Settings
The Video Color and Image Settings in the Nvidia Control Panel give you powerful options to fine-tune how colors and brightness appear during gaming and video playback. Adjusting these settings can make a noticeable difference in your visual experience, helping you see details more clearly or enjoy richer, more vibrant colors.
Adjusting Color Depth And Brightness
Color depth controls how many colors your display can show, directly affecting image quality. Increasing the color depth to 10-bit or higher, if supported by your monitor, can reduce color banding and create smoother gradients.
Brightness settings are equally important. Too bright, and you lose detail in highlights; too dark, and shadows get crushed. Try adjusting brightness while watching a game scene with both dark and bright areas to find the perfect balance for your eyes.
- Set output color depth to the highest supported by your monitor.
- Use the brightness slider to improve visibility in dark scenes without washing out colors.
- Remember, small tweaks can reveal hidden details you might have missed before.
Enhancing Video Playback Quality
Besides gaming, the Nvidia Control Panel also lets you optimize video playback. You can sharpen images and enhance contrast to make videos look more vibrant on your screen.
Try enabling features like “Edge Enhancement” and “Noise Reduction” to improve clarity without creating unnatural effects. These settings help especially when watching compressed videos or streaming content with lower resolution.
- Enable Edge Enhancement to sharpen video edges and improve detail.
- Turn on Noise Reduction to smooth out grainy or pixelated footage.
- Adjust Contrast and Gamma sliders to match your room lighting and personal preference.
Have you noticed how a small change in video settings can make your favorite game or movie feel brand new? Experiment with these tweaks to find the sweet spot that suits your display and gaming style best.
Credit: medium.com
Saving And Applying Profiles
Saving and applying profiles in the Nvidia Control Panel is a game-changer for your gaming setup. It lets you tailor settings for different games or applications and switch between them without hassle. This flexibility ensures you always get the best performance and visuals without reconfiguring every time.
Creating Custom Profiles
Start by opening the Nvidia Control Panel and navigating to the “Manage 3D settings” section. Here, you can create a new profile by selecting “Add” and choosing the game or application you want to customize.
Adjust settings like texture filtering, antialiasing, and power management to suit your needs. Once you’re happy, save the profile with a clear name that helps you remember its purpose, such as “High FPS Shooter” or “Graphics-Intensive RPG.”
Creating custom profiles means you don’t have to compromise settings for different games. You’ll save time and avoid frustration by having tailored configurations ready to go.
Switching Between Profiles Easily
Switching profiles is just as simple as creating them. Within the Nvidia Control Panel, you can quickly select the profile you want to use from the drop-down menu in the “Manage 3D settings” area.
This instant switch means you can jump from a competitive shooter’s high-performance settings to a visually rich RPG without missing a beat. It’s like having multiple setups in one place, ready whenever you need them.
Think about how often you switch games or apps—wouldn’t it be easier if your settings adapted instantly? Using profiles removes the need to tweak every option manually, keeping your gaming experience smooth and optimized.
Frequently Asked Questions
How Do I Access Nvidia Control Panel For Gaming?
Right-click your desktop and select “Nvidia Control Panel. ” Alternatively, search it via the Start menu. This panel allows you to tweak graphics settings for better game performance.
What Settings Improve Gaming Performance In Nvidia Control Panel?
Adjust “Manage 3D Settings” by enabling “Maximum Performance” mode. Set “Power Management” to prefer maximum performance. Also, configure “Texture Filtering” for high quality without lag.
Should I Enable V-sync In Nvidia Control Panel?
Enabling V-Sync reduces screen tearing but may cause input lag. For smoother gameplay, enable it if screen tearing distracts you. Otherwise, keep it off for faster response times.
How To Optimize Nvidia Control Panel For Specific Games?
Use “Program Settings” to customize graphics for each game individually. This allows you to prioritize performance or quality based on the game’s needs and your system capabilities.
Conclusion
Optimizing the Nvidia Control Panel can boost your gaming experience. Adjust settings like resolution, refresh rate, and 3D preferences. Small changes make games run smoother and look better. Remember to test each setting to find what fits best. This helps your PC work well with your games.
Keep your drivers updated for the best performance. Enjoy playing with improved graphics and less lag. Simple tweaks can make a big difference. Start customizing today and feel the change in your games.