
Are you trying to figure out how to measure ohms with a multimeter but don’t know where to start? You’re in the right place.
Understanding resistance is key to fixing electronics, checking wires, or even building your own gadgets. Measuring ohms might sound tricky, but with the right steps, you can do it quickly and accurately. You’ll learn simple, clear instructions that anyone can follow—even if you’re new to using a multimeter.
Keep reading, and you’ll gain the confidence to test electrical components like a pro.
What Is Ohms And Why Measure It
Understanding what ohms measure is essential if you want to use a multimeter effectively. Ohms quantify electrical resistance, which tells you how much a material opposes the flow of electric current. Knowing this helps you check circuits, troubleshoot devices, and ensure components work safely and efficiently.
What Is Ohms?
Ohms (symbol: Ω) represent the unit of electrical resistance. Resistance is like a gatekeeper that controls how much current flows through a wire or component. The higher the ohm value, the harder it is for electricity to pass through.
Think about a thin wire compared to a thick wire. The thin wire usually has a higher resistance because it restricts current more. Measuring ohms lets you see these differences clearly.
Why Measure Ohms?
Measuring ohms helps you find problems in circuits before they cause damage. For instance, if a wire or component has too much resistance, it might overheat or fail. Checking resistance can prevent these issues.
You also use ohm measurements to verify if parts like resistors, switches, or cables work as expected. This saves time and money by avoiding guesswork when fixing electronics.
Common Situations To Measure Ohms
- Testing if a resistor matches its specified resistance value.
- Checking for broken wires or poor connections in a circuit.
- Verifying continuity in switches and fuses.
- Diagnosing faults in electrical appliances and vehicles.
Have you ever encountered a device that just wouldn’t turn on? Measuring resistance might reveal a hidden issue you never suspected.
Credit: www.bbc.co.uk
Tools Needed For Measuring Ohms
Measuring ohms is essential for checking electrical resistance in circuits. The right tools make this task simple and accurate. Having the proper equipment ensures safety and reliable results.
Before you start, gather the tools needed for measuring ohms. This section covers the main devices and accessories you must have.
Choosing The Right Multimeter
Select a multimeter that can measure resistance in ohms. Digital multimeters are easy to read and more accurate. Look for features like:
- Clear display with backlight
- Auto-ranging for convenience
- Good battery life
- Durable and compact design
- Safety ratings for electrical work
Analog multimeters work but require more skill to read. Digital models suit beginners better. Check the multimeter’s resistance range to match your project needs.
Additional Accessories
Besides the multimeter, some accessories help measure ohms more efficiently. These include:
- Test leads with sharp probes for good contact
- Alligator clips to hold wires steady
- Insulated gloves for safety when working with electricity
- A small screwdriver to adjust components if needed
- A clean cloth to wipe contacts before testing
Organize these tools before testing. Proper accessories improve accuracy and protect you during measurements.
Preparing Your Multimeter
Preparing your multimeter correctly is the key to getting accurate ohm readings. Skipping this step can lead to confusion and incorrect measurements. Taking a moment to set up your device properly will save time and frustration.
Setting The Multimeter To Ohms
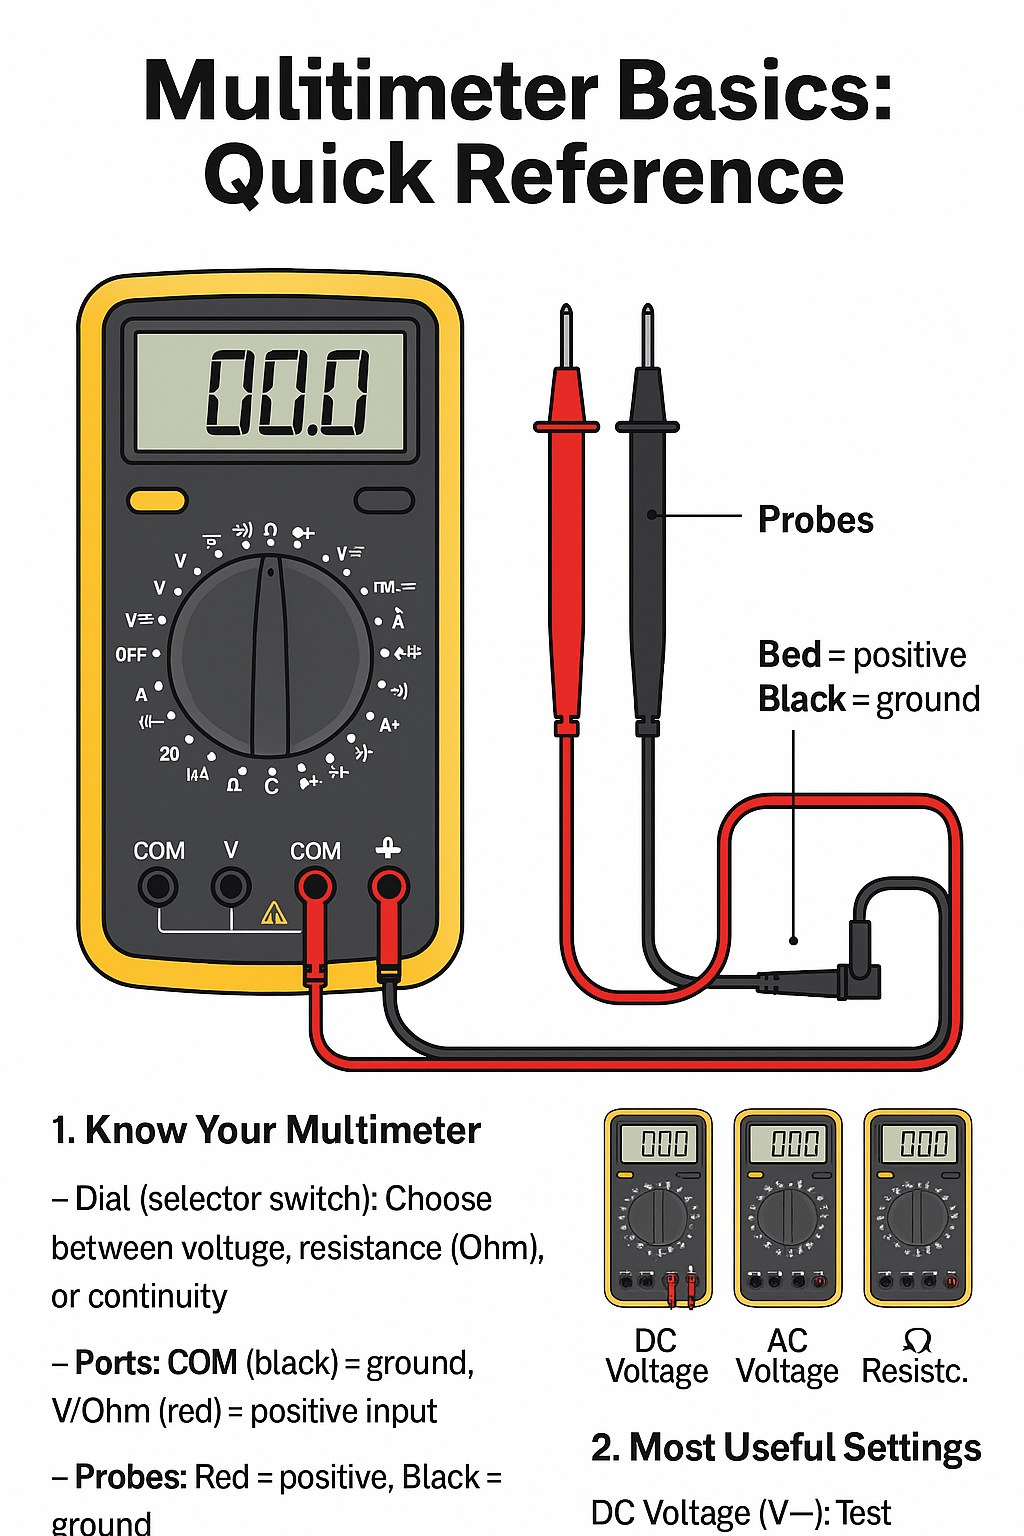
Start by turning the dial on your multimeter to the ohm symbol (Ω). This symbol represents resistance, which is what you’re measuring in ohms. If your multimeter has multiple resistance ranges, pick one that matches the expected resistance level.
For example, if you expect a low resistance, select a lower range like 200Ω. If you’re unsure, start high and work your way down. This avoids overloading the meter and helps you get a clearer reading.
Calibrating The Device
Calibrating your multimeter before measuring resistance is crucial. Touch the two test leads together and look for the reading on the display. It should show zero or very close to zero ohms.
If it doesn’t, use the calibration knob or adjust the setting until it reads zero. This step ensures that any resistance in the test leads themselves doesn’t affect your measurement. Have you ever wondered why your readings seemed off? Calibration might be the reason.

Credit: www.youtube.com
Step-by-step Measurement Process
Measuring ohms with a multimeter requires careful steps to get an accurate reading. This process involves preparing your multimeter, connecting the probes, and interpreting the numbers shown. Follow these clear instructions to measure resistance safely and correctly.
Connecting The Probes Correctly
First, turn off power to the circuit or device you want to test. Set your multimeter to the resistance or ohms (Ω) setting. Insert the black probe into the common (COM) jack. Place the red probe into the VΩ jack. Touch the probes together to check the multimeter. The display should show zero or near zero ohms. This confirms the probes work and the meter is ready.
Taking The Reading
Touch the probes to the two ends of the resistor or component. Hold them steady for a few seconds. Avoid moving the probes during measurement to prevent errors. The multimeter will display the resistance value. If the screen shows “OL” or “1,” the resistance is too high or out of range. Try switching to a higher range on the meter if available.
Interpreting The Results
The number on the display shows the resistance in ohms. Lower numbers mean less resistance. Higher numbers mean more resistance. Compare the reading to the expected value of the component. Small differences are normal due to tolerance. Large differences may mean the component is damaged or faulty. Use this data to decide if repair or replacement is needed.
Common Mistakes To Avoid
Measuring ohms with a multimeter can seem straightforward, but even seasoned users make mistakes that can lead to inaccurate results or damage to the device. Whether you’re a beginner or have been using a multimeter for years, understanding the common pitfalls can save you time and frustration. Let’s dive into some critical errors to avoid ensuring precise readings and keeping your multimeter in good shape.
Incorrect Meter Settings
One of the most frequent mistakes is setting the multimeter to the wrong measurement type. Always ensure your multimeter is set to the ‘Ω’ symbol before measuring resistance. This simple oversight can lead to confusion, especially if you’re juggling multiple tasks. Double-check the settings to avoid unnecessary guesswork.
Using Damaged Leads
Faulty leads can give skewed readings, misleading you and potentially leading to incorrect conclusions. Regularly inspect your multimeter leads for breaks or wear. A personal tip: gently tug on each lead before use. If there’s any sign of damage, replace them immediately to ensure reliable measurements.
Ignoring Calibration
Calibration is crucial for accurate readings. A multimeter that’s out of calibration can deceive you with faulty data. Schedule regular checks against a known reference, especially if your device has been through rigorous use. Ask yourself, how often do you calibrate your tools? Setting reminders can keep you on track.
Neglecting Battery Status
Low battery power can affect the multimeter’s accuracy. Always check the battery status before starting your measurements. A quick battery check can prevent errors that might lead to incorrect troubleshooting. Remember, a fully powered multimeter is a reliable one.
Incorrect Probe Placement
Placing probes incorrectly can result in inaccurate readings or even damage. Make sure each probe is securely connected and positioned correctly on the device or circuit you’re testing. Taking a moment to ensure proper placement can prevent costly mistakes.
Not Accounting For Environmental Factors
Temperature and humidity can influence resistance readings. If you’re working in extreme conditions, these factors might skew your results. Consider measuring in a controlled environment whenever possible, and be mindful of any external influences. What’s your testing environment like? Adjust accordingly.
- Always verify settings before starting measurements
- Inspect leads regularly for any damage
- Calibrate your multimeter at regular intervals
- Keep an eye on battery levels
- Ensure correct probe placement
- Account for environmental conditions
By avoiding these common mistakes, you can ensure accurate and reliable measurements each time you use your multimeter. Keeping these tips in mind will not only help you in your current tasks but also improve your overall skill set in handling electronic measurements.
Practical Tips For Accurate Readings
Getting accurate ohm readings requires careful handling of your multimeter and the object being tested. Small mistakes can cause wrong results. Follow these practical tips to improve your measurement accuracy and avoid common pitfalls.
Ensure The Circuit Is Powered Off
Always turn off power before measuring resistance. Live circuits can damage the multimeter and give false readings. Disconnect the component from the circuit if possible for the best results.
Use The Correct Multimeter Setting
Select the appropriate resistance range on your multimeter. Auto-ranging meters adjust automatically. Manual meters need the right scale to avoid overload or low sensitivity.
Keep Test Leads Clean And Firm
Dirty or loose test leads cause unstable readings. Wipe the metal tips before use. Hold the probes steadily on the test points to maintain good contact.
Measure At Room Temperature
Resistance changes with temperature. Measure components at room temperature for consistent results. Avoid testing hot or cold parts when possible.
Zero The Meter Before Testing
Some multimeters allow zero calibration. Touch the test probes together and adjust the meter to read zero. This step removes lead resistance from the measurement.
Avoid Touching The Metal Probes
Your fingers add extra resistance. Hold the insulated part of the probes only. This keeps the reading focused on the component, not your body.
Check For Damaged Components First
Broken parts give misleading resistance values. Inspect the component visually before testing. Replace or repair damaged parts to get reliable measurements.
Troubleshooting Measurement Issues
Measuring ohms with a multimeter should be simple. Sometimes, the readings may seem off or unclear. Troubleshooting helps find the cause of these problems. It ensures accurate and reliable measurements. This section guides you through common issues and fixes.
Check The Multimeter Leads And Probes
Faulty leads or probes cause wrong readings. Look for visible damage or wear on the wires. Make sure the probes are firmly connected to the multimeter. Clean the metal tips to remove dirt or rust. Replace damaged leads for better accuracy.
Ensure Proper Multimeter Settings
Set the multimeter to the correct ohm range. Using the wrong range can give confusing results. For unknown resistance, start with the highest setting. Adjust down to get a precise number. Confirm the dial is firmly set to the resistance mode.
Test The Multimeter On A Known Resistor
Check if the multimeter reads correctly on a resistor with a known value. This step helps confirm the meter works well. If the reading differs greatly, the multimeter may need calibration or repair. Testing known components avoids false troubleshooting.
Remove Power From The Circuit
Measuring resistance on a live circuit causes incorrect readings. Always disconnect power before testing. Power flow can damage the multimeter or harm you. Unplug batteries or switch off devices before measuring ohms.
Check For Parallel Paths In Circuits
Resistance readings can be affected by parallel paths. Other components may create alternate routes for current. This changes the resistance value seen by the multimeter. Isolate the component or remove it from the circuit for accurate testing.
Inspect The Multimeter’s Battery
A weak or dead battery causes unstable readings. Multimeters need enough power to measure resistance accurately. Replace the battery if the display dims or fluctuates. Regular battery checks keep your tool ready and reliable.
Credit: www.facebook.com
Frequently Asked Questions
How Do I Measure Resistance With A Multimeter?
To measure resistance, set the multimeter to the ohm (Ω) setting. Connect the probes to the component terminals and read the value on the display. Ensure the circuit is powered off before measuring to get an accurate reading.
What Does A High Ohm Reading Indicate?
A high ohm reading usually means high resistance or an open circuit. It may indicate a damaged or faulty component, causing poor current flow. Always compare with the component’s specifications for proper diagnosis.
Can I Measure Ohms On A Powered Circuit?
No, never measure resistance on a powered circuit. Applying voltage during measurement can damage the multimeter or give false readings. Always disconnect power and discharge capacitors before testing resistance.
Why Is My Multimeter Showing Zero Ohms?
A zero-ohm reading means very low or no resistance, indicating a short circuit or direct connection. Check the probes and circuit for shorts, as this reading suggests no resistance to current flow.
Conclusion
Measuring ohms with a multimeter is simple and useful. You just need to set the meter correctly and place the probes on the circuit or component. Reading the resistance helps you check if something works well or needs fixing. Practice a few times to feel confident.
Always be careful and follow safety steps. With these tips, you can easily test resistors and wires at home. Keep your multimeter ready for any small electrical task. It saves time and money by finding problems fast. Try it today and see how easy it is!