
Imagine never having to plug in your phone again. How convenient would it be to simply place your device on a surface and watch it charge effortlessly?
If you’ve ever wondered how wireless battery chargers work or thought about making one yourself, you’re in the right place. This guide will show you step-by-step how to create your own wireless charger, saving you money and giving you a cool tech project to master.
Ready to impress yourself and others with this smart DIY? Let’s dive in and get started!

Credit: www.elecbee.com
Materials Needed
Gathering the right materials is the first step toward building your own wireless battery charger. Without the proper components and tools, the project can quickly become frustrating or even impossible. Understanding exactly what you need saves time and ensures your charger will work efficiently.
Essential Components
- Wireless Charging Module:This is the core of your charger, including both the transmitter coil and receiver coil. You can find these modules online or salvage them from old wireless chargers.
- Rechargeable Battery:Choose a battery that fits your power needs, such as a lithium-ion battery, which offers good capacity and recharge cycles.
- Voltage Regulator:This helps maintain a steady voltage output to protect your devices during charging.
- USB Charging Port:Enables you to recharge the battery itself using a standard USB cable.
- Enclosure:A small plastic or wooden box to safely house all components and keep everything tidy.
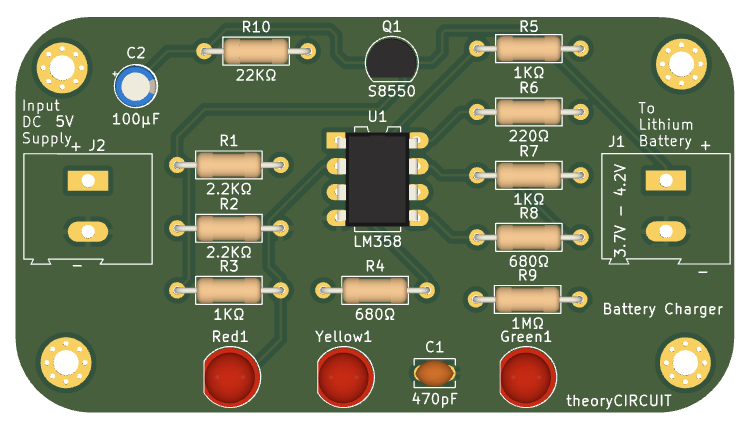
- Circuit Board:A small PCB to connect all the components, which you can either buy or create on a breadboard.
Think about the size and weight of these parts. Will your charger be portable or stationary? These questions will help you choose the right components.
Tools Required
- Soldering Iron and Solder:Essential for making strong electrical connections between components.
- Wire Strippers:Necessary to remove insulation from wires cleanly without damaging them.
- Multimeter:Helps you check voltage, current, and continuity during assembly to avoid mistakes.
- Screwdriver Set:Useful for opening enclosures and securing parts in place.
- Hot Glue Gun (optional):Great for fixing components securely without permanent soldering in some spots.
Have you ever started a project only to realize you’re missing a crucial tool? It happens to the best of us. Double-check your toolset before you begin to keep your momentum going strong.
How Wireless Charging Works
Wireless charging lets you power devices without plugs or cables. It uses energy transfer through space to charge batteries. Understanding how this works helps you build your own wireless charger. The process relies on simple physics and smart design.
Basic Principles
Wireless charging sends energy from a power source to a device without wires. It uses two main parts: a transmitter and a receiver. The transmitter creates an energy field, while the receiver catches that energy. This energy then turns into electricity to charge the battery.
The system works only when the transmitter and receiver are close. Usually, this distance is a few centimeters. The closer they are, the more efficient the charging becomes. This method avoids the need for physical connections.
Electromagnetic Induction
Electromagnetic induction is the key to wireless charging. It happens when a changing magnetic field creates an electric current in a nearby conductor. The transmitter coil creates this magnetic field using electricity.
The receiver coil, inside the device, catches the magnetic field. This induces an electric current in the receiver coil. The current is then converted to direct current (DC) to charge the battery.
This process is safe and efficient for small distances. The coils must be aligned for the best power transfer. This is why wireless chargers often have a flat surface to place devices properly.
Step-by-step Assembly
Gather all parts carefully before starting the assembly. Connect the coils and battery properly to ensure wireless charging works smoothly. Test the charger to confirm it powers devices without wires.
Creating a wireless battery charger can be an exciting and rewarding project, combining creativity with technology. Dive into the process with this step-by-step guide to assemble your own charger. Whether you’re a tech enthusiast or a curious beginner, you’ll find these instructions simple yet effective.Preparing The Coils
Begin by gathering your materials. You’ll need copper wire, a ferrite core, and some electrical tape. Wind the copper wire around the ferrite core to form coils. Ensure the coils are tightly wound and evenly spaced for optimal performance. Secure the ends with electrical tape, leaving a few inches of wire exposed for connections. Imagine the coils as the heart of your charger, crucial for energy transfer.Connecting The Circuit
Now, focus on the circuit. You’ll need a transmitter and a receiver circuit board. Connect the ends of your coils to the transmitter circuit. Follow the schematic provided with your circuit kit carefully. Attach the receiver circuit to the battery you want to charge. This step can make or break your setup, so double-check connections.Testing The Setup
Testing is where the magic happens. Power up the transmitter circuit and place the receiver near it. Check if the battery starts charging. Adjust the coil placement for efficiency. Consider this: what if it doesn’t work? Troubleshoot by checking connections and ensuring components are functioning properly. Building a wireless charger is a hands-on project that can boost your understanding of electronics. With patience and precision, you can create a functional device that reflects your personal touch.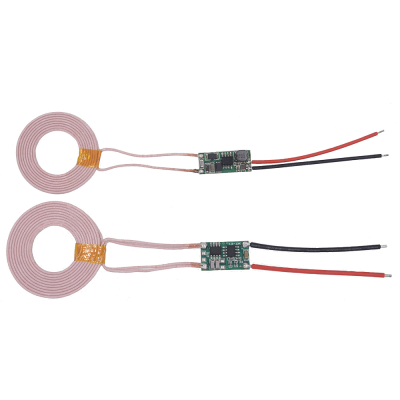
Credit: www.xcluma.com
Safety Tips
Building your own wireless battery charger is exciting, but safety must stay your top priority. Neglecting safety can lead to damage, injury, or worse. Taking simple precautions will protect you and your project while ensuring your charger works reliably.
Handling Electrical Components
Always treat electrical parts with care. Use insulated tools and avoid touching exposed wires with bare hands to prevent shocks.
Keep components dry and work on a non-conductive surface. Static electricity can harm sensitive parts, so consider grounding yourself or using an anti-static wristband.
Have you ever accidentally connected a circuit backward? It’s a quick way to ruin components. Double-check all connections before powering your charger.
Avoiding Overheating
Wireless charging generates heat, which can damage batteries and circuits if not managed properly. Make sure your design includes adequate ventilation or heat sinks.
Check the temperature of your charger regularly during use. If it feels too hot to touch, switch it off and let it cool down.
Consider using components rated for higher temperatures. This little extra investment can prevent failures and extend your charger’s life.
Troubleshooting
Building a wireless battery charger is exciting, but it doesn’t always work perfectly the first time. Troubleshooting helps you identify where things might be going wrong and how to fix them quickly. Understanding common issues and knowing quick fixes can save you time and frustration.
Common Issues
One frequent problem is the charger not powering on. This can happen due to loose wiring or a faulty power source. Another issue is the device not charging even when the charger is on, often caused by misalignment between the charging coil and the phone’s receiver coil.
Sometimes, overheating occurs during charging, which could indicate a short circuit or poor ventilation. You might also notice slow charging speeds, which often result from using incompatible components or low-quality materials.
Quick Fixes
- Check connections:Make sure all wires are securely connected and there are no breaks in the circuit.
- Realign coils:Adjust the position of the charging coil to ensure it lines up perfectly with your device’s receiver coil.
- Replace the power source:Test your charger with a different adapter or USB port to rule out power supply issues.
- Improve ventilation:If overheating occurs, add a small fan or create airflow around the charger to cool it down.
- Use quality components:Upgrade to better coils, cables, or circuits if charging speed is slow or inconsistent.
Have you checked if your device supports the wireless charging standard you’re using? Sometimes the issue is compatibility, not your build. Troubleshooting encourages you to think critically about each part of your project and learn from small setbacks.
Credit: theorycircuit.com
Enhancing Your Charger
Enhancing your wireless battery charger can make it more effective and visually appealing. Small changes improve how fast it charges and how it looks. These enhancements help you enjoy the charger more and extend its life.
Improving Efficiency
Use high-quality coils to increase power transfer. Align coils carefully for better energy flow. Add a cooling system to prevent overheating. Choose a stable power source with steady voltage. Use materials that reduce energy loss. Test the charger often to find ways to boost performance.
Customizing Design
Pick colors and shapes that match your style. Use lightweight materials for easy portability. Add LED lights to show charging status. Create a compact size to save space. Use a smooth surface that protects your device. Personalize the charger with patterns or logos. Make sure design changes do not affect function.
Frequently Asked Questions
How Does A Wireless Battery Charger Work?
A wireless battery charger uses electromagnetic fields to transfer energy. It creates a magnetic field that induces current in the device’s receiver coil. This process charges the battery without physical connections, making charging convenient and cable-free.
What Materials Are Needed To Make A Wireless Charger?
You need a transmitter coil, receiver coil, power source, and control circuit. Additional components include capacitors, resistors, and a charging pad. These materials work together to transmit and receive energy wirelessly for charging.
Is Making A Wireless Charger Safe At Home?
Yes, making a wireless charger at home is safe with proper precautions. Use insulated wires, avoid short circuits, and follow instructions carefully. Ensure components are compatible to prevent overheating or damage.
How Long Does It Take To Charge Wirelessly?
Charging time varies by device and charger power. Typically, wireless charging takes longer than wired charging. Expect around 2 to 4 hours for a full charge, depending on battery capacity and charger efficiency.
Conclusion
Making a wireless battery charger is easier than you think. You need only a few parts and some patience. This project helps you learn about wireless power. It saves space and reduces cable clutter. Try building one to see how it works.
You can charge your devices without plugging them in. It’s a fun and useful skill to have. Start today and enjoy the convenience it brings.