
Have you ever wanted to create a mechanical keyboard that feels just right for you? Building your own keyboard lets you choose every detail—from the click of the keys to the look and feel.
It’s easier than you might think, and the result is a unique tool that matches your style and typing needs perfectly. In this guide, you’ll discover simple steps to make your own mechanical keyboard, even if you’ve never tried it before.
Ready to take control of your typing experience? Let’s get started.
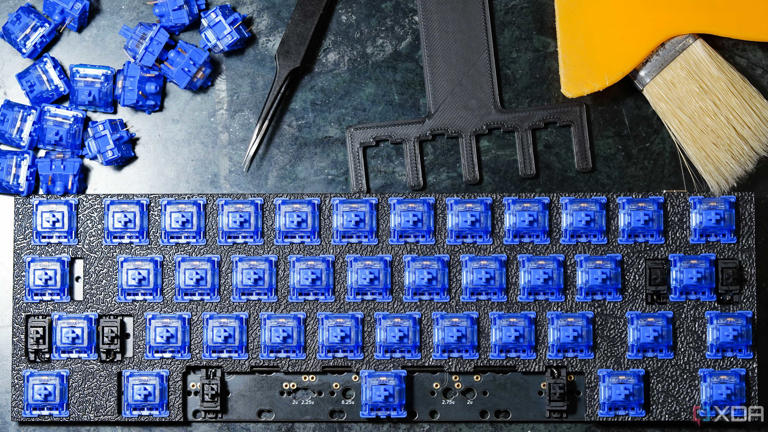
Credit: www.msn.com
Choosing Keyboard Components
Choosing the right components is key to building a mechanical keyboard. Each part affects how your keyboard feels and works. The right choices make typing more comfortable and enjoyable. This section helps you pick the best parts for your build.
Selecting Switch Types
Switches control the feel and sound of your keyboard. Choose from three main types:
- Linear:Smooth and quiet, with no tactile bump.
- Tactile:A slight bump signals each keypress.
- Clicky:Tactile with a loud click sound.
Consider how loud you want your keyboard and how it feels under your fingers.
Picking Keycaps
Keycaps affect the look and feel of your keyboard. They come in different shapes, materials, and colors.
- Material:ABS is soft; PBT is durable and textured.
- Profile:SA, OEM, Cherry, and others change key shape.
- Legends:Printed or engraved letters that may fade or last.
Choose keycaps that feel good and match your style.
Finding The Right Pcb
The PCB connects all switches and controls the keyboard functions. It must fit your layout and support your needs.
- Layout support:Full-size, tenkeyless, 60%, or custom layouts.
- Features:Hot-swappable switches allow easy changes.
- Compatibility:Make sure it works with your case and keycaps.
Pick a PCB that fits your build plans perfectly.
Choosing A Case
The case holds your keyboard parts and affects its look and sound. Cases come in various materials and styles.
- Material:Plastic is light; aluminum is sturdy and heavy.
- Design:Compact or full, with or without extra features.
- Sound:Different materials change the typing noise.
Choose a case that matches your taste and typing style.
Essential Tools And Materials
Building a mechanical keyboard requires specific tools and materials. Each item plays a key role in assembling a high-quality keyboard. Having the right equipment makes the process smooth and enjoyable. Below are the essential tools you need for this project.
Soldering Equipment
Soldering tools join electronic parts on the keyboard’s circuit board. A reliable soldering iron with adjustable temperature is best. Use thin solder wire made for electronics. A soldering stand and sponge help keep the iron safe and clean. A desoldering pump or braid fixes any solder mistakes. Safety glasses protect your eyes from hot solder splashes.
Keycap Puller And Switch Opener
A keycap puller removes keycaps without damage. Choose a wire or plastic puller for easy grip. A switch opener helps open mechanical switches to modify or clean them. These tools save time and keep parts intact. Using them avoids scratches and broken pieces during assembly or repair.
Lubricants And Stabilizers
Lubricants improve switch smoothness and reduce noise. Use special keyboard grease designed for switches. Apply it carefully on moving parts inside switches. Stabilizers keep larger keys stable and balanced. Lubricated stabilizers prevent rattling and enhance typing comfort. Together, these materials boost the keyboard’s feel and sound quality.
Preparing The Workspace
Preparing your workspace is a crucial first step in building a mechanical keyboard. A well-organized and clean area not only makes the process smoother but also helps prevent mistakes and lost parts. Think about the last time you tried assembling something without a tidy space—frustrating, right? Setting up the right environment can save you time and keep your focus sharp.
Setting Up A Clean Area
Start by choosing a flat, stable surface with plenty of room to spread out your tools and parts. Clear away anything unnecessary to avoid clutter and distractions. A clean desk or table with good lighting works best, especially natural light if you can get it.
Dust and dirt can cause problems with small components, so wipe down the area before you begin. Consider using a mat or tray to keep screws and tiny pieces from rolling away. Have a trash bin nearby to toss packaging and scraps immediately.
Organizing Components
Lay out all your keyboard parts systematically. Group similar items together—switches, keycaps, screws, stabilizers—to quickly find what you need. Using small containers or compartments can keep these parts from mixing up.
Labeling each group can help, especially if you have different switch types or extra accessories. I once mixed up two types of springs, which caused uneven key feel, so keeping components separate avoids such issues. Arrange your tools like screwdrivers, soldering iron, and tweezers within easy reach.
Safety Precautions
Working with small electronic parts means you should prioritize safety. Always unplug devices before starting any electrical work. If soldering, ensure your workspace is well-ventilated to avoid inhaling fumes.
Wear safety glasses to protect your eyes from solder splashes or tiny flying parts. Keep a first aid kit nearby just in case. Remember to handle sharp tools carefully and store them properly when not in use.
Have you ever overlooked a small safety step and paid for it later? Taking these precautions upfront can save you from unexpected setbacks.

Credit: www.youtube.com
Assembling The Keyboard
Assembling a mechanical keyboard brings all parts together into a working device. This stage requires care and patience. Each component fits precisely to ensure smooth typing and durability. Follow clear steps to assemble your keyboard correctly.
Installing Stabilizers
Stabilizers help larger keys stay balanced and smooth. Start by clipping the stabilizers into the keyboard plate. Make sure they snap into place firmly. Lubricate the moving parts with keyboard grease to reduce noise. Test the stabilizer by pressing the key to check for smooth movement.
Mounting Switches
Switches are the heart of a mechanical keyboard. Align each switch’s pins with the holes on the plate and PCB. Press down gently until the switch snaps into place. Ensure all switches sit evenly and do not wobble. Check that each switch’s pins pass through the PCB holes fully.
Soldering Switches To Pcb
Soldering connects switches to the keyboard’s circuit board. Heat your soldering iron to the right temperature. Touch the iron tip to the switch pins and PCB pad simultaneously. Feed solder into the joint until it covers the connection smoothly. Avoid using too much solder to prevent shorts. Repeat for every switch, checking for solid connections.
Programming The Keyboard
Crafting a mechanical keyboard involves selecting switches, assembling the case, and arranging keycaps. Personalize your layout with unique designs and colors. Programming offers custom macros for efficiency and a tailored typing experience.
Programming a mechanical keyboard adds a personal touch to your typing experience. It involves setting up the firmware, customizing layouts, and flashing the PCB. These steps enhance functionality and tailor the keyboard to your needs. Let’s explore each aspect to ensure your keyboard performs optimally.Choosing Firmware
Selecting the right firmware is crucial. Firmware controls how the keyboard interacts with your computer. Popular choices include QMK and VIA. QMK is versatile and widely used. VIA offers a user-friendly interface for beginners. Consider your skill level and preferences. Research and pick firmware that suits your requirements.Customizing Layouts
Layouts dictate the arrangement of keys. Customizing them allows for efficient typing. Start by mapping key functions to your liking. Use software tools like QMK Configurator or VIA’s web app. Adjust key positions and functions to enhance comfort. Experiment with different layouts. Test your setup before finalizing.Flashing The Pcb
Flashing updates the keyboard with your chosen settings. It involves transferring firmware to the PCB. Ensure your computer recognizes the keyboard. Use tools like QMK Toolbox or VIA’s interface. Follow step-by-step guides for precision. Confirm successful flashing with a test run. This process solidifies your customized layout. Programming a mechanical keyboard requires patience and attention. Each step enhances usability and personalizes the typing experience. Embrace the process to create a keyboard tailored just for you.
Credit: m.youtube.com
Testing And Troubleshooting
Testing and troubleshooting your mechanical keyboard after assembly is crucial to ensure every key works perfectly and your typing experience is smooth. Skipping this step can lead to missed issues that affect performance and durability. You’ll want to carefully check each key, fix any common problems, and tweak the firmware to match your preferences.
Checking Key Functionality
Start by connecting your keyboard to your computer and open a key testing tool, such as an online keyboard tester or software like Switch Hitter. Press each key one at a time, and watch for any that don’t register or behave oddly.
Pay close attention to keys that produce multiple inputs or don’t respond at all. This simple step helps catch wiring issues or soldering mistakes early, saving you a lot of frustration later.
Fixing Common Issues
If you find keys that don’t work, first check your solder joints. Cold or incomplete solder connections are common problems and can be fixed by reheating the joint and adding a little more solder.
Sometimes stabilizers can cause keys to stick or feel uneven. Try lubricating the stabilizers or adjusting their placement for smoother keypresses.
Have you noticed ghosting or key chatter? These can often be resolved by cleaning the switches or replacing faulty ones. Keep spare switches handy for quick replacements.
Adjusting Firmware
Once the hardware is solid, dive into your keyboard’s firmware settings using tools like QMK or VIA. These let you customize key mapping, lighting, and debounce times—adjustments that can fix responsiveness and typing comfort.
If a key registers multiple times with one press, increasing the debounce time in firmware can help. Conversely, if your keyboard feels sluggish, lowering debounce might improve speed.
Have you thought about programming macros or layers? Tweaking firmware lets you tailor your keyboard’s behavior to your workflow, making your setup truly personal.
Enhancing Your Build
Enhancing your mechanical keyboard build takes your project beyond basic assembly. Small improvements boost typing feel and sound. These upgrades help your keyboard stand out and feel personal.
Lubricating Switches
Lubricating switches reduces friction and noise. It makes key presses smoother and quieter. Use a fine brush and a proper lubricant made for mechanical switches. Apply a small amount on the slider and spring. Avoid over-lubricating to keep the switch working well.
Adding Sound Dampening
Sound dampening cuts down on keyboard noise. Use foam or silicone mats inside the keyboard case. This material absorbs sound from key presses. It also lessens vibrations that cause rattling. Adding sound dampening creates a more pleasant typing experience.
Customizing Keycaps
Custom keycaps change the keyboard’s look and feel. Choose different colors, shapes, or materials. PBT plastic keycaps last longer and feel better than ABS. Some keycaps have textured surfaces for better grip. Personalize your keyboard to match your style and comfort.
Frequently Asked Questions
What Tools Do I Need To Make A Mechanical Keyboard?
You need key switches, a PCB, keycaps, stabilizers, a case, a soldering kit, and a screwdriver. Optional tools include a switch puller and lubricant.
How Do I Choose The Right Switches For My Keyboard?
Select switches based on typing feel and sound preference. Options include tactile, linear, and clicky switches for different experiences.
Can Beginners Build A Mechanical Keyboard Easily?
Yes, beginners can build one with patience and tutorials. Start with a hot-swappable PCB to avoid soldering.
How Long Does It Take To Assemble A Mechanical Keyboard?
Assembly usually takes 1 to 3 hours, depending on experience and complexity. Practice speeds up the process.
Conclusion
Building your own mechanical keyboard takes time and patience. Each step helps you learn more about how keyboards work. You get to choose parts that fit your style and needs. The process can be fun and rewarding. Enjoy the feel of typing on something you made yourself.
Keep practicing and trying new designs. Soon, you will have a keyboard that is truly yours. Don’t rush. Take it one step at a time. Your effort will pay off in a unique, personalized keyboard.