
Are you ready to turn your room into the ultimate movie theater or create a stunning presentation space? Hanging a projector might seem tricky, but with the right steps, you can do it yourself quickly and safely.
In this guide, you’ll discover simple tips to mount your projector perfectly, so you get the best picture every time. Keep reading, and you’ll be amazed at how easy it is to transform your space with just a few tools and a bit of know-how.
Your perfect viewing experience is just a few steps away!
Credit: www.avsforum.com
Choosing The Right Projector
Choosing the right projector is key to a good viewing experience. It affects picture quality, ease of use, and where you can place it. Understanding different projector features helps you pick one that fits your needs and space.
Types Of Projectors
Projectors come in several types. Each has unique features for different uses.
- Lamp-Based Projectors:Common and affordable. They need lamp replacements over time.
- LED Projectors:Use LED lights. They last longer and use less power.
- Laser Projectors:Bright and clear images. They cost more but need less maintenance.
- DLP Projectors:Use mirrors to create images. They offer sharp picture quality.
- LCD Projectors:Use liquid crystal displays. They have vibrant colors and good brightness.
Projector Brightness And Resolution
Brightness is measured in lumens. Higher lumens mean a clearer image in bright rooms.
For dark rooms, 1000 to 2000 lumens work well. For rooms with light, choose 3000 lumens or more.
Resolution affects image detail. Common types include:
- 720p (HD):Good for casual use.
- 1080p (Full HD):Clear and detailed. Ideal for movies and presentations.
- 4K:Very sharp. Best for large screens and high-quality video.
Portability And Size Considerations
Consider where you will place the projector. Size affects portability and installation options.
Compact projectors are easy to move and set up. They work well for outdoor use or small rooms.
Larger projectors often have more features and better brightness. They need a fixed place and sturdy mounts.
Weight matters if you plan to hang the projector. Choose a model that fits your mounting hardware.
Credit: www.inovawebsolutions.net
Selecting The Ideal Location
Choosing the right spot to hang your projector can make or break your viewing experience. It’s about balancing space, screen visibility, and ambient conditions to get the best picture quality. Let’s break down the key factors that can help you find the perfect location for your projector.
Room Size And Layout
Think about how big your room is and where you usually watch movies or presentations. A small room might need a short-throw projector closer to the screen, while a larger room allows more flexibility in placement.
Look at the seating arrangement too. You want everyone to have a clear view without neck strain or shadows. Sometimes, moving furniture around can open up better placement options.
Screen Placement Options
Decide where your screen will go before you fix the projector. The projector should be aligned with the center of the screen to avoid distortion.
Consider if you want a fixed screen on the wall or a retractable one from the ceiling. Each option affects how high and how far your projector should be mounted.
Have you measured the throw distance specified in your projector’s manual? This distance ensures the image fits perfectly without losing sharpness or size.
Avoiding Light And Obstructions
Ambient light can wash out your picture quickly. Position your projector away from windows or direct sunlight to keep the image crisp and vibrant.
Look for potential obstructions like ceiling fans, light fixtures, or even tall furniture that might block the beam.
Think about cable routes too. Keeping cables tidy and out of the way helps avoid accidents and keeps your setup clean.
Gathering Necessary Tools And Materials
Before you start hanging your projector, gathering the right tools and materials is key to a smooth setup. Having everything on hand saves time and prevents frustrating interruptions. Think about the space where you want to mount the projector and the type of ceiling or wall you have—this will affect the kind of equipment you need.
Mounting Brackets And Hardware
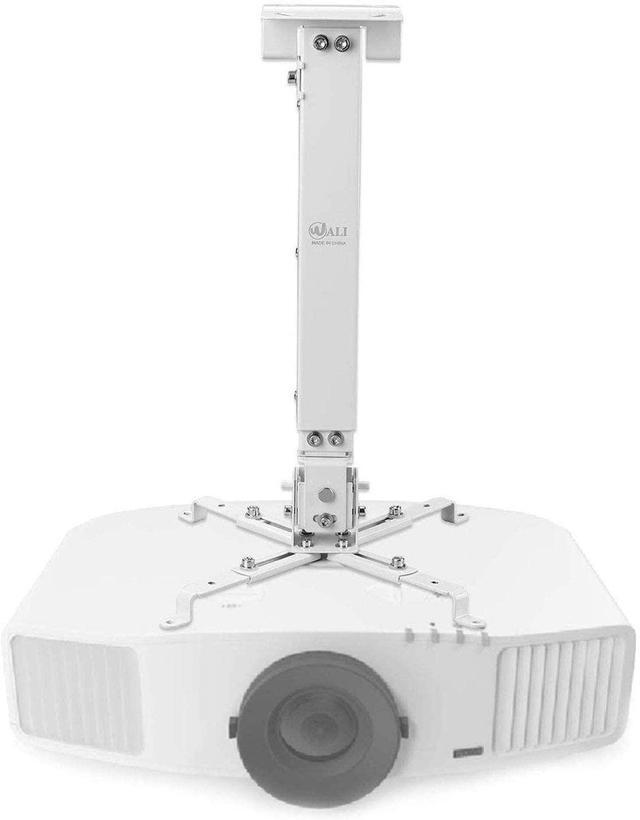
Choosing the right mounting bracket is crucial for keeping your projector secure. Look for a bracket that matches your projector’s weight and mounting hole pattern. Many projectors come with a basic mount, but investing in an adjustable bracket lets you fine-tune the angle easily.
Don’t forget the hardware: screws, anchors, and washers should be compatible with your wall or ceiling material. Have a variety of sizes ready—drywall, wood, and concrete all require different anchors.
Measuring Tools
Accuracy matters when positioning your projector. A good tape measure is essential to find the perfect distance from the screen and the right height. Consider a laser level to ensure your mount is perfectly straight; even a small tilt can distort the image.
Marking tools like pencils or painter’s tape help you keep track of drill points without damaging surfaces. How will you verify the projector’s alignment after mounting? Planning this ahead saves a lot of hassle.
Cable Management Supplies
Messy cables can ruin the clean look of your setup and even create safety hazards. Cable ties, clips, and covers help keep cords organized and out of the way. Choose supplies that match your wall color or projector setup to maintain a neat appearance.
Think about the length and type of cables you need—HDMI, power cords, and audio cables all require different handling. Have extra cable length for future adjustments or repositioning.
Preparing The Mounting Surface
Choose a sturdy wall or ceiling free from cracks or damage. Clean the surface to remove dust and dirt for better adhesion. Ensure the area can support the projector’s weight safely.
Preparing the mounting surface for your projector is a crucial step that can make or break your viewing experience. If done correctly, it ensures stability and optimal positioning, allowing for the perfect movie night or presentation. You’ll want to make sure your wall or ceiling is up to the task, mark your drill points accurately, and ensure everything is perfectly level. Let’s dive into the specifics.Checking Wall Or Ceiling Strength
Before you start drilling, it’s essential to assess the strength of your mounting surface. Is it made of drywall, concrete, or something else? Each material has its own weight-bearing capacity. Drywall, for example, might need additional reinforcement, while concrete could provide a more solid foundation. Think of your projector’s weight and ensure your surface can support it. If you’re unsure, consulting with a professional or using a stud finder can help identify the best areas to mount.Marking Drill Points
Precision is your friend here. Once you’ve picked the spot, grab a pencil and mark your drill points clearly. These marks are your guides, helping to avoid misalignment and unnecessary holes in your wall or ceiling. Use a measuring tape to ensure symmetry and balance. If you’re installing a ceiling mount, make sure it’s centered to your screen for the best viewing angle.Ensuring Level Alignment
A projector that’s not level can result in a skewed image, ruining your viewing experience. Use a spirit level to check that your marked points are aligned. This step ensures your projector hangs straight and projects a perfectly rectangular image. Ask yourself: Is it worth skipping this step and risking a lopsided display? A few extra minutes spent here can save you from future frustration and provide a seamless visual experience. By preparing your mounting surface carefully, you set the stage for a successful projector installation. Each step is a building block towards achieving a stable and enjoyable viewing setup.Installing The Mount
Installing the mount is a key step in hanging a projector securely. It ensures the projector stays fixed and aligned for the best picture. Careful mounting prevents accidents and keeps the setup stable. Follow these steps to install the mount properly.
Drilling And Securing Anchors
Choose a strong wall or ceiling spot for the mount. Use a pencil to mark drill points on the surface. Select the right drill bit size for the anchors. Drill holes carefully on the marked spots. Insert wall anchors firmly into the holes. Anchors hold screws tightly to prevent slipping.
Attaching The Mounting Bracket
Align the mounting bracket holes with the anchors. Use screws that fit the anchors for strong support. Tighten screws with a screwdriver until the bracket feels steady. Avoid over-tightening to protect the wall and bracket. Check that the bracket is level for proper projector alignment.
Verifying Stability
Gently shake the mounted bracket to test its strength. Ensure no movement or wobbling occurs. Confirm the bracket can hold the projector’s weight safely. Double-check all screws and anchors are secure. A stable mount keeps the projector safe and the image clear.

Credit: www.amazon.com
Mounting The Projector
Mounting the projector is a key step to ensure clear and stable image projection. Proper mounting keeps the device safe and improves viewing quality. This process involves securing the projector to a bracket, adjusting its angle, and locking it firmly in place.
Attaching Projector To Bracket
Start by locating the mounting holes on your projector’s bottom. Align these holes with the screws on the bracket. Use the provided screws to fasten the projector securely. Make sure the screws are tight but avoid over-tightening. Check that the projector is stable and does not wobble.
Adjusting Angle And Position
Adjust the projector’s tilt and swivel to aim the image correctly. Position the lens so it faces the screen directly. Use the bracket’s adjustment knobs or screws to set the angle. Small changes can fix image distortion and improve focus. Take your time to get the perfect view.
Tightening And Securing
Once the projector is in the right position, tighten all adjustment screws. Double-check that the device is firmly held by the bracket. This prevents the projector from moving or falling. Use a level to confirm the projector is straight. Safety comes first for a long-lasting setup.
Connecting Cables And Power
Once your projector is mounted securely, the next critical task is connecting the cables and ensuring it has power. This step is essential for bringing your visuals and audio to life. Without the right connections, all your efforts in mounting the projector will be in vain. Let’s dive into the practical aspects of setting up cables and power for your projector.
Video And Audio Connections
Start by identifying the available ports on your projector and media source. HDMI is the most common choice for a seamless connection, offering high-quality video and audio transmission. If your devices support it, an HDMI cable is your best bet for simplicity and quality.
Don’t overlook the audio! Some projectors come with built-in speakers, but for a truly immersive experience, connect external speakers. Optical or auxiliary cables can enhance audio quality significantly. Double-check compatibility to avoid any surprises.
Power Supply Setup
Ensure your projector is near a power outlet or use an extension cord if necessary. A good power supply is crucial for uninterrupted viewing. Protect your projector with a surge protector to guard against unexpected power spikes.
Consider the location of your outlets. A strategic setup can prevent tripping hazards and keep your room tidy. Think ahead to avoid the frustration of rearranging furniture later.
Cable Organization Tips
Messy cables can ruin the aesthetic of your setup. Use cable ties or clips to keep cables organized and out of sight. This not only looks good but also prevents tangling and potential damage.
Label each cable if you’re using multiple connections. This small step can save time troubleshooting later. Trust me, knowing what each cable is for can be a lifesaver.
Have you ever spent hours untangling cables? Avoid this by planning your cable routes carefully. A little organization now can save you from headaches later.
Calibrating The Projector
Calibrating your projector is key to getting a crisp, clear image that fits perfectly on your screen or wall. It’s not just about hanging the projector but making sure what you see matches your expectations. Small adjustments can make a huge difference in how immersive your viewing experience becomes.
Focusing The Image
Start by adjusting the focus ring or slider on your projector lens. You want the sharpest edges possible so text and details don’t blur together. If the image looks soft or fuzzy, it’s a sign the focus needs tweaking.
Try moving the projector slightly closer or farther from the screen if the focus adjustment alone doesn’t help. Remember, a perfectly focused image reduces eye strain and makes your viewing more enjoyable.
Adjusting Keystone And Zoom
Keystone correction fixes the trapezoid shape that appears when the projector isn’t perfectly aligned with the screen. Use the keystone controls to make the image rectangular again.
Zoom adjustment helps fill the screen without moving the projector. If your image doesn’t quite cover the screen, zoom in or out to get the right size. But be careful—zooming too much can reduce image quality.
- Check if vertical or horizontal keystone correction is needed.
- Use digital keystone sparingly to avoid image distortion.
- Combine minor projector repositioning with zoom for best results.
Optimizing Picture Settings
Picture settings like brightness, contrast, and color balance impact how vivid your image looks. Adjust these settings based on your room’s lighting conditions.
Try different presets like “Cinema” or “Game” modes to see what fits your content best. Don’t be afraid to fine-tune each setting—sometimes a slight increase in brightness or contrast can reveal details you missed.
| Setting | What It Does | Quick Tip |
|---|---|---|
| Brightness | Controls how dark or light the image is | Dim your room to reduce the need for very high brightness |
| Contrast | Defines the difference between the darkest and brightest parts | Increase contrast to make colors pop, but avoid losing shadow detail |
| Color | Adjusts the intensity of colors | Lower color if skin tones look unnatural or overly saturated |
Have you ever noticed how a small tweak in color balance can make a movie scene feel completely different? Experiment with these settings until the image looks just right to your eyes.
Troubleshooting Common Issues
Hanging a projector can sometimes come with unexpected challenges. Troubleshooting these common issues quickly keeps your setup smooth and your viewing experience sharp. Knowing what to check first saves time and frustration.
Image Distortion Fixes
If your projected image looks stretched, blurry, or uneven, start by adjusting the projector’s keystone settings. Many projectors have an automatic keystone correction, but manual tweaks often give better results.
Check if the projector is perfectly perpendicular to the screen. Even a slight tilt can cause trapezoidal distortion. Try moving the projector or screen until the image edges appear straight and uniform.
Lens focus is another simple fix. Rotate the focus ring slowly until the image sharpens. If the image remains blurry, clean the lens gently with a microfiber cloth to remove dust or smudges.
Connectivity Problems
Have you ever connected your projector only to find no signal on the screen? Start by confirming the input source matches the cable connection. Many projectors support multiple inputs, so double-check the selected input on the device menu.
Loose or damaged cables cause frequent issues. Inspect HDMI or VGA cables for frayed ends or poor connections. Swapping cables or trying a different port often solves signal problems immediately.
Sometimes, the problem lies with the device sending the video. Restart your laptop, DVD player, or streaming device to refresh the connection. If you’re still stuck, test the projector with another device to isolate the problem.
Mounting Stability Checks
Feeling uneasy about your projector’s stability is common. Make sure the mounting bracket is securely fastened to a sturdy surface. Loose screws or weak ceiling anchors can cause wobbling or even a fall.
Use a level to confirm the mount is perfectly horizontal. An unlevel mount can cause the image to skew and may put unnecessary stress on the hardware.
Check the projector’s weight against the mount’s capacity. Mounts have weight limits, and exceeding these puts your device at risk. If your projector is heavy, consider a professional-grade mount for extra support.
Maintenance And Safety Tips
Keeping your projector in top shape ensures clear images and prevents accidents. Regular maintenance and safety checks protect your investment and keep your viewing experience smooth. Let’s look at simple tips you can apply to maintain and handle your projector safely.
Cleaning The Projector Lens
Dust and smudges on the lens reduce image quality. Use a soft, lint-free cloth to gently wipe the lens surface. Avoid using harsh chemicals; instead, opt for lens cleaning solutions designed for delicate optics.
Try to clean the lens regularly, especially if your projector is in a dusty environment. Did you know even fingerprints can distort the image? Keeping it clean can save you from blurry or dim projections.
Checking Mount Integrity
After installation, the projector mount needs regular inspections. Look for any loose screws, cracks, or signs of wear in the mounting bracket. Tighten screws and replace worn parts immediately to avoid falls or damage.
Think about how often you use your projector and its weight. Heavier models require sturdier mounts and more frequent checks. Have you checked your mount lately to ensure it’s still rock solid?
Safe Handling Practices
Always handle your projector with care, especially during installation or maintenance. Use both hands and avoid carrying it by cables or ports. Disconnect power before cleaning or adjusting the unit to prevent shocks or damage.
Consider where you place your projector to avoid accidental knocks. Do you have kids or pets around that might bump into it? Setting it in a secure spot reduces risks and prolongs the life of your device.
Frequently Asked Questions
How Do I Choose The Right Projector Mount?
Choose a mount that fits your projector’s weight and size. Consider ceiling or wall mounts based on room layout. Look for adjustable mounts to ensure perfect alignment. Always check compatibility with your projector model for secure installation.
What Tools Are Needed To Hang A Projector?
You’ll need a drill, screws, anchors, a screwdriver, and a stud finder. A measuring tape helps with placement accuracy. A level ensures your projector hangs straight. Having a pencil for marking spots is also useful.
How High Should A Projector Be Mounted?
Mount the projector so its lens aligns with the top of your screen. Typically, this is about 6 to 12 inches above the screen’s top edge. Adjust height for your projector’s lens shift capability. Proper height ensures a clear, distortion-free image.
Can I Hang A Projector Without Ceiling Studs?
Yes, but use heavy-duty wall anchors or toggle bolts rated for your projector’s weight. Avoid drywall alone as it can’t support heavy loads. Anchors ensure your mount stays secure and prevents damage to walls or projector.
Conclusion
Hanging a projector can be simple with the right steps. Choose a strong spot that fits your room size. Use proper tools and measure carefully before drilling. Secure the mount tightly to avoid accidents. Test the projector’s angle and focus for the best picture.
Taking your time makes the setup easier and safer. Enjoy your clear and bright viewing experience every time. This guide helps you hang a projector with confidence and ease.