
Want to share your computer screen on a big projector but don’t know where to start? Connecting your computer to a projector can seem tricky, but it’s actually simpler than you think.
Whether you’re preparing for an important presentation, movie night, or gaming session, getting this connection right makes all the difference. In this guide, you’ll discover easy, step-by-step tips to connect your computer to a projector quickly and without stress. Keep reading to unlock the secret to a smooth, clear display that will impress everyone in the room.

Credit: www.youtube.com
Choosing The Right Cable
Choosing the right cable to connect your computer to a projector is more important than you might think. The cable you pick affects the quality of your presentation and how smoothly everything runs. If you don’t choose carefully, you might face compatibility issues or poor image quality that distracts your audience.
Hdmi Vs Vga Vs Displayport
HDMI is the most common and widely used cable for connecting computers to projectors. It carries both video and audio signals in high definition, making your setup cleaner with fewer cables.
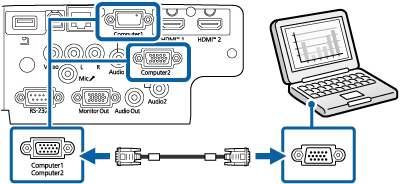
VGA is an older type of connection that only transmits video. It works well with many projectors but offers lower image quality compared to HDMI. If your projector or computer is older, you might still find VGA ports there.
DisplayPort is less common but supports very high resolutions and refresh rates. It’s a good choice if you want the best video quality and your devices support it. Some laptops and modern graphics cards include DisplayPort outputs.
Checking Your Devices’ Ports
Before buying any cable, take a close look at your computer’s and projector’s ports. Are they HDMI, VGA, or DisplayPort? Sometimes, you might find a combination of these.
Don’t assume your devices have the same ports. For example, a new laptop might only have USB-C or DisplayPort outputs, while your projector could rely on VGA or HDMI inputs.
Make a quick list of the ports you have. This will save you time and money and avoid last-minute scrambling for the right cable.
Adapters And Converters
If your computer and projector ports don’t match, adapters and converters come to the rescue. A simple HDMI-to-VGA adapter can bridge the gap between modern and older devices.
Be careful when choosing these accessories. Some adapters only convert the signal one way, so check the direction before purchasing.
Also, active converters are better for converting digital signals (like HDMI) to analog (like VGA) because they improve compatibility and signal quality. Passive adapters work only when the signal type is the same on both ends.
Preparing Your Devices
Preparing your devices is the first important step to connect your computer to a projector. This stage ensures both devices are ready for a smooth connection and clear display. Proper preparation helps avoid common issues like no image or poor picture quality.
Start by turning on both devices and making sure they are fully powered. Then adjust the projector settings for the best image projection. Finally, set your computer’s display preferences to match the projector’s output. These steps create a seamless connection and better viewing experience.
Powering On The Projector And Computer
Connect the projector to a power source using its power cable. Press the power button on the projector to turn it on. Wait for the projector to warm up and the lamp to light.
Turn on your computer by pressing the power button. Let it fully boot up before connecting to the projector. This prevents display errors and allows proper device recognition.
Adjusting Projector Settings
Use the projector’s remote or buttons to access the menu. Adjust the brightness and contrast for clear images in your room’s lighting. Set the input source to match the cable connected to the computer, such as HDMI or VGA.
Focus the lens to sharpen the image. Position the projector at the correct distance for the desired screen size. Use keystone correction if the image looks trapezoidal.
Setting Display Preferences On Computer
Open your computer’s display settings. Choose the option to detect the projector as a second display. Select how to use the projector screen:
- Duplicate: shows the same image on both screens
- Extend: treats the projector as extra workspace
- Second screen only: shows image only on the projector
Adjust the resolution to match the projector’s native resolution. This ensures the best image quality without distortion.
Connecting The Devices
Start by checking the available ports on both your computer and projector. Use the right cable, like HDMI or VGA, to link the two devices securely. Turn on the projector and select the correct input source to display your computer screen.
Connecting your computer to a projector can seem daunting, but with the right steps, it becomes a straightforward process. Whether you’re prepping for a big presentation or movie night, ensuring a seamless connection between your devices is key to success. Let’s dive into how you can easily connect your computer to a projector, focusing on plugging in the cable, selecting the correct input source, and deciding whether to mirror or extend your display.Plugging In The Cable
Start by identifying the type of cable you need. Most projectors and computers use HDMI or VGA cables. Make sure you have the right one on hand. Locate the ports on both your computer and projector. They’re usually marked, making it easy to connect the cable. Plug one end of the cable into your computer and the other into the projector. It’s as simple as fitting a puzzle piece.Selecting The Correct Input Source
Now that your devices are physically connected, it’s time to select the correct input source on your projector. Often, projectors have multiple input options like HDMI1, HDMI2, or VGA. Using the projector’s remote or control panel, navigate through the input sources. Your goal is to find the one that matches the cable type you used. Once you select the right input source, your computer’s screen should appear on the projection screen. If not, double-check your connections and input selection.Mirroring Or Extending The Display
You have two main options for displaying your screen: mirroring or extending. Mirroring shows the exact content from your computer screen on the projector. Extending the display gives you more workspace, essentially turning the projector into a second screen. This is perfect for presentations where you want to showcase slides while keeping notes on your computer. Decide which option suits your needs. You can toggle between these display settings in your computer’s display settings menu. Connecting your computer to a projector doesn’t have to be complicated. Are you ready to impress your audience with a flawless presentation?Troubleshooting Common Issues
Connecting your computer to a projector usually goes smoothly, but sometimes issues pop up that can throw off your presentation or movie night. Understanding common problems and how to fix them quickly saves you time and frustration. Let’s look at some frequent hiccups and how you can troubleshoot them effectively.
No Signal On Projector
Seeing a “No Signal” message on your projector screen can be confusing. First, check if the cable is firmly plugged into both your computer and the projector. Loose connections are the most common cause of this problem.
Next, verify that the projector is set to the correct input source. Projectors often have multiple input options like HDMI, VGA, or USB, so make sure you select the one matching your cable.
If everything seems right but the problem persists, try restarting both devices. Sometimes a simple reboot resets the connection and clears any glitches.
Resolution And Display Problems
Have you ever noticed that the image on the projector looks blurry, stretched, or doesn’t fit the screen? This usually relates to resolution or display settings on your computer. Adjust your computer’s display resolution to match the projector’s native resolution for the best picture quality.
Windows users can go to Display Settings and choose “Duplicate” or “Extend” display modes to control how the image appears. Mac users can find similar options under System Preferences > Displays. If the image still looks off, experiment with different resolutions until it fits perfectly.
Also, check the projector’s aspect ratio settings. Sometimes switching between 4:3 and 16:9 formats solves distortion issues.
Audio Not Transmitting
It’s frustrating when your visuals work, but there’s no sound from the projector. First, confirm your cable supports audio transmission. HDMI cables carry audio, but VGA cables do not, so you might need a separate audio connection.
Check your computer’s sound settings to ensure the output device is set to the projector or the correct audio device. Sometimes the audio output defaults to your laptop speakers even when connected to a projector.
If you use a separate audio cable, make sure it is plugged into the correct ports on both your computer and the projector or external speakers. Testing with headphones or another speaker can help identify if the problem is with the projector or your computer.
Wireless Connection Options
Connecting a computer to a projector without wires offers more freedom. Wireless options reduce clutter and increase flexibility in meetings or classrooms. Several ways exist to connect wirelessly, each with its own setup and features.
Using Wi-fi Or Bluetooth
Many modern projectors support Wi-Fi or Bluetooth connections. Wi-Fi allows your computer to send video and audio directly to the projector. Bluetooth is usually for audio or limited display features.
To use Wi-Fi, connect both devices to the same network. Then, select the projector as the output device on your computer. Bluetooth pairing requires enabling the feature on both devices and following pairing prompts.
Screen Mirroring Apps
Screen mirroring apps make wireless projection easy. Apps like Miracast, AirPlay, or Google Cast work with many devices. Install the app on your computer and projector or smart TV.
These apps mirror your computer screen in real time. No cables needed, and the setup is often quick. Ensure both devices support the chosen app and are on the same network.
Projector-specific Wireless Features
Some projectors come with built-in wireless features. These may include proprietary apps or direct Wi-Fi connections. Brands like Epson, BenQ, and Optoma offer their own wireless solutions.
Check your projector’s manual for details on wireless setup. Usually, you install the brand’s app on your computer. Follow the instructions to connect and start projecting wirelessly.

Credit: www.youtube.com
Tips For Optimal Viewing
Getting your computer connected to a projector is just the start. To make sure what you display looks great, you need to fine-tune how the image appears. Here are practical tips to help you get the best picture quality and make your presentation or movie night a success.
Adjusting Brightness And Focus
Once your projector is connected, the image might look blurry or too dim. Adjust the focus ring on the projector lens until the picture sharpens clearly. Brightness controls are usually available on the projector or in its menu settings—boost the brightness if the image looks washed out, but avoid making it too bright as it can cause eye strain.
Try to find a balance that keeps colors vivid without overwhelming your eyes. Have you ever noticed how a slightly blurry image can distract from your presentation? Sharp focus keeps your audience engaged.
Positioning The Projector
Where you place the projector affects the image size and clarity. Position it so the lens is directly aimed at the center of your screen or wall. If the projector is off to the side or too high, the image may look distorted or trapezoidal.
Use the projector’s keystone correction feature to fix minor distortions, but it’s better to set it up straight if possible. Think about your room layout—can you find a spot that keeps cables tidy and avoids blocking the light path?
Managing Ambient Light
Ambient light can wash out your projected image, making it hard to see details. To improve visibility, dim the lights or close curtains and blinds before you start. If that’s not possible, increase the projector’s brightness or use a screen designed to enhance contrast.
Try to minimize reflective surfaces near the screen that can bounce unwanted light. Have you checked how the image looks at different times of the day? Sometimes moving the setup slightly can make a big difference in how clearly your content shows.
Credit: files.support.epson.com
Frequently Asked Questions
How Do I Connect A Laptop To A Projector?
To connect a laptop to a projector, use an HDMI or VGA cable. Plug the cable into the laptop and projector ports. Then, select the correct input source on the projector. Adjust display settings on your laptop if needed for proper screen sharing.
What Cable Is Best For Computer To Projector Connection?
HDMI cables are best for connecting computers to projectors. They support high-definition video and audio with one cable. VGA cables are older and only transmit video. Choose HDMI for better quality and ease of use.
How To Fix No Signal From Computer To Projector?
Check all cable connections first. Ensure the projector is on and set to the correct input source. Restart your computer and projector if needed. Update display drivers on your computer to resolve compatibility issues.
Can I Connect A Wireless Computer To A Projector?
Yes, wireless connections are possible with compatible projectors or adapters. Use Wi-Fi, Miracast, or Bluetooth to connect. Install necessary software or apps for wireless projection. Wireless connections offer flexibility but may have slight delays.
Conclusion
Connecting your computer to a projector is simple with the right steps. Choose the correct cable and plug it in securely. Adjust your computer’s display settings to share the screen. Test the connection to ensure the image shows clearly. Now, you can share presentations or watch videos on a bigger screen.
Remember, practice makes this process easier each time. Enjoy your larger display and clear visuals.