
Are you struggling with electrical problems and wondering if your wiring is causing the issue? Knowing how to check voltage drop with a multimeter can save you time, money, and frustration.
Voltage drop might seem complicated, but with the right steps, you can easily spot where your circuit is losing power. In this guide, you’ll learn simple, clear methods to measure voltage drop accurately. Stick with me, and you’ll gain the confidence to troubleshoot your electrical system like a pro.
Ready to take control of your electrical setup? Let’s dive in!
Voltage Drop Basics
Understanding voltage drop is essential before you start measuring it with a multimeter. It helps you diagnose electrical issues and ensures your circuits function properly. Let’s break down the basics so you know exactly what to look for and why it matters.
What Causes Voltage Drop
Voltage drop happens when electrical energy loses strength as it travels through a wire or component. This loss is mainly due to resistance in the wire, which turns some electrical energy into heat. The longer the wire or the thinner it is, the more resistance it has, leading to a bigger voltage drop.
Other factors like poor connections, corrosion, or damaged insulation can also cause voltage drop. Have you ever noticed dim lights or slow motors? Those are often signs of voltage drop caused by wiring issues.
Why Voltage Drop Matters
Voltage drop matters because it directly affects how well your electrical devices work. If the voltage drops too much, motors may not start, lights can flicker, and sensitive electronics might fail. This can lead to safety risks or costly repairs.
Checking voltage drop helps you keep your system efficient and safe. It also prevents unexpected breakdowns by catching problems early. Do you want your electrical setup to run smoothly without hidden issues? Then understanding and measuring voltage drop is a skill you need.
Credit: legrand.my.site.com
Choosing The Right Multimeter
Choosing the right multimeter is crucial when checking voltage drop accurately. Not all multimeters offer the same level of precision or features that make your task easier. Picking a model that fits your specific needs will save you time and avoid frustration.
Types Of Multimeters
There are two main types of multimeters: analog and digital. Analog multimeters use a needle to show readings, which some users find harder to read but can be useful for spotting trends. Digital multimeters (DMMs) provide clear numeric displays, making them more popular for everyday use.
For voltage drop checks, a digital multimeter is generally better because it offers higher accuracy and easier readability. You might also come across clamp meters, which measure current without disconnecting wires, but they are less common for voltage drop tests.
Features To Look For
Accuracy is key. Look for a multimeter with a resolution that can detect small voltage changes, preferably one with a resolution of at least 0.1 millivolts.
Auto-ranging is another helpful feature. It automatically selects the correct measurement range, so you don’t have to guess and risk getting incorrect readings. Backlit displays can be a lifesaver if you work in dimly lit spaces.
Consider the multimeter’s safety ratings. A CAT III or CAT IV rating means the device can handle higher energy environments safely, which matters when working with household wiring or industrial equipment.
Have you ever struggled with unclear readings or a multimeter that couldn’t measure low voltage drops? Choosing a device with these practical features can make your work smoother and more reliable.
Preparing For The Test
Preparing to check voltage drop with a multimeter sets the tone for an accurate and safe measurement. Before you dive in, it’s crucial to get your workspace and mindset ready. Proper preparation helps avoid mistakes and keeps you safe while handling electrical components.
Safety Precautions
Safety should always be your top priority. Before testing, make sure the power source is turned off to prevent electric shock. Use insulated gloves and wear safety goggles to protect your hands and eyes from accidental sparks.
Double-check that your multimeter is rated for the voltage level you plan to test. A quick inspection of the test leads for any damage or frayed wires can prevent equipment failure. Remember, a calm and focused approach reduces the risk of accidents.
Tools And Materials Needed
Gathering the right tools makes your voltage drop test smoother. You will need:
- A digital or analog multimeter capable of measuring voltage
- Insulated test leads compatible with your multimeter
- Protective gear such as gloves and safety glasses
- A flashlight or good lighting to clearly see connections
- A notepad or device to record your readings
Having these items ready saves time and prevents interruptions. Have you ever started a test only to realize you forgot a tool? Avoid that frustration by preparing everything beforehand.
Credit: www.facebook.com
Step-by-step Voltage Drop Test
Performing a voltage drop test is essential to find power loss in electrical circuits. This test shows if wires or connections cause problems. Using a multimeter makes this test quick and accurate. Follow these steps carefully to check voltage drop correctly.
Setting Up The Multimeter
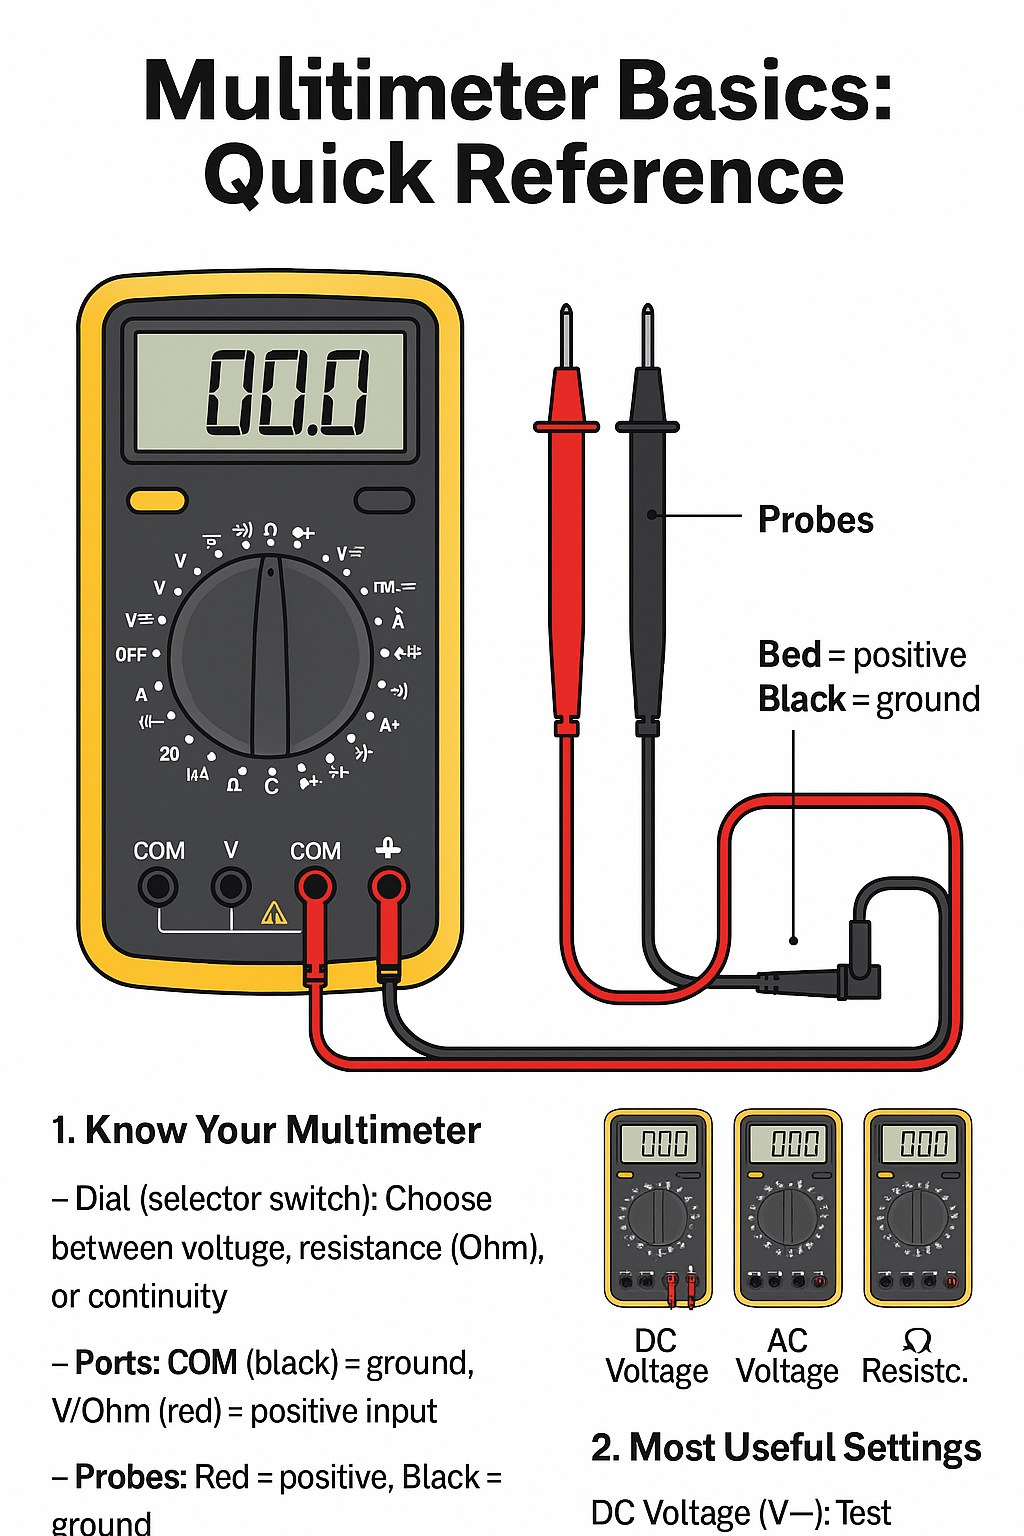
First, switch on your multimeter. Set it to measure voltage (V). Choose the correct range for your circuit’s voltage. Use the probes carefully—red for positive, black for negative. Make sure the multimeter is ready before testing.
Measuring Voltage At Source
Touch the red probe to the positive terminal of the power source. Place the black probe on the negative terminal or ground. Read the voltage shown on the multimeter screen. This is the source voltage, the starting point of your test.
Measuring Voltage At Load
Move the probes to the load side of the circuit. Red probe on the load’s positive terminal. Black probe on the load’s negative terminal or ground. Check the voltage reading here. This shows how much voltage reaches the load.
Calculating The Voltage Drop
Subtract the load voltage from the source voltage. The result is the voltage drop across the wires or connectors. For example:
| Source Voltage (Vsource) | Load Voltage (Vload) | Voltage Drop (Vdrop) |
|---|---|---|
| 12.5 V | 11.8 V | 0.7 V |
Voltage drop indicates resistance in the circuit. High voltage drop means a problem with wiring or connections.
Interpreting Your Results
Check the multimeter reading carefully to see the voltage drop value. A low voltage drop means good electrical flow, while a high drop indicates a problem. Compare the result to standard values for your device to understand its condition.
Interpreting Your Results After you’ve completed the process of checking voltage drop with a multimeter, understanding what the numbers mean is crucial. Voltage drop can affect the performance of electrical systems, leading to inefficiencies and potential hazards. Knowing how to interpret these results can help you make informed decisions about necessary actions.Normal Vs Excessive Voltage Drop
A normal voltage drop is typically around 3-5% of the total voltage. If you’re working with a 12V system, expect a drop of around 0.36V to 0.60V. Anything beyond this range might indicate excessive voltage drop, which could signal issues such as undersized wires or poor connections. Excessive voltage drop can lead to overheating and inefficiency. Ask yourself, is the wire gauge appropriate for the load? Are the connections secure? Identifying these factors early can prevent potential damage.Common Troubleshooting Tips
If you encounter excessive voltage drop, consider these troubleshooting tips:- Check for loose or corroded connections. A loose connection can increase resistance and cause voltage drop.
- Ensure wire gauge is suitable for the current load. Thinner wires can cause higher resistance.
- Inspect the length of the wiring. Longer wires can contribute to higher voltage drop.

Credit: www.youtube.com
Preventing Voltage Drop Issues
Preventing voltage drop issues is vital for safe and efficient electrical systems. Voltage drop can cause devices to underperform or fail. It also wastes energy and can lead to overheating. Taking simple steps helps keep your system running smoothly and safely.
Proper Wire Sizing
Choosing the right wire size reduces voltage drop significantly. Thin wires increase resistance and cause more drop. Use thicker wires for longer distances or higher currents. Follow electrical codes to pick the correct wire gauge.
Check wire size charts for guidance. Consider the total length of the wire run. Larger wire sizes cost more but save energy and protect equipment. Proper sizing prevents overheating and voltage loss.
Maintaining Connections
Loose or corroded connections increase resistance and voltage drop. Inspect connections regularly for tightness and cleanliness. Clean any corrosion with a wire brush or contact cleaner.
Use proper connectors and avoid twisting wires together. Tighten all screws and terminals firmly. Good connections ensure stable voltage and reduce power loss. Maintenance extends the life of your electrical system.
Frequently Asked Questions
What Is Voltage Drop And Why Measure It?
Voltage drop is the loss of voltage across a component or wire. Measuring it helps identify electrical issues, ensuring devices function efficiently and safely.
How Do I Check Voltage Drop With A Multimeter?
Set the multimeter to DC volts, connect probes across the component or wire, and read the voltage difference displayed on the screen.
What Causes High Voltage Drop In Circuits?
High voltage drop is caused by long wires, loose connections, or damaged cables, leading to inefficient power delivery and potential device failure.
Can Voltage Drop Affect Electrical Device Performance?
Yes, excessive voltage drop reduces power to devices, causing them to underperform, overheat, or malfunction, which may shorten their lifespan.
Conclusion
Checking voltage drop with a multimeter helps keep circuits safe. It shows if wires or connections lose power. This simple test saves time and money on repairs. Use clear steps and double-check your readings. Regular checks prevent bigger electrical problems later.
Practice often to feel confident with your tool. Now, you can spot issues before they grow. Stay safe and keep your devices working well.