
Are you struggling to measure impedance but don’t know where to start? Checking impedance with a multimeter might sound tricky, but it’s easier than you think.
Whether you’re fixing electronics or working on audio equipment, knowing how to accurately test impedance can save you time and money. In this guide, you’ll discover simple steps to use your multimeter effectively and get reliable results every time. Keep reading to master this essential skill and boost your confidence with your tools.

Credit: www.youtube.com
What Is Impedance
Impedance is a key concept in electronics and electrical engineering. It describes how much a circuit resists the flow of alternating current (AC). Unlike simple resistance, impedance also accounts for the effects of capacitance and inductance. It tells us how voltage and current relate in an AC circuit. Measuring impedance helps to understand how devices perform under real conditions. This knowledge guides the design and troubleshooting of electronic systems.
Difference Between Impedance And Resistance
Resistance is a measure of how much a material opposes direct current (DC). It does not change with frequency. Impedance, however, varies with the frequency of the AC signal. It combines resistance with reactance, which comes from capacitors and inductors. Reactance causes the current to lag or lead the voltage. Resistance only reduces current, while impedance affects both current and phase.
Why Measure Impedance
Measuring impedance helps check the health of components like speakers and coils. It reveals problems that resistance alone cannot show. It ensures circuits work well at specific frequencies. Impedance measurement is vital for audio systems, radio transmitters, and many sensors. It helps improve performance, reduce energy loss, and avoid damage. Knowing impedance guides better maintenance and repair of electrical devices.
Tools Needed
To check impedance with a multimeter, you need the right tools. Using proper equipment ensures accurate and safe measurements. Without the correct tools, readings can be misleading or even damage your device. Gathering the necessary tools before starting helps you work efficiently and confidently.
Choosing The Right Multimeter
Select a multimeter with an impedance or resistance measurement function. Digital multimeters are preferred for clear readings and ease of use. Choose a model with a good accuracy range suitable for your testing needs. Look for features like auto-ranging and a clear display. Make sure the multimeter can measure low resistance values for precise impedance checks.
Additional Equipment
Prepare extra items to support your impedance testing. Use test leads with sharp, clean tips for good contact. Consider alligator clips for hands-free connections. A small screwdriver might be needed to access terminals or adjust settings. Keep a clean cloth to wipe contacts and prevent dirt from affecting results. Having a notebook or device to record measurements is useful for tracking data.
Preparing The Multimeter
Preparing the multimeter is a crucial step before checking impedance. This ensures accurate and reliable readings. Proper setup helps avoid errors and protects both you and the device.
Setting The Multimeter To Measure Resistance
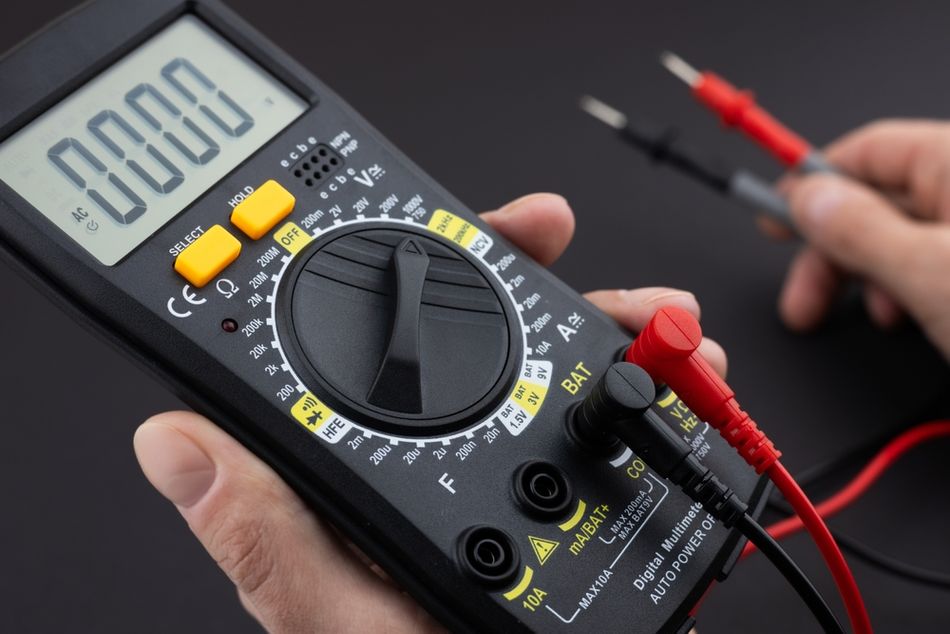
To check impedance, set the multimeter to measure resistance. Look for the symbol that looks like the Greek letter omega (Ω). This represents resistance on most multimeters.
Turn the dial to the correct range if your multimeter is not auto-ranging. Choose a range higher than the expected impedance to prevent damage. Auto-ranging meters adjust automatically, making this easier.
Connect the test leads to the correct ports. The black lead usually goes into the COM port. The red lead goes into the port labeled with an ohm symbol or VΩ.
Calibrating The Device
Calibrate the multimeter before taking measurements. Calibration ensures the readings are accurate and consistent.
Start by touching the two test leads together. The display should show zero or very close to zero ohms. If it does not, use the zero or relative button to adjust the reading.
Check the battery power. Low battery levels can cause false readings. Replace the battery if the display dims or behaves oddly during calibration.
Credit: www.wevolver.com
Testing Impedance Step-by-step
Testing impedance with a multimeter is a straightforward process once you understand the key steps. It’s important to approach the task carefully to avoid incorrect readings or damage to your device. Let’s break down the essential actions you need to take to measure impedance accurately.
Disconnecting The Component
Before testing impedance, always disconnect the component from any circuit or power source. This prevents interference from other components and ensures your safety. If you’re measuring a speaker or resistor, unplug it completely to get a clear reading.
Have you ever tried measuring impedance while the device was still connected and wondered why the numbers seemed off? That’s usually the cause—other paths in the circuit affect the measurement.
Connecting Multimeter Leads
Set your multimeter to the impedance or ohms (Ω) setting. Next, connect the multimeter leads to the two ends of the component. Make sure you have a solid connection—loose contacts can cause fluctuating or inaccurate results.
- Use the black lead for the common (COM) terminal.
- Use the red lead for the impedance or resistance terminal.
- Hold the leads steady against the component terminals without pressing too hard.
Reading The Measurement
Once connected, observe the reading displayed on the multimeter. The value shown is the impedance of the component in ohms. If the reading fluctuates or shows “OL” (over limit), check the connections and try again.
Remember, impedance varies with frequency, so a simple multimeter reading gives a basic estimate. For more precise measurements, specialized impedance meters may be needed. Still, for many DIY projects and repairs, your multimeter’s reading will be enough to identify faulty parts or verify specifications.
Interpreting Results
Understanding impedance results requires careful attention. Check impedance by setting the multimeter to measure resistance. Connect leads to the component and read the display for impedance value.
Interpreting Results Understanding the results from your multimeter when checking impedance can be both intriguing and informative. It’s like deciphering a mystery that reveals the health of your components. You need to know what normal readings should look like and how to pinpoint any anomalies.Normal Impedance Ranges
Impedance readings vary significantly depending on the type of component you’re measuring. Resistors, for example, have a specific resistance value often marked on them. If your multimeter reads close to this number, it’s a sign things are as expected. Capacitors and inductors, however, might show higher impedance due to their reactance at different frequencies. You might wonder what constitutes a ‘normal’ range. Typically, resistors have values between a few ohms to several megaohms. Capacitors and inductors, on the other hand, require a bit more context—considering factors like frequency and circuit design. Are your readings falling within these expected ranges?Identifying Faulty Components
Spotting faulty components is like being a detective in the world of electronics. If a resistor shows a reading vastly different from its indicated value, it might be burnt or damaged. For capacitors, unexpected low impedance can suggest a short circuit, while infinite impedance might mean an open circuit. Have you ever wondered why a device suddenly stops working? Often, it’s due to a component’s unexpected impedance. By consistently checking and interpreting these values, you can proactively replace faulty parts before they wreak havoc on your whole system. Understanding these nuances can save you time and prevent headaches. If a component doesn’t fit the expected impedance range, it’s a clear signal for further investigation.Common Mistakes To Avoid
Checking impedance with a multimeter might seem straightforward, but small mistakes can lead to inaccurate results or even damage your device. Knowing what to avoid helps you save time and get reliable readings. Let’s look at the most common errors that can trip you up during the process.
Incorrect Multimeter Settings
Using the wrong setting on your multimeter is one of the easiest mistakes to make. If your meter isn’t set to measure impedance or resistance properly, your readings will be off or show no value at all.
Always double-check that the dial is on the correct function—usually marked as “Ω” for resistance or “Z” for impedance on more advanced models. If your multimeter doesn’t support impedance measurement, using the resistance setting can still give you an approximate idea.
Have you ever wondered why your readings fluctuate wildly? Incorrect settings often cause this. Make sure you read your multimeter’s manual so you understand how to select the right mode for the component you’re testing.
Poor Contact With Leads
Another common pitfall is not securing good contact between the multimeter leads and the component terminals. Loose or dirty connections can cause inconsistent or false readings.
Before testing, inspect your leads for any dirt, oxidation, or damage. Clean the tips with a cloth or fine sandpaper if necessary. Firmly pressing the leads against the test points helps maintain stable contact.
Try to avoid holding the leads with your fingers on the metal parts during measurement. Your body’s resistance can interfere with the reading. Instead, use clips or hold the insulated parts to maintain a steady grip.
Tips For Accurate Measurements
Getting accurate impedance readings with your multimeter depends on careful attention to detail. Small mistakes can lead to misleading results, wasting your time and effort. The tips below help you avoid common pitfalls and improve your measurement reliability.
Ensuring Stable Connections
Your measurement is only as good as the connection between the multimeter probes and the component. Loose or shaky contacts cause fluctuating readings that confuse rather than clarify. Make sure the probes touch the terminals firmly without slipping.
Using alligator clips can help keep the connection steady, especially if you need both hands free. Also, clean the contact points to remove dirt, oxidation, or grease that might interfere with conductivity. Have you ever noticed a sudden jump in numbers while measuring? That’s often a sign of unstable connections.
Measuring In A Noise-free Environment
Electrical noise can distort your impedance readings. Nearby devices, fluorescent lights, or even static electricity might add unwanted interference. Try to measure in a quiet area away from heavy machinery or wireless signals.
Turn off other electrical equipment around you to reduce background noise. If you’re indoors, close windows and doors to minimize electromagnetic interference. Have you tried shielding your setup with a metal enclosure or anti-static mat? Such simple steps can dramatically improve your reading accuracy.

Credit: www.youtube.com
Frequently Asked Questions
How Do I Measure Impedance With A Multimeter?
Set your multimeter to the ohms (Ω) setting. Connect the probes across the component. Read the resistance value shown. This value approximates impedance in simple circuits.
Can A Multimeter Measure Ac Impedance Directly?
No, standard multimeters measure resistance, not true AC impedance. For accurate AC impedance, use an LCR meter or impedance analyzer instead.
What Is The Difference Between Resistance And Impedance?
Resistance is opposition to DC current flow. Impedance includes resistance and reactance, affecting AC signals. Multimeters measure resistance but not full impedance.
Why Is Impedance Important In Electronic Circuits?
Impedance affects signal quality and power transfer. Correct impedance ensures optimal performance and reduces signal loss in circuits.
Conclusion
Checking impedance with a multimeter is simple and useful. You only need a few steps to get accurate results. Always make sure your multimeter is set correctly before testing. This skill helps in fixing electronics and understanding circuits better. Practice often to build confidence and avoid mistakes.
Remember, safety first when working with electrical devices. Now, you can test impedance with ease and care. Keep learning and exploring more about electronics.