
Have you ever dreamed of flying your very own drone and capturing stunning aerial photos or videos? Building a drone with a camera might sound complicated, but it’s easier than you think.
Imagine the thrill of controlling a device you built yourself, seeing the world from a brand-new perspective, and sharing breathtaking footage with your friends. In this guide, you’ll discover simple steps and insider tips to create your own drone, even if you’re a beginner.
Ready to take off? Let’s dive in and make your drone-building dream a reality.
Choosing The Right Drone Frame
Choosing the right drone frame is key to building a drone with a camera. The frame holds all parts together and affects flight performance. Picking a good frame helps balance strength, weight, and size for better control and flight time.
Types Of Drone Frames
Frames come in various shapes and styles. The most common types are:
- Quadcopter:Four arms and motors, stable and easy to fly.
- Hexacopter:Six arms, offers more power and stability.
- Octocopter:Eight arms, used for heavy camera setups.
- Tricopter:Three arms, lighter and agile but less stable.
Choose a frame type based on the camera weight and flight needs.
Material Considerations
Frame material affects durability and weight. Common materials include:
- Plastic:Cheap and lightweight but less durable.
- Carbon Fiber:Strong and very light, ideal for high performance.
- Aluminum:Durable but heavier than carbon fiber.
- Wood:Low cost but not very durable or light.
Carbon fiber is best for balancing strength and weight.
Size And Weight Factors
Frame size impacts flight time and handling. Small frames are light and fast. Large frames carry bigger cameras but use more power.
Weight affects battery life and flight stability. Lighter frames need less power and fly longer.
Match the frame size and weight to your camera and battery capacity.
Selecting Motors And Propellers
Selecting the right motors and propellers is crucial for building a drone with a camera. These components control the drone’s lift, speed, and stability. Choosing mismatched parts can lead to poor performance or even damage. Understanding key specifications helps create a balanced and efficient drone.
Motor Specifications
Motors come with several important specifications. Look for the following:
- KV Rating:Indicates motor speed per volt. Higher KV means faster spin but less torque.
- Power Output:The maximum power motor can handle without overheating.
- Weight:Lighter motors reduce overall drone weight, improving flight time.
- Size:Larger motors can provide more thrust but add weight.
Choose motors that match the drone’s size and camera weight. Avoid overpowering motors on small frames.
Propeller Sizes And Types
Propellers affect how the drone moves and lifts. They come in different sizes and materials:
- Diameter:Larger diameter propellers create more lift but use more power.
- Pitch:The angle of the blades controls speed and thrust.
- Material:Plastic is common and lightweight. Carbon fiber is stronger but costlier.
- Blade Count:More blades increase thrust but reduce efficiency.
Match propeller size to motor specs. Bigger propellers suit lower KV motors for stable flight.
Balancing Power And Flight Time
Power and flight time depend on motor and propeller combinations. High power motors with large propellers boost lift but drain batteries fast.
Smaller propellers with medium KV motors use less power, extending flight time. Consider the drone’s purpose:
- For smooth video, prioritize stability and longer flight time.
- For fast maneuvers, prioritize power and responsiveness.
Test different setups to find the best balance. Proper balance ensures efficient flight and good camera performance.
Picking A Flight Controller
Picking the right flight controller is a crucial step in building a drone with a camera. It acts as the brain of your drone, managing everything from stability to navigation. Choosing wisely can save you hours of troubleshooting and enhance your flying experience dramatically.
Popular Flight Controllers
Several flight controllers have earned a solid reputation among drone builders. The Pixhawkis popular for its versatility and open-source software. The Betaflight F4offers excellent performance for racing drones and agile flying.
If you want something beginner-friendly, the DJI Nazaprovides great stability and easy setup. Meanwhile, the Holybro Kakuteseries is favored for its compact size and compatibility with many frame types.
Features To Look For
Focus on features that match your drone’s purpose. Look for GPS support if you want precise navigation or return-to-home functions. A built-in OSD (On-Screen Display) helps you monitor battery life and signal strength during flight.
Consider the number of UART ports for connecting peripherals like cameras and telemetry modules. Also, check the controller’s firmware compatibility to ensure it supports the latest updates and community tools.
Installing The Controller
Mount your flight controller at the drone’s center of gravity for balanced flight. Use vibration-damping pads to protect it from motor vibrations, which can affect sensor accuracy. Secure the wiring carefully to avoid loose connections during flight.
Once installed, connect the controller to your computer for initial setup. Calibrate sensors like the accelerometer and compass to improve flight stability. Testing the controls before the first flight helps catch issues early and saves frustration later.
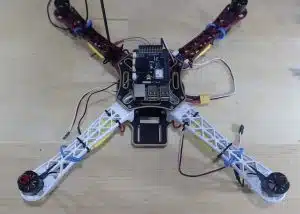
Credit: dojofordrones.com
Choosing A Camera For Your Drone
Choosing the right camera for your drone affects the quality of your aerial photos and videos. It also impacts the drone’s weight and flight time. A good camera matches your needs and budget. Understanding camera types, stabilization, and mounting helps make the best choice.
Camera Types And Resolutions
There are many camera types for drones. Each type suits different uses and budgets.
- Action Cameras:Small, lightweight, easy to mount. Good for casual flying and simple videos.
- DSLR and Mirrorless Cameras:High image quality, manual controls. Suitable for professional photography but heavier.
- FPV Cameras:Designed for first-person view flying. Low latency but lower resolution.
Resolution affects image clarity. Higher resolution means sharper photos and videos. Common resolutions include 1080p, 4K, and even 6K. Choose one that fits your project and storage capacity.
Gimbal Stabilization Options
Gimbals keep the camera steady during flight. They reduce shaking and vibration.
- Single-Axis Gimbals:Stabilize only one direction, usually tilt.
- Two-Axis Gimbals:Control pitch and roll for smoother footage.
- Three-Axis Gimbals:Best option, stabilize yaw, pitch, and roll.
A good gimbal improves video smoothness and image sharpness. It is essential for professional-quality footage.
Mounting The Camera
The camera’s mounting affects balance and safety. Proper mounting ensures stable flight and good shots.
- Use a strong, lightweight mount to hold the camera securely.
- Place the camera where it has the best view without blocking propellers.
- Check vibration isolation to avoid blurry images.
- Test the setup before flying to ensure stability.
Power Supply And Battery Setup
Building a drone with a camera is an exciting venture, and one crucial aspect is ensuring it has a reliable power supply and battery setup. This part of the build affects everything from your drone’s weight to its flight duration. Picking the right battery can make all the difference in achieving smooth, extended flights. Let’s dive into the essentials of battery types, capacity, and safe charging practices for your drone.
Battery Types
Not all batteries are created equal. The most common types for drones are Lithium Polymer (LiPo) and Lithium-ion batteries. LiPo batteries are popular due to their high energy density and lightweight nature. They are perfect for high-performance drones where agility is key. Lithium-ion batteries, on the other hand, offer longer life cycles but are heavier. Consider the trade-offs between weight and endurance when selecting your battery.
Capacity And Flight Duration
Capacity is measured in milliampere-hours (mAh) and directly influences how long your drone can stay airborne. Higher capacity means longer flights but can also add weight. You might be tempted to go for the highest mAh available, but remember, balancing your drone’s weight is crucial. For instance, a 3000mAh battery could provide around 15-20 minutes of flight time, depending on your drone’s efficiency.
Safe Charging Practices
Charging your drone’s battery safely is vital to prevent damage and extend its lifespan. Always use a dedicated LiPo charger if you’re using LiPo batteries to avoid overcharging. Never leave batteries unattended while charging. Many drone enthusiasts recommend charging batteries in a fireproof bag or container as an extra precaution. Are you aware of the risks associated with improper charging? Safety should always be a priority.

Credit: www.youtube.com
Assembling The Drone Components
Assembling the drone components is a crucial phase in building your drone with a camera. This step combines all parts into a functional unit ready to fly and capture stunning footage. Careful assembly ensures stability, performance, and safety during flight.
Follow each part carefully. Precision in assembly reduces errors and improves drone longevity.
Frame Assembly Steps
Start with the drone frame, the structure holding all parts. Place the arms in their slots on the central body. Use screws and nuts to fix them tightly. Check the frame for any loose parts before moving on.
Choose a lightweight but strong frame to keep the drone agile. Carbon fiber and plastic are common materials. Make sure the frame fits your motor size and camera.
Wiring Motors And Electronics
Connect the motors to the electronic speed controllers (ESCs). Use the correct wire colors: usually red for power and black for ground. Secure connections with solder or connectors to avoid loose wires.
Attach the ESCs to the flight controller. Follow the wiring diagram carefully to prevent errors. Organize wires neatly to improve airflow and reduce damage risks.
Connect the battery to the power distribution board. Check all connections twice for safety before powering on.
Securing The Camera
Attach the camera mount to the front of the drone frame. Use screws or clamps designed for your camera model. Ensure the mount holds the camera firmly during flight vibrations.
Connect the camera wiring to the flight controller or video transmitter. Test the camera connection before finalizing the assembly. Adjust the camera angle for the best field of view.
Configuring The Software
Configuring the software is a key stage in building a drone with a camera. It ensures the drone works smoothly and safely. The software controls flight, camera functions, and sensor data. Proper setup makes flying easier and improves video quality. This section guides you through installing firmware, calibrating sensors, and setting flight parameters.
Installing Firmware
Firmware is the software that runs on the drone’s flight controller. It controls all drone functions. Choose firmware that fits your drone model and camera setup.
- Download the latest firmware version from a trusted source.
- Connect the flight controller to your computer using a USB cable.
- Use the recommended software tool to upload the firmware.
- Follow on-screen instructions carefully during installation.
- Restart the flight controller once installation finishes.
Installing correct firmware prevents crashes and enhances performance.
Calibrating Sensors
Sensor calibration helps the drone understand its position and movement. Common sensors include accelerometers, gyroscopes, and compass.
- Place the drone on a flat, stable surface.
- Use the flight controller software to start calibration.
- Follow prompts to move the drone in specific ways.
- Wait for the software to confirm successful calibration.
- Repeat calibration if the drone shows unstable flight behavior.
Proper calibration improves flight stability and control accuracy.
Setting Flight Parameters
Flight parameters define how the drone flies and reacts. Adjust settings for altitude limits, speed, and failsafe options.
| Parameter | Description | Common Settings |
|---|---|---|
| Max Altitude | Highest allowed flying height | 50-120 meters |
| Max Speed | Top flying speed | 10-25 m/s |
| Failsafe | Action on signal loss | Return to Home or Land |
Set parameters according to your flying environment and skill level. Adjusting these keeps your drone safe and responsive.

Credit: www.youtube.com
Performing Test Flights
Test flights help check if your drone flies smoothly and the camera works well. Watch for stability, control, and clear video during these initial flights. Adjust settings to improve performance before regular use.
Performing test flights is a thrilling phase of your drone-building journey. It’s the moment when your creation takes to the skies, showcasing your hard work and ingenuity. But before you launch, there are crucial steps to ensure your drone flies smoothly and safely.Pre-flight Checklist
Start by conducting a thorough inspection of your drone. Check the battery levels—nothing’s worse than a mid-air power failure. Examine the propellers; they should be firmly attached without any signs of damage. Ensure the camera is secured and functioning, ready to capture stunning aerial views. Verify your remote control settings. Make sure you’re in a safe, open area free from obstacles and interference. Doing these checks can prevent unexpected failures and give you peace of mind.Basic Flight Maneuvers
Begin with simple maneuvers to get comfortable with the controls. Practice hovering steadily. Try moving forward and backward, then side to side. Gradually increase altitude and attempt gentle turns. These exercises build your confidence and help you understand your drone’s responsiveness. Imagine the joy of mastering these maneuvers, setting the stage for more complex aerial feats.Troubleshooting Common Issues
Encountering issues is part of the learning curve. If your drone wobbles or drifts, recalibrate the sensors. Check for interference from nearby electronics which can affect stability. If the camera isn’t capturing well, inspect the connections and settings. Adjust as necessary to ensure sharp, clear images. Have you faced unexpected challenges during a test flight? Reflecting on these moments can enhance your skills and make future flights smoother. Remember, every flight is a step towards mastering your craft.Tips For Improving Flight Performance
Improving flight performance is key for a smooth drone experience. Small changes can make your drone fly better and last longer in the air. Focus on balance, parts, and camera setup to get the best results.
Optimizing Weight Distribution
Keep your drone balanced for better control and stability. Place heavy parts like batteries near the center. Avoid putting too much weight on one side. This helps prevent drifting and makes flying easier.
Use lightweight materials for the frame to reduce total weight. Spread components evenly to avoid strain on motors. Check balance by lifting the drone from the middle before flying.
Upgrading Components
Replace basic motors with more powerful ones for better lift. Choose high-quality propellers that match your drone size. Stronger motors and good propellers improve speed and flight time.
Use a better battery with higher capacity for longer flights. Consider upgrading the flight controller for smoother handling. Quality parts make a big difference in overall performance.
Enhancing Camera Stability
Use a gimbal to keep the camera steady during flight. A stable camera captures clearer videos and photos. Avoid mounting the camera directly on the frame to reduce vibrations.
Add dampeners or shock absorbers between the camera and drone. This reduces shaking and improves image quality. Proper camera stability makes your drone footage look professional.
Safety And Legal Considerations
Building a drone with a camera is exciting, but it also comes with important safety and legal responsibilities. Ignoring these can lead to fines, accidents, or even legal trouble. Understanding the rules and practicing safe flying will keep you and others safe while protecting your privacy and rights.
Local Drone Regulations
Every area has different rules for flying drones. Some places require you to register your drone or get a license before flying. Check with your local aviation authority to find out what laws apply to you.
For example, in the U.S., the FAA requires drones over 0.55 pounds to be registered. In some countries, flying near airports or crowded places is strictly forbidden. Knowing these rules before you fly can save you from penalties and keep your drone safe.
Safe Flying Practices
Flying your drone safely protects both your equipment and people around you. Always do a pre-flight check to ensure your drone’s battery is full and controls are working properly.
- Keep your drone within sight at all times.
- Fly below 400 feet to avoid manned aircraft.
- Avoid flying near crowds, roads, or restricted areas.
Have you ever lost control of a drone? I have, and it taught me to practice in open spaces before flying anywhere busy. Safety starts with preparation and respect for your environment.
Privacy Concerns
Using a camera on your drone means you must respect other people’s privacy. Avoid flying over private property without permission to prevent conflicts or legal issues.
Think about how you would feel if someone recorded you without asking. Always inform people if you plan to capture footage in public events or gatherings.
Privacy isn’t just about laws—it’s about trust. Building that trust ensures your drone hobby remains enjoyable and problem-free.
Frequently Asked Questions
What Components Are Needed To Build A Drone With A Camera?
To build a drone with a camera, you need a frame, motors, ESCs, flight controller, propellers, battery, transmitter, receiver, and a camera. Each part plays a vital role in flight and capturing stable footage. Choosing quality components ensures better performance and reliability.
How Do I Choose The Right Camera For My Drone?
Select a lightweight camera with high resolution and stabilization features. Consider compatibility with your drone’s size and power capacity. Popular choices include action cameras and FPV cameras, which provide clear visuals and smooth video quality for aerial photography.
Can Beginners Build A Drone With A Camera Easily?
Yes, beginners can build drones with proper guidance and tutorials. Start with a simple frame and easy-to-use flight controller. Practice assembling parts step-by-step and learn basic flying skills before adding complex features like cameras.
How Do I Connect The Camera To The Drone’s Flight Controller?
Most cameras connect via dedicated video transmitters or gimbals linked to the flight controller. Use compatible wiring and ports. Secure connections ensure smooth video transmission and control. Follow your flight controller’s manual for exact wiring instructions.
Conclusion
Building a drone with a camera can be fun and rewarding. Start with the right parts and follow clear steps. Test your drone often to ensure it works well. Keep learning and fixing small problems along the way. Enjoy capturing amazing photos and videos from the sky.
With patience and practice, your drone will fly smoothly. Now, take what you learned and start building today.