
Are you ready to take control of your home’s comfort and save on energy bills? Installing an Ecobee Smart Thermostat is easier than you might think.
This guide will walk you through every step, making the process simple and stress-free. Whether you’re tech-savvy or a beginner, you’ll learn how to set up your new thermostat quickly and start enjoying smarter heating and cooling right away. Keep reading to discover how you can make your home smarter and more energy-efficient today.
Prepare For Installation
Getting ready to install your Ecobee Smart Thermostat sets the tone for a smooth and successful setup. Taking time to prepare can save you from unexpected hiccups and ensure your device runs perfectly from day one. Let’s break down what you need to do before you start handling wires and screws.
Check Compatibility
Not every HVAC system works with the Ecobee Smart Thermostat. Check your current system’s wiring and power requirements to confirm compatibility. Ecobee supports most 24V heating and cooling systems, but if you have a high-voltage system or a proprietary setup, installation might get tricky.
Look for a C-wire (common wire) in your thermostat wiring, as it powers the device continuously. If you don’t see one, don’t panic—Ecobee offers solutions like a Power Extender Kit. Have you inspected your wiring yet? Knowing this upfront prevents surprises later.
Gather Necessary Tools
Having the right tools ready before installation cuts down frustration and keeps you focused. Basic tools you’ll need include:
- Phillips and flathead screwdrivers
- Wire strippers or a utility knife
- Drill with appropriate bits (if mounting holes need adjustment)
- Level to ensure your thermostat sits straight on the wall
- Smartphone or tablet for setup and app connection
Don’t forget a flashlight if your wiring closet is dim. Preparing your toolkit ahead means you won’t have to pause midway to hunt for a screwdriver.
Turn Off Power
Safety is non-negotiable when dealing with electrical devices. Before touching any wires, turn off power to your HVAC system at the circuit breaker. This simple step prevents shocks and protects your equipment from damage.
After switching off, test the thermostat to confirm no power is running through. Have a trusted helper verify this if you’re unsure. Taking these precautions shows respect for your home and your own well-being.

Credit: www.stevejenkins.com
Remove Old Thermostat
Removing the old thermostat is a vital step before installing your Ecobee Smart Thermostat. This process ensures a smooth setup and prevents wiring mistakes. Take your time to handle each part carefully. This protects your home’s heating and cooling system from damage.
Start by preparing the area and gathering tools like a screwdriver. Turn off power to the HVAC system to avoid electrical hazards. Follow these steps to remove the old thermostat safely and correctly.
Take Photos Of Wiring
Use your phone or camera to take clear pictures of the thermostat wiring. Capture each wire’s position and color. These photos will guide you during the new thermostat setup. They act as a visual reference for correct wiring connections.
Label Wires
Attach small labels or pieces of tape to each wire. Write the corresponding terminal letter or function on each label. This step helps keep track of wires and prevents confusion. Proper labeling makes reinstallation much easier and safer.
Detach Thermostat
Carefully unscrew the thermostat base from the wall. Gently pull the base away, exposing the wires. Disconnect each labeled wire from the terminals. Avoid pulling wires forcefully to prevent damage. Place the old thermostat and screws aside safely.
Install Ecobee Backplate
Installing the Ecobee backplate is a crucial part of setting up your smart thermostat. It serves as the foundation that holds the thermostat securely while connecting it to your home’s wiring system. Getting this step right ensures your Ecobee works flawlessly and looks neat on your wall.
Mount Backplate On Wall
Start by aligning the Ecobee backplate against your wall where the old thermostat was located. Make sure it’s level; a crooked backplate can throw off the touchscreen’s appearance and functionality.
Use a pencil to mark the screw holes through the backplate. If your wall has drywall, consider using anchors to ensure the backplate stays firmly attached over time.
Have you checked if the location allows easy access to your HVAC wiring? Sometimes, moving the backplate slightly can avoid tangled wires and make the connection process smoother.
Connect Wires To Terminals
Next, identify each wire coming from your HVAC system and match it to the corresponding terminal on the backplate. The labels on the backplate help you connect wires like R, C, W, Y, and G correctly.
Push each wire firmly into its terminal and tighten the screw to secure it. Loose connections can cause your thermostat to malfunction or lose communication with your system.
Double-check the wiring against your HVAC manual or the Ecobee installation guide. Have you noticed any extra wires? Sometimes they’re unused, but knowing their purpose can save troubleshooting later.
Secure Backplate
After wiring, press the backplate flush against the wall and screw it into the marked holes. The backplate should be snug without any gaps between it and the wall.
Make sure all wires stay tucked neatly inside the wall cavity, avoiding pinching or bending. A clean installation not only looks better but also prevents long-term wear on the wires.
Do you feel the backplate is stable? Try giving it a gentle wiggle. If it moves, tighten the screws a bit more to keep your thermostat steady for years.

Credit: www.youtube.com
Attach Ecobee Thermostat
Attaching your Ecobee thermostat is a simple task. It secures the device firmly to your wall and prepares it for use. This step ensures the thermostat connects properly to the wiring and the backplate. Follow clear instructions for a smooth attachment process.
Snap Thermostat Onto Backplate
Align the thermostat with the backplate on the wall. Make sure the pins and connectors match perfectly. Press the thermostat gently but firmly until you hear a click. This sound confirms the device has snapped into place.
Power On Device
Switch the power back on at your circuit breaker. The Ecobee thermostat will light up and start booting. Wait a few moments for it to power up fully. This step activates the device and prepares it for setup.
Follow On-screen Setup
Use the touchscreen to follow the setup instructions. Select your language, connect to Wi-Fi, and set your location. Enter any necessary HVAC system details as prompted. The easy-to-follow guide helps you personalize settings fast.
Connect To Wi-fi
Getting your Ecobee Smart Thermostat connected to Wi-Fi is crucial for optimal performance. It allows your device to access weather updates and remote control. Follow these simple steps to ensure a seamless connection.
Select Network
On the thermostat screen, tap the menu icon. Choose ‘Settings,’ then select ‘Wi-Fi.’ A list of available networks will appear. Identify your home network from the list. Tap on it to proceed.
Enter Password
Once your network is selected, you will be prompted to enter the password. Use the on-screen keyboard to type the password carefully. Ensure each character is correct to avoid connection issues. Double-check the password before hitting ‘Connect.’
Verify Connection
After entering the password, wait for the thermostat to connect. A successful connection will display a checkmark next to your network name. If the connection fails, verify the password and network settings. Retry the process if necessary.
Configure Settings
Configuring your Ecobee Smart Thermostat settings is a crucial step that shapes how comfortable your home will feel every day. This process lets you tailor the thermostat to suit your lifestyle and preferences, ensuring it works efficiently for your unique needs. By adjusting these settings, you can enjoy a smarter, more responsive heating and cooling system that actually learns from you.
Set Location And Preferences
Start by entering your home’s exact location. This helps the thermostat gather accurate weather data to optimize heating and cooling. It’s a small step that makes a big difference in energy savings and comfort.
Next, set your temperature preferences. Choose the ideal temperature ranges for when you’re home, away, or sleeping. This customization lets your thermostat adjust automatically without you needing to constantly change it.
Create Comfort Schedules
Think about your daily routine and create schedules that match it. You can program different temperature settings for morning, daytime, evening, and night. This way, your home feels just right exactly when you want it to.
If your schedule changes often, try using the Ecobee’s flexible scheduling options. You can easily adjust or add new time blocks as your week unfolds. Don’t you find it satisfying when your home temperature perfectly fits your day without manual tweaks?
Enable Smart Features
Ecobee offers smart features like occupancy sensing and remote sensors to improve comfort and save energy. Turn on these features to let the thermostat detect when rooms are empty and adjust accordingly.
Smart Recovery is another handy feature that learns how long it takes to reach your preferred temperature and starts heating or cooling early. This means your home hits the perfect temperature exactly when you want, not minutes or hours later.
Activating these smart options turns your thermostat into a proactive assistant, not just a temperature controller. Have you noticed how these little tweaks can dramatically improve your home environment?
Test And Troubleshoot
After installing your Ecobee Smart Thermostat, testing and troubleshooting are crucial to ensure it works flawlessly with your home’s HVAC system. This phase helps you catch any issues early, so your comfort isn’t compromised. Let’s walk through how to check your system’s response, fix common problems, and keep your thermostat’s firmware updated for optimal performance.
Check System Response
Start by adjusting the temperature on your Ecobee and watch how your heating or cooling system reacts. Does the system turn on promptly? If not, check your thermostat’s settings to confirm it’s connected to the correct HVAC equipment.
Listen for any unusual noises or delays in operation. For instance, if your heat kicks in too late, it might indicate wiring problems or a compatibility issue. Have you noticed your system reacting slower than usual? That’s a key sign to investigate further.
Resolve Common Issues
Many users face similar hiccups after installation. One frequent problem is the thermostat not connecting to Wi-Fi, which can disrupt remote control features. Try restarting your router and thermostat to fix this quickly.
Another common issue is inaccurate temperature readings. Make sure your Ecobee is installed away from direct sunlight or drafts. Also, double-check that the sensors are properly placed and clean. If the screen freezes, a simple reboot often solves it.
- Wi-Fi connection problems: Restart devices and check network settings.
- Temperature inaccuracies: Reposition sensors and avoid direct sunlight.
- Screen freezes: Perform a thermostat reboot.
Update Firmware
Keeping your Ecobee’s firmware up to date ensures you benefit from the latest features and bug fixes. You can check for updates in the thermostat’s settings menu under “About” or via the Ecobee app.
Updates usually install automatically, but if you notice any glitches or delays, manually triggering an update can help. Have you ever ignored an update only to face issues later? Staying current can save you time and hassle.
Regular firmware updates improve compatibility and security, so make it a habit to check periodically. This simple step keeps your smart thermostat running smoothly and enhances your home’s energy efficiency.
Credit: thermostat.guide
Frequently Asked Questions
How Do I Install Ecobee Smart Thermostat Step-by-step?
First, turn off your HVAC system power. Remove the old thermostat carefully. Connect the Ecobee base plate wires to matching terminals. Attach the Ecobee thermostat to the base plate. Turn the power back on and follow on-screen setup instructions.
What Tools Are Needed For Ecobee Thermostat Installation?
You need a screwdriver, drill, level, and wire stripper. A smartphone or tablet is handy for app setup. Having a voltage tester can ensure safe installation. Most installations require basic household tools only.
Can I Install Ecobee Thermostat Without A C-wire?
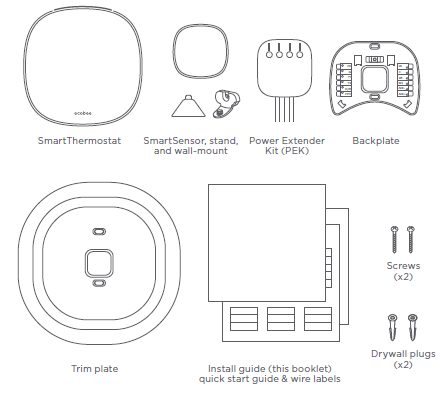
Yes, Ecobee includes a Power Extender Kit (PEK) for C-wire alternatives. It enables installation even if your system lacks a dedicated C-wire. The PEK installs near your furnace or HVAC control board, providing necessary power.
How Long Does Ecobee Thermostat Installation Usually Take?
Typical installation takes about 30 to 45 minutes. Complex HVAC systems might require more time or professional help. Following the step-by-step guide can speed up the process efficiently.
Conclusion
Installing your Ecobee smart thermostat is simpler than it seems. Follow each step carefully for best results. Double-check your wiring before turning on the power. Test the system to ensure it works correctly. Enjoy better control of your home’s temperature anytime.
Stay comfortable and save energy with this smart device. Regular updates keep your thermostat working smoothly. Trust the process and take your time. Your home will feel just right every day.